
Are you feeling like your laptop is slowing you down? Upgrading your CPU might be the key to boosting its speed and performance.
But you might be wondering, is it even possible to upgrade a laptop’s CPU? And if so, how do you do it without breaking anything? You’ll discover simple, clear steps to upgrade your laptop’s CPU safely and effectively. By the end, you’ll know exactly what to do to give your laptop the power it needs to keep up with you.
Keep reading—your faster, smoother laptop is closer than you think.
Check Laptop Compatibility
Before upgrading your laptop’s CPU, checking compatibility is crucial. Not all CPUs fit or work well with every laptop model. Some laptops have locked CPUs or unique hardware setups. Skipping this step can cause damage or poor performance. Follow these steps to ensure your new CPU matches your laptop perfectly.
Identify Your Current Cpu
Start by finding out the exact model of your current CPU. You can check this in your system settings or use software like CPU-Z. Knowing your CPU helps you understand your laptop’s performance level. It also guides you to pick a suitable upgrade.
Research Compatible Cpus
Not all CPUs work with every laptop. Check the manufacturer’s website or user forums for compatibility lists. Look for CPUs designed for your laptop series or brand. This research saves you time and money. It ensures the new CPU will fit and function properly.
Verify Socket Type And Chipset
Check your laptop’s CPU socket type. Common types include PGA, BGA, and LGA. The new CPU must match this socket exactly. Also, verify the chipset on your motherboard. The chipset controls communication between CPU and other parts. Your new CPU should support this chipset to work well.
Gather Necessary Tools
Before upgrading your laptop’s CPU, gather all necessary tools. Having the right tools makes the process smooth and safe. It helps avoid damage to your laptop parts. Prepare your workspace with good lighting and a clean surface. Keep tools organized and within reach.
Essential Tools For Disassembly
You need a set of small screwdrivers, usually Phillips and flathead. A plastic pry tool helps open the laptop case without scratches. Tweezers are handy for lifting small connectors and screws. Use a container to keep screws safe and avoid losing them. Thermal paste is necessary for reapplying on the new CPU. Have a microfiber cloth ready to clean dust and debris.
Anti-static Precautions
Static electricity can damage laptop components easily. Use an anti-static wrist strap to ground yourself during the upgrade. Work on a non-metal surface to reduce static risks. Avoid wearing wool or synthetic clothes that create static. Touch a metal object periodically to discharge static buildup. These steps protect your laptop’s sensitive electronics.
Prepare Your Laptop
Preparing your laptop before upgrading the CPU is crucial for a smooth process. Taking the right steps helps avoid data loss and hardware damage. Follow these simple tasks to get your laptop ready.
Backup Important Data
Backing up important data protects your files from accidental loss. Copy photos, documents, and work files to an external drive or cloud storage. This step ensures your information stays safe during the upgrade.
Power Down And Disconnect
Turn off your laptop completely before starting any hardware work. Unplug the power adapter and remove the battery if possible. Disconnect all connected devices like USB drives and headphones. This reduces the risk of electric shock and damage to parts.
Disassemble The Laptop
Disassembling your laptop is the first step to upgrade the CPU. It requires careful handling and attention to detail. This process lets you access the internal parts safely. Follow the steps below to open your laptop properly.
Remove Back Panel
Turn off your laptop and unplug all cables. Place it on a flat surface with good light. Use a screwdriver to remove all screws from the back panel. Keep the screws in a safe place. Gently lift the panel off. Avoid using too much force to prevent damage.
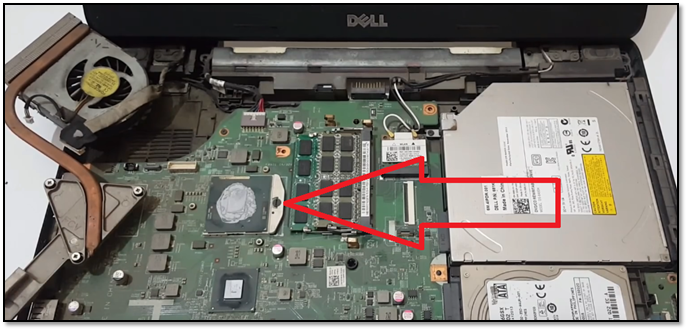
Locate The Cpu
Inside, you will see the motherboard and other parts. Find the CPU by looking for a square chip with a heat sink or fan on top. The CPU is usually near the center of the motherboard. Take a clear look before touching anything.
Handle Internal Components Safely
Static electricity can damage your laptop’s parts. Use an anti-static wrist strap or touch a metal object often. Avoid touching the CPU pins or other delicate areas. Work slowly and carefully to keep all parts safe. Keep your workspace clean and organized.
Remove The Old Cpu
Removing the old CPU is a key step in upgrading your laptop’s processor. It needs careful handling to avoid damage. Follow each step slowly and precisely.
First, you must access the CPU socket and then remove the chip safely. This section explains how to unlock the socket and carefully take out the CPU.
Unlock The Cpu Socket
Locate the CPU socket on the motherboard. It is usually under a heat sink or fan.
Find the locking mechanism. This can be a small lever or screws holding the CPU in place.
Gently lift or turn the lever to release the CPU. Do not force it. The CPU should loosen easily.
Make sure you keep the lever in the open position before removing the CPU.
Carefully Extract The Cpu
Hold the CPU by its edges. Avoid touching the pins or contacts.
Lift the CPU straight up from the socket. Avoid bending or twisting.
Place the old CPU on an anti-static surface or bag. This protects it from damage.
Handle the CPU gently to keep it safe for future use or disposal.

Credit: www.youtube.com
Install The New Cpu
Installing the new CPU in your laptop is a careful process. It needs focus and steady hands. A wrong move can damage the delicate pins or the socket. Follow each step with care to ensure the CPU fits perfectly and works well.
Align And Place The New Cpu
Look at the CPU and the socket closely. Find the small triangle or mark on one corner of the CPU. Match this mark with the one on the socket. This shows the correct direction to place the CPU. Gently lower the CPU straight into the socket. Do not push or force it. It should drop in smoothly and sit flat.
Secure The Cpu Socket
After placing the CPU, lock it in place. Use the socket lever or latch to secure the CPU firmly. Press down the lever gently until it clicks or locks. This holds the CPU tightly and stops it from moving. Double-check that the CPU is level and secure before moving on.
Apply Thermal Paste
Applying thermal paste is a key step in upgrading a laptop CPU. It helps move heat from the CPU to the cooler. This keeps the CPU from overheating and slows down. Proper application improves performance and protects your laptop.
Clean Old Thermal Paste
Start by removing the old thermal paste. Use isopropyl alcohol and a soft cloth. Gently wipe the CPU and cooler surfaces until clean. Avoid scratching the metal parts. Cleaning well ensures the new paste sticks properly.
Apply New Thermal Paste Properly
Put a small dot of new thermal paste on the CPU center. About the size of a grain of rice is enough. Do not spread it with your finger or tool. When you attach the cooler, the paste will spread evenly. This creates a thin, uniform layer for better heat transfer.

Credit: www.hp.com
Reassemble The Laptop
Reassembling the laptop is the final step after upgrading the CPU. This step ensures your laptop works properly and stays cool. Take your time and follow each action carefully. A well-assembled laptop will run smoothly and avoid damage.
Reattach Cooling System
Start by placing the cooling system back on the CPU. Align it carefully to fit the new processor. Secure the screws evenly to avoid pressure on one side. Connect the fan cable to the motherboard. This step helps keep your laptop cool and prevents overheating.
Close The Back Panel
Place the back panel on the laptop carefully. Make sure all edges fit tightly without forcing. Insert and tighten all screws in their original places. Double-check to ensure no screws are left out. Closing the panel protects your laptop’s internal parts and keeps dust away.
Test The New Cpu
Testing the new CPU is a key step after installation. It ensures the laptop works correctly with the upgraded processor. This step helps find any issues early before using the laptop fully. Follow these simple actions to check the new CPU’s performance and stability.
Power On And Access Bios
Turn on your laptop after installing the new CPU. Watch closely for the startup screen. Press the key to enter BIOS settings. This key is usually F2, Del, or Esc. In BIOS, check if the new CPU model appears correctly. Ensure the system recognizes the new processor. Save and exit BIOS if everything looks right.
Run Performance Checks
After BIOS confirmation, boot into your operating system. Run basic tasks to see how the laptop performs. Use CPU monitoring tools to check temperature and speed. Run simple benchmarks to test the processor’s power. Look for any crashes or slowdowns. Stable performance means the CPU upgrade is successful.
Credit: www.easeus.com
Troubleshooting Tips
Upgrading a laptop CPU can improve performance but may cause issues. Knowing how to fix common problems saves time and stress. This section offers simple tips to solve frequent troubles during CPU upgrades.
Common Installation Issues
One common issue is the laptop not starting after installation. This often happens due to poor CPU seating. Check if the CPU fits firmly in the socket.
Another problem is overheating. This may occur if the cooling system is not reattached properly. Always clean the fan and apply fresh thermal paste.
Sometimes, the laptop shows errors or freezes. This can result from incompatible CPUs. Verify your laptop supports the new CPU model before installation.
When To Seek Professional Help
Seek help if the laptop does not power on despite correct installation. This may signal electrical damage or motherboard issues.
Complex problems like BIOS errors or hardware conflicts may require expert diagnosis. Professionals have tools and experience to fix these safely.
If you feel unsure about opening your laptop or handling sensitive parts, it is safer to consult a technician. Avoid risking damage to your device.
Frequently Asked Questions
Can I Upgrade The Cpu On Any Laptop Model?
Not all laptops allow CPU upgrades. Many have soldered CPUs, making upgrades impossible. Check your laptop’s manual or specs to confirm if the CPU is replaceable before proceeding.
What Tools Are Needed To Upgrade A Laptop Cpu?
You typically need a precision screwdriver set, thermal paste, and an anti-static wrist strap. These tools help safely remove and install the CPU without damaging components.
How Do I Check If My Laptop Cpu Is Upgradeable?
Open your laptop’s service manual or search online using your model number. Look for details on CPU socket type and whether the processor is removable or soldered.
Will Upgrading My Laptop Cpu Improve Performance Significantly?
Upgrading can boost performance if the new CPU is faster and compatible. However, gains vary based on your laptop’s cooling and other hardware limitations.
Conclusion
Upgrading a laptop’s CPU can boost its speed and performance. It takes careful planning and the right tools to do it safely. Check your laptop’s compatibility before buying a new CPU. Follow the steps slowly and carefully to avoid damage.
Your laptop will feel faster and work better after the upgrade. Remember, not all laptops allow CPU changes easily. Patience and attention make the process smoother. Enjoy a quicker laptop that meets your needs.