
Is your laptop feeling slow or struggling to keep up with your tasks? Upgrading your laptop’s CPU can breathe new life into your device, making it faster and more efficient.
But you might be wondering, is it even possible? And if so, how do you do it without breaking your laptop or losing your data? You’ll discover simple, clear steps to upgrade your laptop CPU safely and effectively. By the end, you’ll know exactly what to do to boost your laptop’s power and get the performance you need.
Keep reading—your faster laptop is just a few clicks away.

Credit: www.youtube.com
Assessing Compatibility
Upgrading a laptop CPU is not just about buying a faster processor. Compatibility matters a lot. A CPU must fit and work well with your laptop. This step saves time and money. It avoids issues during installation and use.
Start by checking the laptop model and CPU socket. Then, review BIOS support. Last, consider the cooling system limits. These checks help ensure a smooth upgrade.
Check Laptop Model And Cpu Socket
Every laptop has a specific model number. This number shows what parts fit inside. Find your laptop’s model on the bottom or in system settings. Search online for its CPU socket type. The socket is where the CPU connects to the motherboard. Sockets differ in shape and pins. A CPU must match the socket to fit properly.
Review Bios Support
The BIOS controls hardware in your laptop. It must support the new CPU. Without BIOS support, the laptop won’t start or use the CPU. Visit the laptop maker’s website. Check BIOS updates and CPU compatibility lists. Updating BIOS may be necessary before installing the new CPU.
Consider Cooling System Limits
CPUs generate heat. Laptops have limited cooling systems. A faster CPU may produce more heat than the cooling system handles. Check the CPU’s thermal design power (TDP). Compare it with your laptop’s cooling capacity. Using a CPU with higher TDP can cause overheating and damage. Choose a CPU within your laptop’s cooling limits.
Choosing The Right Cpu
Choosing the right CPU for your laptop upgrade is very important. The CPU affects speed, power use, and heat. Picking a good one helps your laptop run better and last longer. Think about what you need from your laptop. This helps pick a CPU that fits your work and budget.
There are many CPUs available. Some are fast but use more power. Others save energy but may be slower. Understanding these differences helps you make a smart choice.
Compare Performance And Power Ratings
Look at the CPU’s speed and how many cores it has. More cores mean better multitasking. Check the power rating too. Lower power means less heat and longer battery life. Balance speed and power for your needs.
Balance Cost And Benefits
High-speed CPUs cost more. Decide how much speed you really need. Sometimes a mid-range CPU gives good value. Avoid paying extra for features you won’t use. Think about how long you want the CPU to last.
Identify Trusted Cpu Brands
Choose CPUs from well-known brands. Brands like Intel and AMD are popular and reliable. They offer good support and updates. Avoid unknown brands that may cause problems later.
Preparing For The Upgrade
Preparing your laptop for a CPU upgrade is an important step. It helps avoid damage and data loss. Taking time to prepare makes the process smoother and safer.
Gather Necessary Tools
Collect all tools before starting the upgrade. You will need a small screwdriver, thermal paste, and an anti-static wristband. Having everything ready saves time and stress.
Backup Important Data
Save your important files to an external drive or cloud. This protects your data in case something goes wrong. A backup keeps your documents, photos, and programs safe.
Create A Static-free Workspace
Set up your workspace on a clean, flat surface. Avoid carpets and rugs to reduce static electricity. Use an anti-static mat or wristband to protect your laptop parts.

Credit: www.hp.com
Removing The Old Cpu
Removing the old CPU is the first step in upgrading your laptop’s processor. It needs care and attention to avoid damage. Follow simple steps to safely remove the CPU and prepare for the new one.
Disassemble Laptop Components
Start by turning off the laptop and unplugging all cables. Remove the battery if possible. Unscrew the back panel carefully. Keep screws safe to avoid losing them. Take out parts blocking access to the CPU. This may include the cooling fan and heat sink. Be gentle to prevent breaking any parts.
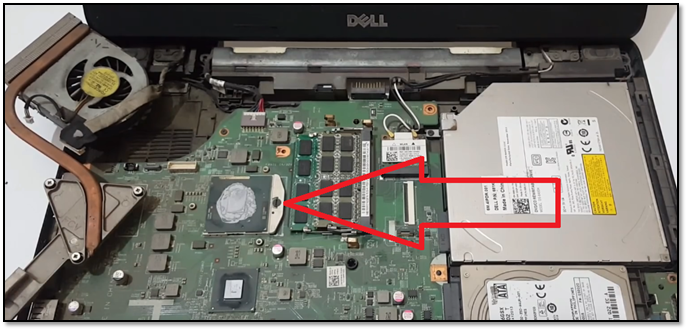
Locate And Unlock Cpu Socket
Find the CPU socket on the motherboard. It looks like a small square with a lever or latch. Gently lift the lever to unlock the socket. Do not use force. Unlocking the socket releases the CPU from its place. Check for any clips or locks around the socket and release them.
Carefully Extract The Cpu
Hold the CPU by its edges. Avoid touching the pins or contacts. Slowly lift the CPU straight up from the socket. Do not twist or bend it. Place the old CPU on an anti-static surface. Keep it safe if you plan to reuse or sell it. The CPU removal is done with care to avoid damage.
Installing The New Cpu
Installing the new CPU is a key step in upgrading your laptop. It requires care and precision. A wrong move can damage the CPU or the laptop’s motherboard. Follow each step carefully to ensure a smooth installation.
Align And Insert The Cpu
Start by holding the CPU gently by its edges. Avoid touching the pins or contacts. Look for the alignment markers on the CPU and socket. Match these markers carefully. Place the CPU straight into the socket. Do not force it. A proper fit means the CPU sits flat and secure.
Apply Thermal Paste Correctly
Thermal paste helps transfer heat from the CPU to the cooler. Use a small pea-sized amount in the center of the CPU. Spread it evenly if needed, but a single dot works well. Too much paste can cause overheating. Too little paste reduces cooling efficiency.
Reattach Cooling System
Place the cooling system back onto the CPU gently. Align it with the screw holes or clips. Tighten screws evenly in a diagonal pattern. This ensures even pressure on the CPU. Connect the fan cable to the motherboard. Confirm it is secure for proper cooling.
Credit: www.easeus.com
Post-installation Steps
After installing your new laptop CPU, some important steps follow. These steps help your laptop work smoothly and safely. Proper care now avoids future problems. Check everything carefully before turning on your laptop.
Reassemble The Laptop
Put all parts back in place carefully. Screw the case tightly but do not force it. Connect cables and components as they were before. Make sure no loose parts remain inside. Clean the laptop surface gently to remove dust.
Update Bios If Needed
New CPUs sometimes need a BIOS update. This update helps the laptop recognize the new processor. Visit the laptop maker’s website to find the latest BIOS version. Follow their instructions closely to avoid errors. A wrong update can cause serious issues.
Run Performance Tests
Check the new CPU’s speed and stability. Use simple software tools to test performance. Look for any unusual noises or overheating. Test for a few hours to be sure. This confirms the upgrade works well and is safe.
Troubleshooting Common Issues
Upgrading a laptop CPU can improve speed and efficiency. Sometimes, issues occur after the upgrade. Knowing how to troubleshoot these problems helps save time and frustration. This section covers common problems and easy fixes.
Laptop Fails To Boot
The laptop not starting is a frequent issue after a CPU upgrade. Check if the CPU is compatible with the motherboard. Make sure the CPU is seated correctly in the socket. Inspect for bent pins or dust blocking connections. Reset the BIOS by removing and reinserting the battery or using the reset jumper. Verify that the cooling fan is connected properly.
Overheating Problems
New CPUs may generate more heat. This can cause the laptop to overheat quickly. Apply fresh thermal paste between the CPU and heatsink. Confirm that the heatsink is installed tightly. Clean dust from fans and vents to improve airflow. Use a cooling pad to help lower temperatures during use. Monitor temperatures with software to avoid damage.
Performance Not Improving
Sometimes, the laptop feels the same after upgrading the CPU. Check if the new CPU is supported by your laptop’s BIOS version. Update the BIOS if needed. Ensure the RAM speed matches the new CPU requirements. Close unnecessary background apps to free up resources. Run performance tests to confirm the CPU is working correctly.
Tips For Maintaining Upgraded Cpu
Upgrading your laptop’s CPU can boost performance significantly. To keep it running smoothly, some care is needed. Proper maintenance helps avoid overheating, slowdowns, and hardware issues. Below are simple tips to maintain your upgraded CPU efficiently.
Regular Cleaning And Cooling
Dust and dirt block airflow and cause heat buildup. Clean your laptop vents and fans regularly with compressed air. Use a cooling pad to keep temperatures low during heavy use. Avoid placing your laptop on soft surfaces that block air vents.
Software Updates
Keep your operating system and drivers updated. Updates often include fixes that improve CPU efficiency and stability. Check for BIOS updates from your laptop maker. These can enhance compatibility with your new CPU.
Monitoring System Health
Use simple tools to watch CPU temperature and usage. High temperatures can shorten CPU life. Close unnecessary programs to reduce CPU load. If you see overheating or slowdowns, investigate and fix the cause quickly.
Frequently Asked Questions
Can I Upgrade My Laptop Cpu Easily?
Upgrading a laptop CPU is often difficult due to soldered chips. Some models allow swaps, but most don’t. Check your laptop’s manual or manufacturer’s website before attempting an upgrade. Consider professional help for complex models.
How To Check If My Laptop Cpu Is Upgradeable?
Check your laptop’s motherboard socket type and CPU compatibility. Use system info tools or manufacturer specs. If the CPU is soldered, upgrades aren’t possible. Verifying these details prevents damage and wasted effort.
What Tools Do I Need To Upgrade A Laptop Cpu?
You need a precision screwdriver set, thermal paste, and an anti-static wrist strap. Also, a clean workspace and patience are essential. Proper tools ensure safe disassembly and reassembly during CPU upgrades.
Will Upgrading My Laptop Cpu Improve Performance?
Upgrading can boost performance if the new CPU is significantly better. However, other components like RAM and storage also affect speed. Ensure your laptop supports the new CPU to avoid compatibility issues.
Conclusion
Upgrading your laptop CPU can boost speed and performance. Choose a compatible CPU that fits your laptop model. Take safety steps to avoid damage during installation. Test your laptop after upgrading to ensure it works well. A better CPU helps run programs faster and smoother.
Remember, not all laptops support CPU upgrades. Check your laptop’s manual or support site first. This small change can extend your laptop’s life. Keep your system cool and updated for best results. Simple steps lead to noticeable improvements in daily use.