
Are you looking to boost your computer’s performance and unlock powerful features like running virtual machines? The key to making that happen lies in turning on CPU virtualization.
It might sound technical, but don’t worry—this guide will walk you through every step clearly and simply. By the end, you’ll have your system ready to handle advanced tasks faster and smoother than before. Keep reading to discover how easy it is to activate CPU virtualization on your computer.
What Is Cpu Virtualization
CPU virtualization lets one computer run many virtual machines at the same time. To turn it on, access your BIOS settings and enable the virtualization option. This helps software like virtual machines work faster and smoother.
CPU virtualization lets one physical computer act like many computers. It creates virtual machines that share one CPU. Each virtual machine runs its own operating system and apps.
This technology helps use hardware better. It saves money and space by running multiple systems on one CPU. It is common in servers and cloud computing.
How Cpu Virtualization Works
The CPU uses a special feature to separate virtual machines. It controls resources and keeps machines from interfering. This makes virtual machines safe and stable.
Virtualization software manages the virtual machines. It talks to the CPU and hardware to share power. This software is called a hypervisor.
Benefits Of Cpu Virtualization
Virtualization saves energy and hardware costs. It allows easy testing and development on different systems. It also helps recover from crashes fast by moving machines.
Types Of Cpu Virtualization
There are two main types: full virtualization and paravirtualization. Full virtualization hides hardware completely. Paravirtualization shares some parts for better speed.
Both types make multiple virtual machines possible on one CPU.
Benefits Of Enabling Virtualization
Enabling CPU virtualization offers many benefits for both personal and professional use. It allows your computer to run multiple operating systems at once. This makes testing software and running different environments easier. Virtualization also improves resource use and system flexibility.
With virtualization turned on, your system can handle more tasks smoothly. It helps reduce hardware costs and energy use. Virtual machines run isolated from the main system, adding security and stability.
Improved System Performance
Virtualization lets your CPU manage resources better. It shares CPU power between virtual machines efficiently. This leads to faster processing and less lag. Your computer can run more apps at once without slowing down.
Enhanced Security
Virtual machines are isolated from your main system. This keeps viruses and malware contained. If one virtual machine is infected, others stay safe. It protects your important files and data from harm.
Cost Savings
Virtualization reduces the need for extra hardware. You can run several operating systems on one machine. This lowers expenses on buying and maintaining multiple computers. It also cuts down electricity bills by using fewer devices.
Easy Testing And Development
Developers use virtualization to test software safely. They try new programs without affecting the main system. This makes finding and fixing bugs simpler. It speeds up the development process and improves software quality.
Check If Virtualization Is Supported
Start by checking if your CPU supports virtualization in the system settings or BIOS menu. This step ensures your computer can run virtual machines smoothly. Accessing the BIOS is usually done by pressing a key during startup, like F2 or Delete.
Understanding Virtualization Support
Virtualization allows your computer to run multiple operating systems. Not all CPUs support this feature. Checking support is the first step before enabling it.
Without support, turning on virtualization in BIOS or UEFI will not work. It is essential to confirm this on your device first.
How To Check Virtualization Support On Windows
Press Ctrl + Shift + Esc to open Task Manager. Click the Performance tab. Look for “Virtualization” on the right side. It should say “Enabled” or “Disabled”.
If it says “Not Supported,” your CPU does not support virtualization.
How To Check Virtualization Support On Mac
Apple Macs with Intel processors support virtualization. Use the Terminal app and type: sysctl -a | grep machdep.cpu.features.
Look for “VMX” in the output. If present, your Mac supports virtualization.
How To Check Virtualization Support On Linux
Open the Terminal. Type: egrep -c ‘(vmx|svm)’ /proc/cpuinfo.
If the output is 0, virtualization is not supported. A number greater than 0 means support is available.
Credit: www.thomas-krenn.com
Accessing Bios Or Uefi Settings
Accessing BIOS or UEFI settings is the first step to enable CPU virtualization. These settings control how your computer starts and runs. You can change many important features here, including virtualization options.
Every computer has a different way to enter BIOS or UEFI. Knowing the correct key or method is important. It allows you to safely access these settings and make changes.
What Is Bios And Uefi?
BIOS (Basic Input Output System) is the older firmware that starts your computer. UEFI (Unified Extensible Firmware Interface) is the newer version. It has a modern interface and better security. Both let you change hardware settings.
How To Enter Bios Or Uefi
Turn off your computer completely. Turn it on and press the key shown on the screen fast. Common keys include Delete, F2, F10, or Esc. Press the key several times until the menu appears.
Finding The Virtualization Setting
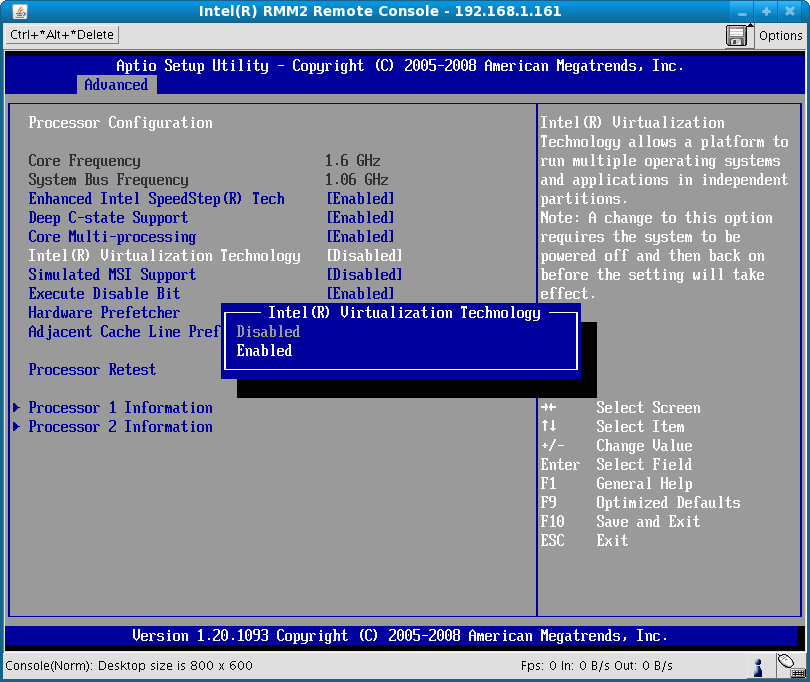
Look for tabs like Advanced, CPU Configuration, or Security. The name may vary by manufacturer. Find an option named Intel VT-x, AMD-V, or Virtualization Technology. Use arrow keys and Enter to navigate.
Saving And Exiting
After enabling virtualization, find the Save and Exit option. Press Enter to save your changes. Your computer will restart with virtualization enabled. Now, you can use virtual machines and other software that needs it.
Steps To Enable Virtualization In Bios
Enabling CPU virtualization in BIOS is essential for running virtual machines. This feature allows your computer to create and manage multiple virtual systems. Before using virtualization software, you must turn on this setting in BIOS.
Accessing BIOS and changing settings can seem hard. The process is simple with clear steps. Follow these instructions carefully to enable virtualization on your PC.
Common Bios Menus For Virtualization
Start your PC and press the BIOS key. It is usually F2, Del, or Esc. This opens the BIOS setup screen.
Look for menus named Advanced, CPU Configuration, or System Configuration. These often contain virtualization settings.
Find options called Intel VT-x, AMD-V, or Virtualization Technology. These names vary by CPU brand.
Use arrow keys to select the virtualization option. Change it from Disabled to Enabled. This turns on CPU virtualization.
Saving And Exiting Bios
After enabling virtualization, press the key to save changes. This is usually F10. A confirmation message will appear.
Select Yes to save and exit BIOS. Your computer will restart with virtualization enabled.
Now, virtualization software can use your CPU’s virtual features. This allows better performance and compatibility.
Enable Virtualization On Windows
Enabling virtualization on Windows lets your computer run virtual machines smoothly. This feature helps run multiple operating systems on one PC. Many software applications and development tools need virtualization to work well.
Turning on CPU virtualization requires changing settings in your computer’s BIOS or UEFI. After that, Windows can use this feature for better performance and compatibility.
Start by checking if your CPU supports virtualization. Open Task Manager by pressing Ctrl + Shift + Esc. Go to the Performance tab and select CPU. Look for “Virtualization” on the right side. If it says “Enabled,” virtualization is already on.
Restart Your Computer And Enter Bios/uefi
Save your work, then restart your PC. Press the BIOS or UEFI access key during startup. This key varies by brand, such as F2, Delete, or Esc. A quick search can help find the correct key for your PC.
Enable Virtualization In Bios/uefi Settings
Inside BIOS or UEFI, find the CPU or Advanced settings menu. Look for “Intel Virtualization Technology,” “VT-x,” or “AMD-V.” Change the option to “Enabled.” Save your changes and exit BIOS/UEFI.
Verify Virtualization Is Enabled In Windows
After reboot, open Task Manager again. Check the Performance tab and find “Virtualization.” It should now show as “Enabled.” Your CPU virtualization is active and ready for use.
Enable Virtualization On Mac
Enabling CPU virtualization on a Mac allows the system to run virtual machines efficiently. This feature is essential for developers, testers, and users who need to run different operating systems on their Mac. Virtualization improves performance and compatibility for software that requires a virtual environment.
Most modern Macs come with virtualization enabled by default. This is because Apple uses hardware that supports virtualization, such as the Intel VT-x or Apple Silicon. Knowing how to check and enable virtualization ensures smooth operation for virtual machines.
Check Virtualization Support On Your Mac
First, verify if your Mac supports virtualization technology. For Intel-based Macs, virtualization is built into the CPU. To check, open the Terminal app and type sysctl -a | grep machdep.cpu.features. Look for “VMX” in the output. If present, virtualization is supported.
Enable Virtualization In Mac Firmware
Most Macs do not require manual enabling of virtualization in firmware. Apple’s design keeps this feature active for Intel and Apple Silicon processors. If virtualization is disabled, it may be due to firmware settings or third-party software restrictions.
Use Virtualization Software On Mac
Install virtualization apps like Parallels Desktop, VMware Fusion, or VirtualBox. These programs use the Mac’s virtualization capabilities. After installation, they handle the settings to optimize virtual machine performance automatically.

Credit: softwareg.com.au
Troubleshooting Virtualization Issues
Troubleshooting virtualization issues can be confusing for many users. Problems often arise when the CPU virtualization does not work as expected. This section helps you identify and fix common problems. Clear steps guide you through the process.
Virtualization Not Showing In Bios
Sometimes virtualization options do not appear in the BIOS menu. This happens because some older CPUs or motherboards do not support virtualization. Check your CPU model online to confirm support. Also, update your BIOS to the latest version. BIOS updates often add new features or fix bugs. If virtualization still does not show, try resetting BIOS settings to default. This can restore hidden options.
Performance Issues After Enabling
Performance can drop after turning on virtualization. This may happen if other settings conflict with virtualization. Disable unnecessary background programs to free up resources. Make sure your system drivers are up to date. Outdated drivers can cause slowdowns. Check your virtual machine settings too. Assigning too many resources to the virtual machine might slow down the host system. Balance CPU and memory allocation carefully. Monitor system temperature as overheating can reduce performance. Use software tools to track CPU usage and temperature.
Virtualization And Security Considerations
Virtualization technology allows a single computer to run multiple operating systems. It creates virtual machines that share the same hardware. This process improves resource use and helps in testing software safely. However, turning on CPU virtualization can affect your computer’s security. Understanding these effects is important before enabling it.
Virtualization can expose your system to new risks. Virtual machines may isolate processes, but they also introduce more attack points. Malware could escape a virtual machine and affect the host system. Keeping virtualization secure requires careful management and updates.
Cpu Virtualization And Security Risks
CPU virtualization opens hardware to different software layers. This adds complexity and increases security risks. Bugs in virtualization software may allow attacks. Hackers might exploit these weaknesses to access sensitive data. Regular patches and updates reduce these risks.
Best Practices For Secure Virtualization
Use strong passwords for virtual machine access. Limit network access to virtual machines. Keep your virtualization software up to date. Disable virtualization features if not needed. Monitor virtual machines for unusual activity regularly.
Hardware Support And Security Features
Modern CPUs offer hardware features to protect virtualization. Technologies like Intel VT-x and AMD-V improve security. They isolate virtual machines better and reduce vulnerabilities. Enabling these features enhances safety during virtualization.
Credit: support.bluestacks.com
Frequently Asked Questions
What Is Cpu Virtualization And Why Enable It?
CPU virtualization allows multiple operating systems to run on one CPU. Enabling it improves performance in virtual machines and software that relies on virtualization technology.
How Do I Check If Cpu Virtualization Is Enabled?
You can check CPU virtualization status in your system BIOS or UEFI settings. Alternatively, use tools like Task Manager on Windows or system info commands on Linux.
What Steps Enable Cpu Virtualization In Bios?
Restart your computer and enter BIOS/UEFI setup. Find the “Virtualization Technology” or “Intel VT-x/AMD-V” option and enable it. Save changes and reboot.
Can Enabling Cpu Virtualization Affect System Security?
Enabling virtualization itself doesn’t harm security. However, insecure virtual machines could expose vulnerabilities. Always keep virtualization software updated for safety.
Conclusion
Enabling CPU virtualization helps run virtual machines smoothly. It improves your computer’s ability to handle multiple systems. Follow the steps carefully to access your BIOS or UEFI. Make sure to save changes before exiting. This simple setting can boost your software testing and development.
Take your time and double-check each step. Soon, you will enjoy better performance for your virtual environments. Keep your system updated for the best results. Virtualization opens new possibilities for learning and work. Give it a try and see the difference yourself.