
Are you ready to upgrade or clean your computer but unsure how to safely remove your GPU? Taking your GPU out might seem tricky, but with the right steps, you can do it easily and without damage.
This guide will walk you through every step, making the process simple and clear. By the end, you’ll feel confident handling your hardware like a pro. Let’s dive in and get your GPU out the right way!
Credit: www.youtube.com
Prepare Your Workspace
Preparing your workspace is the first step to safely remove a GPU. A clean and organized area makes the process smoother. It also helps avoid damage to your computer parts. Take time to set up everything before starting.
Clear your desk or table. Make sure you have enough space to place your tools and the GPU once removed. Good lighting is important too. It helps you see small parts and connectors clearly.
Gather Necessary Tools
Get all tools before opening your computer case. Usually, you need a screwdriver, preferably a Phillips head. Some GPUs may require different screws, so check your model. Keep a small container to hold screws and small parts. This prevents losing anything during the removal.
Ensure Static-free Environment
Static electricity can damage your GPU and other parts. Avoid working on carpet or rugs. Use an anti-static wrist strap if available. If not, touch a metal part of the case to discharge static. Work on a non-metal surface like wood or plastic. These steps protect your hardware from static damage.
Power Down And Unplug
Powering down and unplugging your computer is the first step before removing the GPU. This step keeps you safe and protects your hardware from damage. Always handle electronics carefully to avoid electric shock or data loss.
Follow the steps below to properly shut down and disconnect power and peripherals.
Shut Down The Computer
Turn off your computer using the normal shutdown process. Do not just press the power button. Wait for the screen to go dark and all fans to stop. This ensures the system is completely off.
Disconnect Power And Peripherals
Unplug the power cable from the wall socket or power strip. Disconnect all connected devices like keyboard, mouse, and monitor. This prevents any power from flowing to the computer while you work inside it.
Open The Computer Case
Opening the computer case is the first step to remove your GPU. It gives you access to the inside parts of your computer. You need to be careful and gentle to avoid damage.
Most computer cases have screws or clips that hold the side panel. Removing this panel lets you see and reach the GPU. Work on a clean surface and avoid static electricity.
Remove Side Panel
Turn off your computer and unplug all cables. Find the screws or clips on the back of the case. Use a screwdriver to remove the screws. Keep them safe for later.
Slide or lift the side panel away from the case. Some cases have a latch or button to unlock the panel. Set the panel aside carefully. Now, the inside of the computer is open.
Locate The Gpu
The GPU is a large card inserted into the motherboard. It usually sits near the middle or bottom of the case. Look for a card with one or more fans on it.
Check the back of the case for ports like HDMI or DisplayPort. These ports connect to your monitor. The card attached to these ports is the GPU.
Make sure you identify the right card before removing anything. This step is important to avoid mistakes.
Disconnect Power Cables
Disconnecting the power cables from your GPU is a key step before removal. It ensures safety and protects your hardware. Power cables carry electricity to the GPU, so handle them carefully. Follow these steps to identify and safely unplug the cables.
Identify Gpu Power Connectors
Locate the power connectors on your GPU first. Most GPUs have one or two connectors on the top or side. These connectors often have 6 or 8 pins, sometimes combined as 6+2 pins. Check your GPU model to know the exact type. The power cables from your power supply unit (PSU) will match these connectors. Identifying them correctly prevents damage to your GPU or cables.
Safely Unplug Cables
Before unplugging, turn off your PC and unplug it from the wall. Press the small clip or latch on the power connector to release it. Gently pull the cable straight out without twisting or bending. Avoid pulling the cable by the wire; hold the connector itself. Store the cables safely to avoid dust or damage. This careful approach keeps your GPU and cables in good shape.
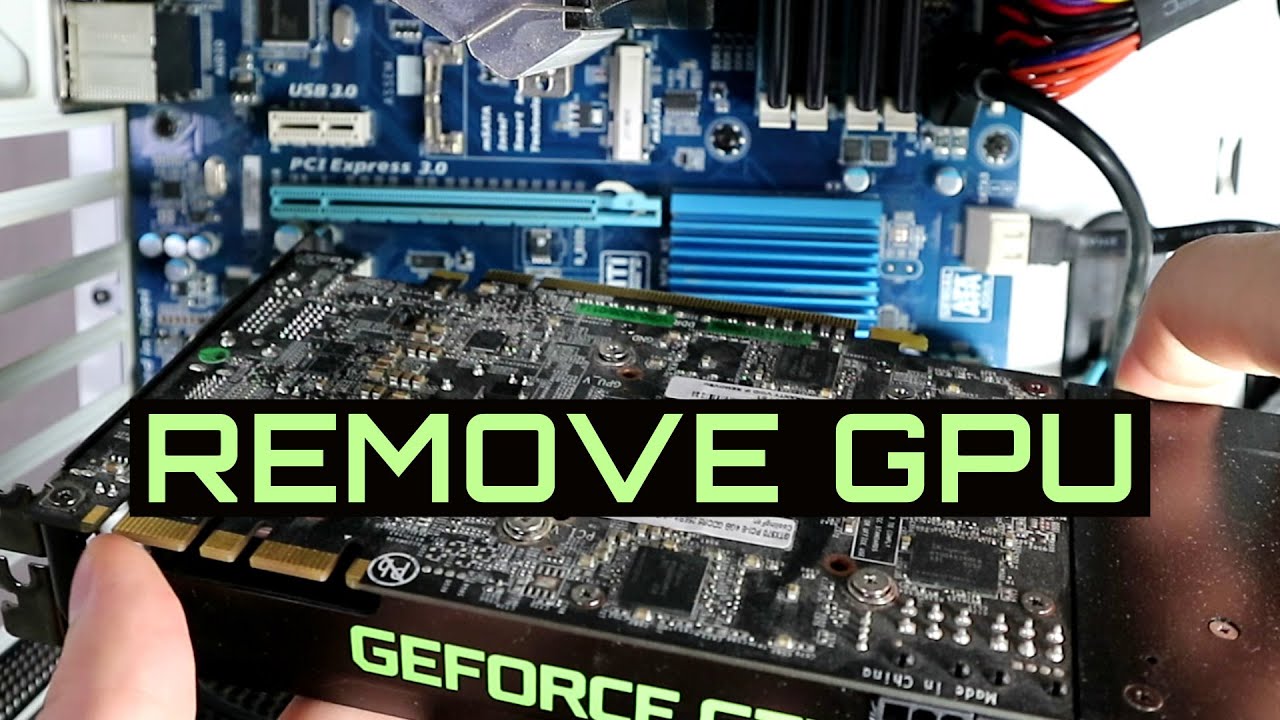
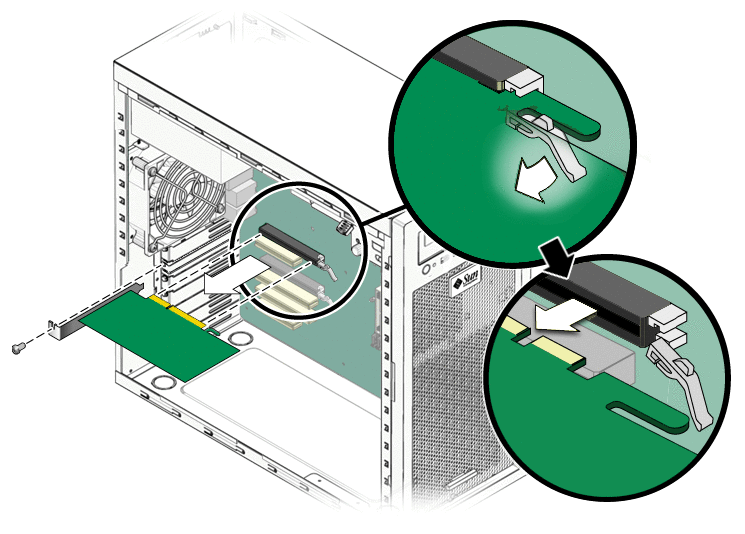
Release The Gpu From The Slot
Releasing the GPU from the slot is a key step in removing it safely. This process requires care to avoid damage to the card or motherboard. The GPU fits tightly into the PCIe slot. A small clip usually holds it in place. Finding and releasing this clip frees the GPU for removal.
Find The Pcie Slot Clip
Locate the PCIe slot on the motherboard. At the end of the slot, find a small plastic clip. This clip locks the GPU firmly. It prevents the card from moving or falling out. The clip may be on one side or both sides of the slot. Look closely to identify its exact position.
Unlock The Gpu Carefully
Press the clip gently to release it. Do not use too much force. The clip will move slightly or pop up. Hold the GPU with one hand. Use the other hand to press the clip. Once unlocked, the GPU will loosen from the slot. Pull the card out slowly and evenly. Avoid bending or twisting the GPU.
Credit: docs.oracle.com
Remove The Gpu
Removing the GPU is an important step when upgrading or cleaning your computer. It requires care and attention to avoid damage. This section explains how to take out the GPU safely and easily.
Grip And Pull Out Gently
First, hold the GPU firmly by its edges. Avoid touching the gold connectors or chips.
Pull the card straight out of the slot. Do this slowly and steadily.
Do not force the card if it feels stuck. Check for any locking clips or screws.
Handle With Care
After removing the GPU, place it on an anti-static surface.
Do not drop or bend the card. It can cause serious damage.
Keep the GPU away from liquids and dust. Store it in a safe place.
Store Or Replace The Gpu
After removing your GPU, you must decide whether to store it or replace it. Storing the GPU properly keeps it safe for future use. Replacing the GPU means preparing your system for a new card. Both steps need care to avoid damage and ensure smooth installation.
Use Anti-static Packaging
Static electricity can harm your GPU’s delicate parts. Use anti-static bags to protect the card. Place the GPU inside the bag carefully. Avoid touching the gold connectors or circuit board. Store the bag in a cool, dry place. Use the original box if you still have it. This packaging keeps the GPU safe from dust and shocks.
Prepare For New Installation
Clear space inside your computer case before installing a new GPU. Clean any dust or debris near the PCIe slot. Check your power supply to ensure it supports the new GPU. Have the right cables and connectors ready. Turn off your computer and unplug it before starting. Handle the new GPU by its edges. Avoid touching the circuit board or connectors. These steps help avoid damage and make installation easier.
Credit: www.corsair.com
Frequently Asked Questions
How Do I Safely Remove A Gpu From My Pc?
First, shut down and unplug your PC. Ground yourself to avoid static. Unscrew the GPU from the case. Carefully release the PCIe slot latch. Gently pull the GPU out in a straight motion.
What Tools Are Needed To Take Out A Gpu?
You mainly need a Phillips-head screwdriver for screws. An anti-static wrist strap is recommended. No complex tools are required. Just ensure your workspace is clean and static-free.
Can Removing A Gpu Damage Other Components?
If done carefully, it won’t damage other parts. Avoid using excessive force or bending the GPU. Disconnect all cables before removal. Ground yourself to prevent static damage.
How To Identify If The Gpu Is Properly Seated?
Check if the GPU is aligned with the PCIe slot. The locking latch should click into place. Screws should be firmly attached. The card should sit flush without gaps.
Conclusion
Removing a GPU is simple when you follow clear steps. Always turn off your computer and unplug it first. Gently unlock the card and pull it out straight. Keep the GPU safe in an anti-static bag or box. Taking your time helps avoid damage to parts.
Practice makes the process easier and less stressful. Now, you can upgrade or clean your computer with confidence.