
Are you tired of slow graphics and lagging performance on your computer? Switching from integrated graphics to a dedicated GPU can make a huge difference.
It can boost your gaming, video editing, and overall computer speed. But if you’re unsure how to make the switch, don’t worry—you’re in the right place. This guide will walk you through the simple steps to upgrade your graphics, so you get the best performance without any hassle.
Keep reading to unlock the full power of your PC!
Credit: www.asus.com
Check Your System Compatibility
Before switching from integrated graphics to a dedicated GPU, check your system compatibility. This step is crucial to avoid hardware conflicts and ensure smooth performance. It helps you understand what your computer supports and what changes are needed.
Identify Your Current Graphics Setup
First, find out which graphics system your computer uses. Open the Device Manager and look under “Display adapters.” You will see if your computer uses integrated graphics only or already has a GPU installed. Knowing this helps you plan the upgrade correctly.
Verify Gpu Installation Options
Check your computer’s motherboard for available slots. Most GPUs use PCI Express x16 slots. Make sure there is space for a new GPU and that the slot matches the card type. Some laptops do not support GPU upgrades, so verify your device type too.
Ensure Power Supply Adequacy
Dedicated GPUs require more power than integrated graphics. Check your power supply unit (PSU) wattage and connectors. The PSU should meet the GPU’s minimum power needs. Without enough power, the GPU may not work properly or could damage your system.
Credit: www.esseg.eu
Prepare Your Hardware
Preparing your hardware is the first step to switch from integrated graphics to a dedicated GPU. Proper preparation keeps your PC safe and makes the installation smooth. Taking time here prevents damage and saves effort later.
Follow each step carefully. Handle parts gently. This will help your PC run better with the new graphics card.
Turn Off And Unplug Your Pc
Start by shutting down your computer completely. Do not use sleep or hibernate modes. After turning off, unplug the power cable from the wall socket.
Also, disconnect all other cables like the monitor, keyboard, and mouse. This keeps you safe from electric shocks. It also protects your PC from damage during the process.
Open The Computer Case Safely
Find a clean, flat surface to work on. Place your PC on it and remove any screws holding the side panel. Slide the panel off gently to expose the inside.
Touch a metal part of the case to discharge static electricity. Static can harm sensitive computer parts. Avoid touching circuit boards or chips directly.
Install The Dedicated Gpu
Locate the PCIe slot on your motherboard. This is where the new GPU will go. Remove the metal slot covers next to the slot for easy access.
Hold the graphics card by its edges. Align it with the PCIe slot and press down firmly until it clicks into place. Secure the card with screws to keep it stable.
Connect any power cables from your power supply to the GPU. Double-check all connections before closing the case. This ensures the card gets enough power to work well.
Configure Bios Settings
Configuring BIOS settings is essential to switch from integrated graphics to a dedicated GPU. The BIOS controls the hardware settings of your computer. Adjusting these settings helps the system use the GPU instead of the integrated graphics. This step is important for better graphics performance.
Access Bios Menu
Restart your computer. Press the BIOS key during startup. Common keys are F2, Del, or Esc. The screen usually shows which key to press. Enter the BIOS menu carefully. Use the keyboard to navigate through options.
Disable Integrated Graphics
Find the graphics or video settings in BIOS. Look for options related to integrated graphics. Select the option to disable integrated graphics. This stops the system from using the built-in graphics chip. Save your changes before moving to the next step.
Set Primary Display To Gpu
Locate the setting for primary display or video adapter. Change it from integrated graphics to PCI Express or your GPU name. This tells the system to use the dedicated GPU first. Save and exit the BIOS menu. Your computer will restart using the GPU.
Credit: gtek.cv
Install Gpu Drivers
Installing GPU drivers is a key step when switching from integrated graphics to a dedicated GPU. Drivers help your computer use the GPU properly. Without correct drivers, your new graphics card will not work as expected.
Follow a clear process to install the right drivers. This ensures smooth performance and fewer errors. Start by downloading the latest drivers, then remove old ones, and finally install the new drivers carefully.
Download Latest Drivers
Go to the official website of your GPU manufacturer. Look for the driver section. Select your GPU model and operating system. Download the latest driver version available. This ensures compatibility and best performance.
Uninstall Old Graphics Drivers
Open the Control Panel on your computer. Find ‘Programs and Features’ or ‘Apps & Features’. Locate old graphics drivers related to your integrated graphics or previous GPU. Uninstall them completely. This prevents conflicts with the new drivers.
Install New Gpu Drivers
Run the downloaded driver setup file. Follow the installation prompts on screen. Choose the custom installation option if available. This helps remove leftover files from old drivers. Restart your computer after installation to apply changes.
Adjust Windows Display Settings
Adjusting Windows display settings is a key step after switching from integrated graphics to a dedicated GPU. This process ensures your system uses the new GPU effectively. It also helps improve visual quality and performance. Proper settings can prevent screen flickering, resolution issues, and other display problems.
Windows offers tools to select the preferred graphics processor, optimize screen resolution, and manage multiple displays. These tools make your experience smoother and more enjoyable. Follow the steps below to customize your display settings for the best results.
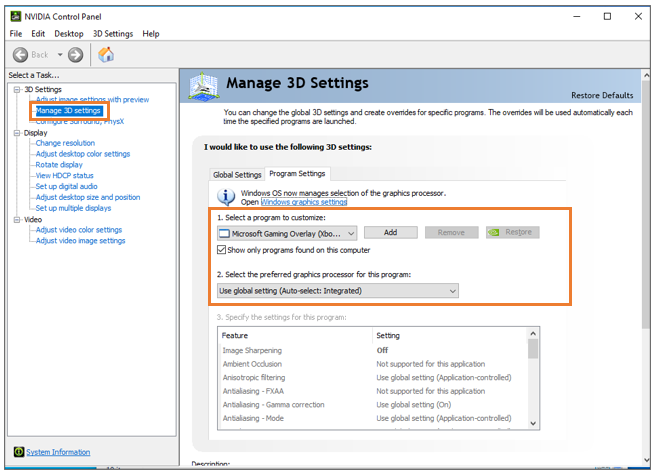
Select Preferred Graphics Processor
Open the Windows Settings menu and go to System. Click on Display, then scroll down to Graphics settings. Here, choose the app or game you want to run on the GPU. Select the app and click Options. Pick “High performance” to use the dedicated GPU. Save the changes to apply your new preference.
Optimize Display Resolution
Go to Settings, then System, and click Display. Under Display resolution, select the recommended resolution. This setting matches your screen’s native resolution for sharp images. Use the drop-down menu to find the best option. Confirm the change and keep the new resolution if it looks right.
Manage Multiple Displays
In Display settings, scroll to Multiple displays. Choose how you want to use your screens. Select Extend to spread your desktop across monitors. Pick Duplicate to mirror the main screen. Arrange the displays by dragging them in the settings window. Apply the changes to finish setup.
Troubleshoot Common Issues
Switching from integrated graphics to a dedicated GPU can improve your computer’s performance. Yet, some common problems may occur during the switch. Troubleshooting these issues helps you get the best experience without frustration.
This section covers simple ways to fix display, driver, and performance problems. Follow these steps to solve issues quickly and keep your system running smoothly.
Fix No Display Problems
No display means your monitor stays black after switching to the GPU. First, check that the GPU is properly seated in the slot. Make sure the power cables are connected to the GPU.
Next, connect your monitor cable to the GPU port, not the motherboard. Restart your PC and see if the display appears. If it still doesn’t work, reset the BIOS to default settings. This can fix detection problems.
Resolve Driver Conflicts
Old or conflicting drivers cause many GPU issues. Uninstall all existing graphics drivers before installing the new GPU driver. Use a driver cleaner tool for a thorough removal.
Download the latest driver from the GPU manufacturer’s website. Install it and restart your PC. This prevents conflicts between integrated and dedicated graphics drivers.
Handle Performance Issues
Performance may lag after switching to a GPU. Check that the GPU is set as the primary graphics device in BIOS or system settings. Close unnecessary background apps to free up resources.
Keep your GPU drivers updated for better stability. Make sure your power settings allow maximum performance. Lower the graphics settings in games or apps if needed for smoother play.
Maintain And Update Your Gpu
Maintaining and updating your GPU is key to getting the best performance. A well-kept graphics card runs smoothly and lasts longer. Regular care prevents common issues and keeps your system stable.
Simple steps can help your GPU stay in top shape. Check your hardware and software often. Watch how your GPU performs during daily use. These habits improve your experience and avoid unexpected problems.
Regular Driver Updates
Graphics drivers connect your GPU to your computer. Updated drivers fix bugs and improve speed. Check the GPU maker’s website for the latest drivers. Install updates as soon as they are available. This keeps your GPU compatible with new software and games.
Clean Hardware Periodically
Dust can block your GPU’s airflow and cause heat. Turn off your computer and open the case carefully. Use compressed air to blow dust from fans and vents. Keep your PC in a clean, dry place to reduce dust buildup. Clean hardware helps the GPU cool down faster and work better.
Monitor Gpu Performance
Keep an eye on your GPU’s temperature and usage. Use simple software tools to check these stats. High temperatures or unusual behavior need attention. Monitoring helps you spot problems early. This avoids damage and keeps your GPU running well.
Frequently Asked Questions
How Do I Switch From Integrated Graphics To Gpu?
To switch, access your BIOS/UEFI settings during startup. Locate graphics settings and select your dedicated GPU. Save changes and restart. You can also set GPU preferences in your operating system’s display or graphics settings for specific applications.
Why Is My Pc Using Integrated Graphics Instead Of Gpu?
Your PC defaults to integrated graphics to save power. Sometimes, BIOS settings or drivers force this. Updating your GPU drivers and adjusting settings in BIOS or GPU control panel usually fixes this issue.
Can I Use Both Integrated Graphics And Gpu Simultaneously?
Yes, some systems support hybrid graphics. Integrated graphics handle basic tasks while GPU manages intensive graphics. This optimizes performance and battery life, especially in laptops, but not all systems support this feature.
Does Switching To Gpu Improve Gaming Performance?
Yes, switching to a dedicated GPU significantly improves gaming performance. GPUs offer higher processing power and better graphics rendering than integrated graphics, providing smoother gameplay and higher frame rates.
Conclusion
Switching from integrated graphics to a GPU can boost your computer’s power. It helps run games and programs more smoothly. The process is simple with the right steps. Make sure to check compatibility before installing a new GPU. Keep your drivers updated for the best performance.
Enjoy clearer visuals and faster speed on your PC. Take your time and follow the guide carefully. This upgrade can make a big difference in daily use. You have the tools to improve your computer now.