
Are you struggling to get the best performance from your computer? Setting your GPU as the primary graphics processor can make a huge difference.
It boosts speed, improves gaming visuals, and enhances your overall experience. But if you don’t know where to start, it can feel confusing. Don’t worry—this guide will walk you through simple steps to set your GPU as primary. By the end, you’ll unlock your system’s full power and enjoy smoother, faster graphics right away.
Keep reading to find out how!
Check Current Gpu Settings
Before setting your GPU as the primary device, check your current GPU settings. This step helps you understand which graphics card your system is using now. It ensures you make the right changes without mistakes. Knowing your active GPU also helps you avoid performance issues.
Identify Active Gpu
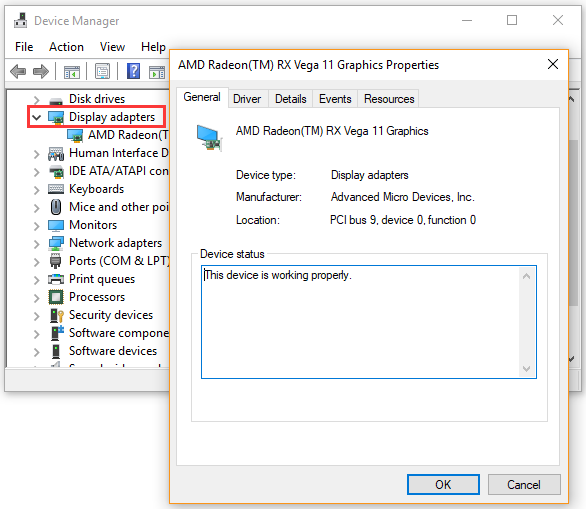
First, find out which GPU is active. On most systems, you have an integrated GPU and a dedicated GPU. The active GPU handles your display and graphic tasks. To identify it, open the Device Manager on Windows. Look under “Display adapters” to see all installed GPUs. The one currently in use is your active GPU.
Use System Tools
System tools help check GPU settings in detail. On Windows, use the Task Manager by pressing Ctrl + Shift + Esc. Go to the “Performance” tab and select “GPU” from the sidebar. This shows the GPU usage and which GPU is active. You can also use DirectX Diagnostic Tool by typing “dxdiag” in the run box. Check the Display tab to find your GPU information.
Credit: www.reddit.com
Access Bios Or Uefi
Accessing the BIOS or UEFI is the first step to set your GPU as primary. This setup controls how your computer starts and which hardware it uses first. You must enter this menu carefully to change the GPU settings.
The BIOS or UEFI interface looks simple but holds many important options. Finding the right setting can take some time. Follow the steps below to find and change the GPU configuration.
Enter Bios Setup
Turn off your computer completely. Press the power button to turn it on again. Immediately press the BIOS key repeatedly. Common keys include Delete, F2, or Esc. The screen will show which key to press. Do not hold the key; press it several times quickly.
If you miss the timing, the computer will start normally. Restart and try again. Once inside, you will see a blue or black screen with text options.
Locate Gpu Configuration
Use the arrow keys to navigate through the BIOS menu. Look for sections like Advanced, Chipset, or Peripherals. Inside these sections, find the GPU or graphics settings.
Options may say Primary Display, Initial Display Output, or Video Configuration. Select the setting and change it to PCIe or PEG (PCI Express Graphics). This tells the system to use your dedicated GPU first.
Save the changes by pressing the key shown on the screen, usually F10. Confirm and exit. Your computer will restart with the new GPU priority.
Change Primary Display Adapter
Changing the primary display adapter lets you choose which GPU your computer uses first. This helps improve graphics performance by prioritizing the dedicated GPU over the integrated one. The process involves adjusting settings in the BIOS, where you can select the preferred graphics device.
Accessing these settings is simple and takes just a few steps. The main goal is to tell your system to use the dedicated GPU for all display tasks. Below, we explain how to do this clearly and easily.
Select Dedicated Gpu
Turn on your computer and enter the BIOS setup. Usually, press keys like F2, Delete, or Esc during startup. Look for a section called “Advanced,” “Chipset,” or “Video Configuration.” Find the option labeled “Primary Display,” “Init Display First,” or “Display Adapter.”
Change this setting from “Integrated Graphics” or “Auto” to “Dedicated GPU” or the name of your graphics card. This change tells the system to use the dedicated GPU as the main display adapter. Save the changes before leaving the BIOS menu.
Save And Exit Bios
After selecting the dedicated GPU, find the option to save and exit. It might be called “Save & Exit,” “Save Changes,” or something similar. Confirm the changes to apply the new settings.
The system will restart automatically. Your computer now uses the dedicated GPU as the primary graphics adapter. This can improve performance in games and graphic-intensive programs.
Configure Gpu In Operating System
Configuring your GPU in the operating system helps improve your computer’s performance. It ensures the right graphics card handles the tasks you need. This is key for gaming, video editing, and other heavy graphics work.
Setting the primary GPU in the OS lets you control which graphics processor is active. It can save power and boost speed. Below are simple steps to adjust these settings in Windows.
Adjust Windows Graphics Settings
Open the Windows Settings by pressing Windows + I keys. Select “System,” then click “Display.” Scroll down and find “Graphics settings.”
Choose an app type: “Desktop app” or “Microsoft Store app.” Click “Browse” to find your program’s file. Add the app to the list.
Select the app, then click “Options.” Pick “High performance” to use your dedicated GPU. Save your changes to apply the setting.
Set Preferred Gpu For Applications
Right-click on your desktop and open your GPU control panel. For Nvidia, open “Nvidia Control Panel.” For AMD, use “AMD Radeon Settings.”
Go to “Manage 3D settings” or similar. Find “Preferred graphics processor” or “Switchable graphics.” Choose your high-performance GPU.
Apply the changes. Some apps may need you to set the GPU individually. This step ensures your GPU is primary for demanding tasks.
Update Gpu Drivers
Updating your GPU drivers is a key step to set your GPU as the primary device. Drivers help your computer talk to the graphics card properly. Old or missing drivers can cause problems. Keeping them updated improves performance and fixes bugs.
This process is simple and takes a few minutes. Follow these steps to download and install the latest drivers for your GPU.
Download Latest Drivers
First, identify your GPU brand and model. Visit the official website of your GPU maker. Common brands include NVIDIA, AMD, and Intel.
Find the driver download section on the site. Enter your GPU model details. Choose the correct operating system version.
Download the latest driver file available. This ensures compatibility and the best performance.
Install And Restart
Open the downloaded driver file to begin installation. Follow the instructions on the screen carefully. Choose the recommended installation type.
Wait for the installation to complete. Do not close the window or turn off your computer during this process.
After installation, restart your computer. Restarting applies the new driver settings.
Your GPU is now ready to be set as primary with updated drivers.
Optimize Gpu Performance
Optimizing GPU performance helps your computer run faster and smoother. It ensures your graphics card works at its best. This is important for gaming, video editing, and other graphic-heavy tasks.
Small changes in settings can make a big difference. You can improve speed, reduce lag, and extend your GPU’s life. Let’s explore two simple ways to optimize your GPU.
Adjust Power Settings
Set your power plan to high performance. This stops your GPU from slowing down to save energy. On Windows, go to Control Panel > Power Options. Choose “High performance” or create a custom plan.
Check your GPU’s own power settings. Many cards have options for power use in their control panel. Select maximum performance to get the best speed.
Use Gpu Management Software
GPU software helps control and monitor your graphics card. Nvidia and AMD offer free programs for this. These tools let you update drivers, adjust fan speed, and tweak performance settings.
Software can also help you switch between integrated and dedicated GPUs. This ensures your primary GPU handles demanding tasks. Regular updates through these tools keep your GPU running smoothly.
Troubleshoot Common Issues
Troubleshooting common issues helps keep your GPU running smoothly. Sometimes, the system does not detect the GPU properly. Other times, performance may drop unexpectedly. Fixing these problems ensures your GPU stays the primary graphics processor.
Simple steps can resolve most issues. Understanding the cause is the first step. This section covers common problems and their solutions.
Fix Detection Problems
Check if your GPU is correctly seated in the slot. Loose connections often cause detection errors. Restart your computer after checking the hardware.
Update your GPU drivers. Outdated drivers can prevent detection. Visit the manufacturer’s website for the latest version.
Use Device Manager to see if the GPU appears. If it shows a warning icon, uninstall and reinstall the driver. Also, check BIOS settings to ensure the GPU is enabled as primary.
Resolve Performance Drops
Performance drops may happen due to overheating. Clean your computer fans and vents regularly. Good airflow keeps the GPU cool and efficient.
Close background apps that use GPU resources. These apps reduce the power available for main tasks. Use Task Manager to identify and stop them.
Check power settings. Set your PC to high-performance mode. This setting allows the GPU to run at full capacity. Keep your drivers updated to fix bugs affecting performance.

Credit: softwareg.com.au
Credit: www.esseg.eu
Frequently Asked Questions
How Do I Set My Gpu As The Primary Display Adapter?
To set your GPU as primary, access your BIOS or UEFI settings. Look for “Primary Display” or “Init Display First” options. Select your dedicated GPU instead of integrated graphics. Save changes and reboot your system for the settings to apply.
Can I Change The Primary Gpu Without Bios Access?
Yes, you can change the primary GPU via your operating system’s display settings. On Windows, go to Display Settings > Graphics Settings. Choose your preferred GPU for specific apps. However, BIOS changes offer a more permanent solution.
Why Is My Gpu Not Recognized As Primary?
Your GPU may not be primary due to incorrect BIOS settings, outdated drivers, or hardware issues. Ensure your BIOS prioritizes the dedicated GPU. Update your graphics drivers and check the GPU connection in your PC.
Does Setting Gpu As Primary Improve Gaming Performance?
Yes, setting your dedicated GPU as primary boosts gaming performance. It ensures games use the powerful GPU instead of integrated graphics. This reduces lag and enhances graphics quality for smoother gameplay.
Conclusion
Setting your GPU as primary improves your computer’s graphics performance. It helps run programs and games more smoothly. You can do this by changing settings in your BIOS or your operating system. Always check if your drivers are updated for best results.
Taking a few simple steps makes a big difference. Now, your system uses the better graphics card first. This change helps you enjoy clearer visuals and faster processing. Try it today and see the improvement yourself.