
Are you curious about what GPU powers your Windows 11 PC? Knowing your graphics card is key for gaming, video editing, or even just making sure your system runs smoothly.
But finding this info isn’t always straightforward if you don’t know where to look. You’ll discover simple, step-by-step ways to check your GPU quickly and easily. By the end, you’ll have a clear picture of your system’s capabilities—and be ready to make smarter choices for your computer needs.
Keep reading to unlock the secrets your PC is hiding!

Credit: www.esseg.eu
Check Gpu Using Device Manager
Checking your GPU on Windows 11 is simple with Device Manager. This tool shows all hardware components on your PC. It helps find detailed information about your graphics card.
Using Device Manager avoids the need for extra software. It works fast and is built into Windows. Follow the steps below to see your GPU model quickly.
Open Device Manager
Press the Windows key on your keyboard. Type “Device Manager” in the search box. Click the Device Manager app from the results. The Device Manager window opens with a list of hardware categories.
Locate Display Adapters
Look for the “Display adapters” section in the list. Click the arrow next to it to expand. This section shows all graphics devices on your PC. It includes both integrated and dedicated GPUs.
Identify Your Gpu Model
Under Display adapters, find the name of your GPU. It usually shows the manufacturer and model number. For example, “NVIDIA GeForce” or “AMD Radeon”. Note this name for your reference or troubleshooting needs.
Credit: www.windowscentral.com
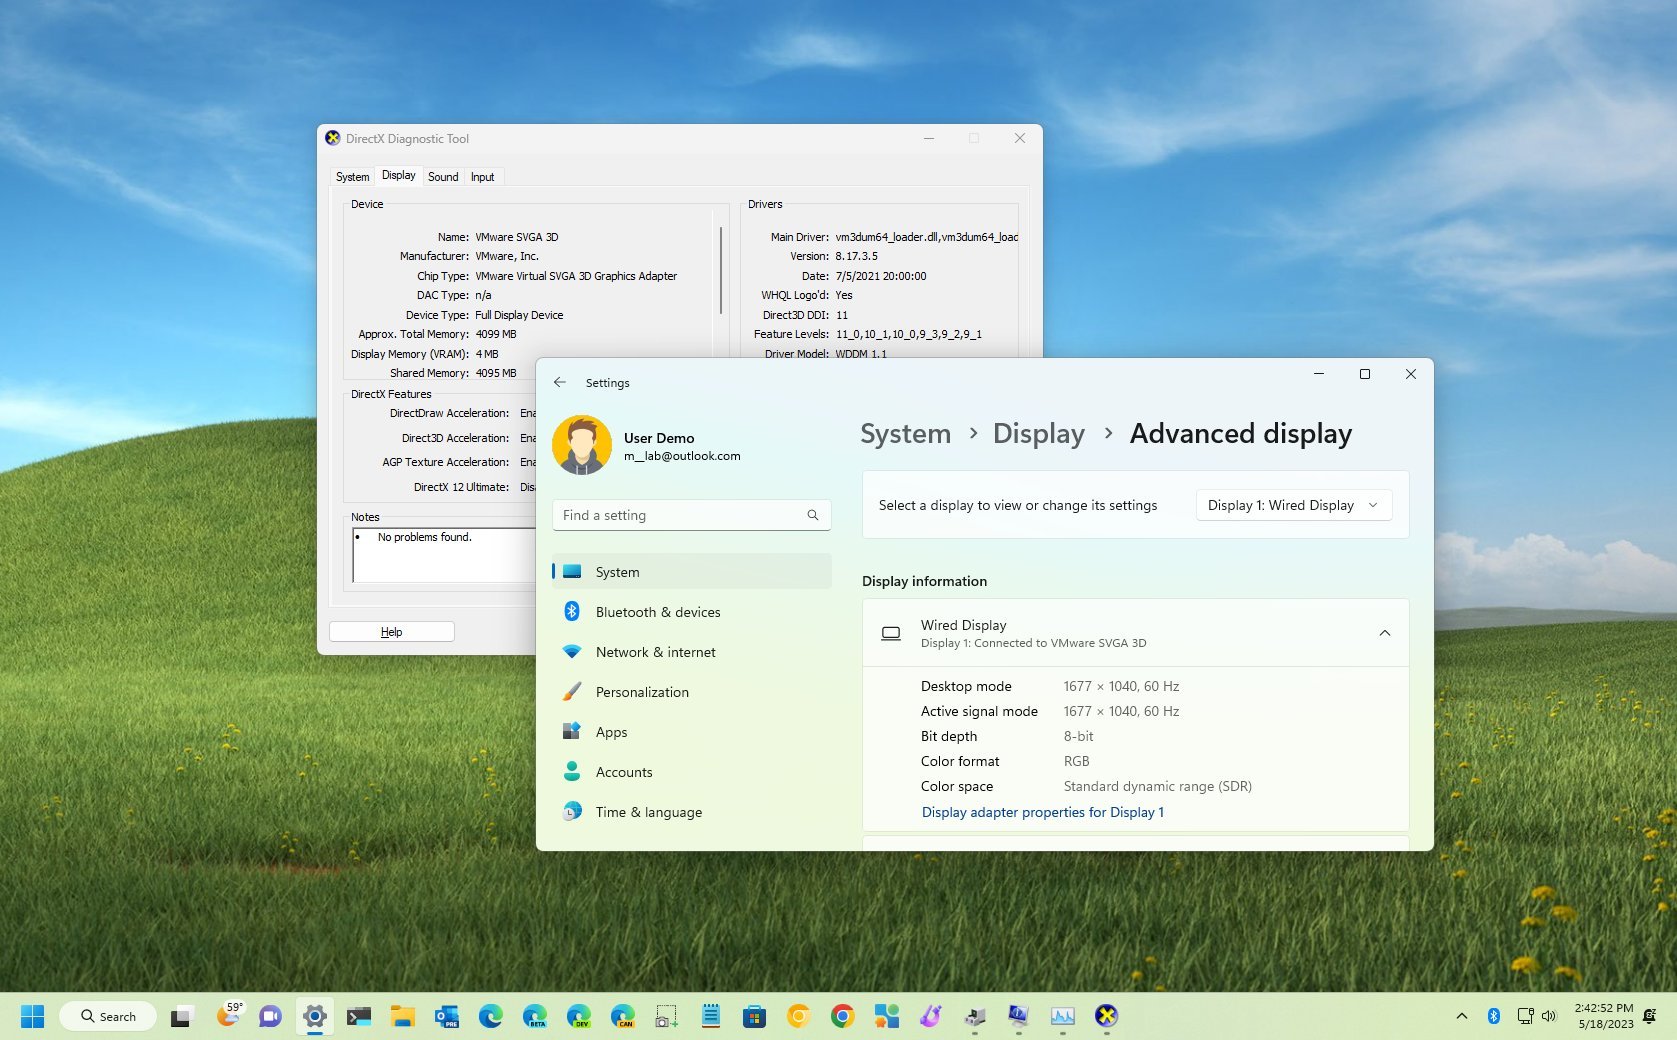
Use Directx Diagnostic Tool
The DirectX Diagnostic Tool is a simple way to check your GPU on Windows 11. It shows detailed information about your graphics hardware. This tool is built into Windows, so there is no need to download anything.
Using the DirectX Diagnostic Tool helps you find your GPU name and other details quickly. It also shows information about your display and drivers. Let’s see how to use this tool step by step.
Launch Dxdiag
Press the Windows key and R at the same time. This opens the Run dialog box. Type dxdiag into the box and press Enter. The DirectX Diagnostic Tool window will open. It may take a few seconds to load all the information.
Access Display Tab
At the top of the dxdiag window, find the tab labeled Display. Click on this tab to switch to the graphics information section. This area shows details about your GPU and display devices.
Read Gpu Information
Look under the Device section in the Display tab. Here, you will see the name of your graphics card. The manufacturer and chip type are also listed. You can check the display memory and driver version here too.
View Gpu In Settings
Checking your GPU in Windows 11 is simple using the Settings app. You can see detailed information about your graphics card without extra tools. This method is quick and works for all Windows 11 users.
Follow a few easy steps to find your GPU details right inside the system settings.
Open Windows Settings
Click the Start button or press the Windows key on your keyboard. Select the gear icon labeled “Settings” from the menu. This opens the main Windows Settings window.
Navigate To System And Display
In the Settings window, click on the “System” category. Then choose “Display” from the left sidebar. This section controls your screen and graphics options.
Find Graphics Settings
Scroll down in the Display settings page until you see “Graphics” or “Graphics settings.” Click on it to open detailed information about your GPU. Here, you will find the name and type of your graphics card.
Check Gpu With Task Manager
Checking your GPU on Windows 11 is simple using Task Manager. This tool gives a quick view of your computer’s hardware. It shows details about your GPU without needing extra software.
Task Manager is built into Windows 11. It helps monitor system performance and hardware status. You can find your GPU model and usage easily here.
Open Task Manager
Press Ctrl + Shift + Esc on your keyboard. This opens Task Manager directly. You can also right-click the taskbar and select Task Manager.
If Task Manager opens in a small view, click More details at the bottom left. This shows the full interface with all tabs.
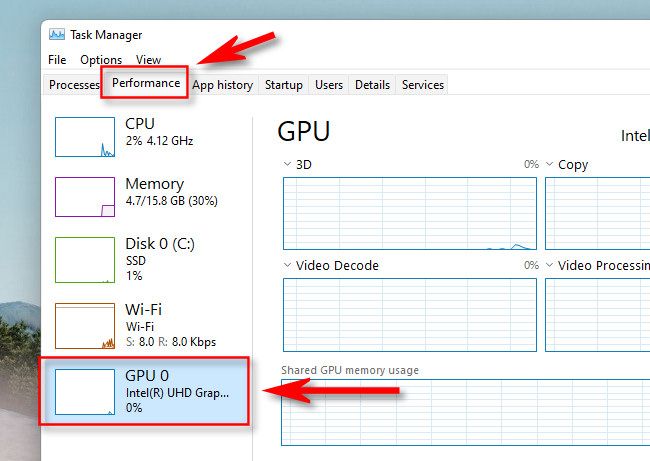
Go To Performance Tab
Click the Performance tab at the top. This tab shows your computer’s CPU, memory, disk, and GPU info. Each device has its own section here.
Look for the GPU section in the left panel. It may say GPU 0 or show the GPU name directly.
Locate Gpu Details
In the GPU section, you see the GPU model name at the top. This tells you the exact graphics card your PC uses.
You can also view GPU usage, memory, and driver version here. This helps understand your GPU’s performance and health.
Use Third-party Apps
Third-party apps give detailed information about your GPU. These tools show real-time data and extra details that Windows might not display. They help you check GPU model, usage, temperature, and memory with ease.
Many apps are free and easy to use. They suit beginners and tech-savvy users alike. Installing one app can save time and give clear insights about your graphics card.
Popular Gpu Monitoring Tools
Several apps are trusted for GPU monitoring. GPU-Z is a simple app that shows your GPU specs clearly. MSI Afterburner is popular for detailed monitoring and tweaking. HWMonitor tracks temperatures, voltages, and fan speeds. Speccy offers a full system overview including the GPU.
How To Install And Use Them
Download the app from its official website to avoid malware. Run the installer and follow on-screen instructions. After installation, launch the app to see your GPU info.
Most apps display GPU name, clock speed, and memory. Some offer graphs to watch GPU usage over time. Check the menus for extra tools like temperature alerts or fan controls.
Tips For Identifying Integrated Vs Dedicated Gpu
Knowing the type of GPU in your Windows 11 PC helps you understand its graphics power. Differentiating between integrated and dedicated GPUs guides you to use your system better. Both types serve different purposes and have unique features to spot.
Differences Between Gpus
Integrated GPUs share memory with the CPU. They use less power and create less heat. These GPUs suit everyday tasks like web browsing and watching videos.
Dedicated GPUs have their own memory. They deliver stronger performance for gaming and video editing. These GPUs are separate parts inside your computer.
How To Spot Each Type On Windows 11
Open Task Manager by pressing Ctrl + Shift + Esc. Click the Performance tab to see GPU information. Integrated GPUs usually show the CPU brand, like Intel or AMD.
Dedicated GPUs often show their brand and model, such as NVIDIA GeForce. You can also check Device Manager under Display Adapters. Here, you will find the exact name of your GPU.
Credit: garinfobahn.com
Frequently Asked Questions
How Do I Check My Gpu On Windows 11?
Open Task Manager by pressing Ctrl + Shift + Esc. Click the Performance tab, then select GPU to see details.
Can I Use Device Manager To Find My Gpu?
Yes, open Device Manager, expand Display adapters. Your GPU model will be listed under this category.
What Is The Quickest Way To View Gpu Specs?
Press Windows + R, type “dxdiag”, then hit Enter. Check the Display tab for detailed GPU information.
Does Windows 11 Display Gpu Info In Settings?
Yes, go to Settings > System > Display > Advanced display. Your GPU details appear under Display information.
Conclusion
Checking your GPU on Windows 11 is simple and quick. You can use built-in tools like Device Manager or Settings to find details. Knowing your GPU helps with gaming, software, and updates. No need for extra programs or tech skills.
Just follow the steps, and you will see your graphics card easily. Stay confident managing your PC hardware anytime.