
If your laptop is running slow or struggling with heavy tasks, upgrading the CPU can give it a powerful boost. But how do you replace the CPU in a laptop without causing damage?
You might think it’s complicated or risky, but with the right steps and tips, you can do it yourself and save time and money. In this guide, you’ll discover exactly what you need to know to swap out your laptop’s CPU safely and effectively.
Ready to bring new life to your laptop? Keep reading, and you’ll learn how to make it happen.
Preparing For The Replacement
Preparing for a CPU replacement in your laptop is a key step. It ensures the process goes smoothly and safely. Taking time to get ready helps avoid mistakes and damage. Follow these simple steps before starting the replacement.
Gathering Necessary Tools
Collect all tools needed for the job. A small screwdriver set is essential. Use an anti-static wrist strap to protect parts. A thermal paste applicator or small brush helps with heat transfer. Keep a clean cloth to wipe old paste. Having these tools ready saves time.
Choosing The Right Cpu
Select a CPU compatible with your laptop model. Check the socket type and power limits. Research the laptop’s motherboard specifications. Avoid CPUs that need new cooling systems. Pick a CPU that fits your needs and budget. This step prevents hardware conflicts and performance issues.
Backing Up Important Data
Save all important files before starting. Use an external drive or cloud storage. Back up photos, documents, and work files. This protects your data from loss during replacement. A backup ensures peace of mind throughout the process.
Credit: www.easeus.com
Disassembling The Laptop
Disassembling a laptop is the first step in replacing the CPU. It requires care and patience to avoid damage. This section guides you through the process clearly and simply.
Follow these steps carefully to prepare your laptop for the CPU replacement.
Powering Off And Unplugging
Turn off your laptop completely. Do not leave it in sleep or hibernate mode.
Unplug the power adapter from the laptop. Removing power prevents electric shock and damage.
Removing The Battery
Locate the battery release latch on the laptop’s underside. Slide it to unlock the battery.
Gently lift and remove the battery from its compartment. This step cuts off all power.
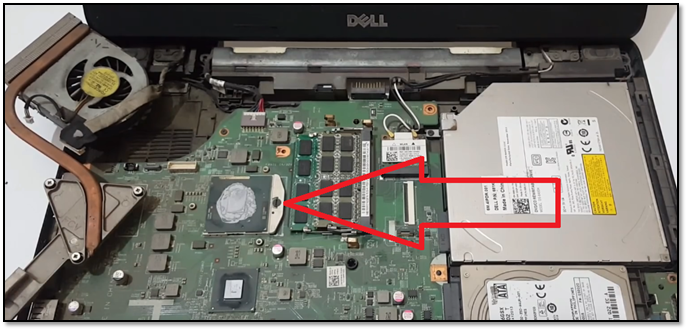
Accessing The Cpu Compartment
Flip the laptop over and find the screws on the bottom panel. Use a small screwdriver to remove them.
Carefully lift the panel to reveal the internal parts. The CPU is usually under a heat sink or fan.
Be gentle to avoid breaking clips or connectors inside the laptop.
Removing The Old Cpu
Removing the old CPU from a laptop is a careful process. It needs focus and patience to avoid damage. Start by preparing your workspace and gathering tools. Follow each step to safely remove the CPU without problems.
Detaching The Cooling System
The cooling system covers the CPU to keep it cool. Usually, it includes a fan and heat sink. First, unplug the fan cable from the motherboard. Then, unscrew the screws holding the heat sink in place. Lift the cooling system gently without forcing it. Avoid touching the thermal paste on the CPU or heat sink.
Unlocking The Cpu Socket
The CPU sits in a socket secured by a locking mechanism. Look for a small lever or screw next to the CPU socket. Carefully lift or turn this lever to unlock the CPU. Do not use too much force. The CPU should be loose and ready to remove once unlocked.
Safely Extracting The Cpu
Hold the CPU by its edges to avoid bending pins. Slowly lift the CPU straight up from the socket. Avoid twisting or sliding it out. Place the old CPU on an anti-static surface to protect it. Keep it safe if you plan to reuse or sell it later.

Credit: www.youtube.com
Installing The New Cpu
Installing the new CPU is a careful task. It needs focus and gentle hands. The CPU must fit perfectly to work well. Small mistakes can cause big problems. Follow each step to avoid trouble.
Take your time. Check every detail. Let’s start with placing the CPU correctly.
Aligning The Cpu Correctly
Find the small triangle on one corner of the CPU. Match it with the triangle on the socket. The pins or contacts must line up perfectly. Do not force the CPU into the socket. It should fit smoothly with light pressure. Proper alignment prevents damage and ensures good contact.
Securing The Cpu In Place
Once aligned, lower the CPU gently into the socket. Use the locking arm or lever to secure it. Make sure it clicks or locks firmly. A loose CPU can cause errors or stop the laptop from starting. Secure it but avoid pressing too hard.
Applying Thermal Paste
Thermal paste helps transfer heat from the CPU to the cooler. Clean the surface of the CPU and cooler with alcohol and a soft cloth. Apply a small pea-sized drop of thermal paste on the center of the CPU. Spread it evenly if needed, but one small drop usually works. Attach the heat sink or cooler carefully. This step keeps your CPU cool and running smoothly.
Reassembling The Laptop
Reassembling the laptop is a careful process. It ensures your laptop works well after replacing the CPU. Take your time and follow each step carefully. This will help avoid damage and keep your laptop safe.
Reattaching The Cooling System
Start by placing the cooling system back on the CPU. Align it carefully with the screw holes. Use the screws you removed earlier to secure it tightly. Make sure the thermal paste is spread evenly for good heat transfer. Connect the fan power cable to the motherboard. Check if the fan spins freely before closing the case.
Replacing The Battery
Next, put the battery back in its slot. Align the connectors properly to avoid any damage. Press the battery firmly until it clicks into place. Tighten any screws that hold the battery. Double-check the battery connection before moving to the next step.
Closing The Laptop Case
Finally, close the laptop case carefully. Align the edges and press down gently. Replace all screws to secure the case. Avoid over-tightening the screws to prevent cracks. Once closed, turn on your laptop to test the new CPU installation.

Credit: www.hp.com
Testing The New Cpu
Testing the new CPU is a vital step after replacement. It confirms the CPU works properly and the laptop runs smoothly. This step helps avoid future problems and ensures the laptop performs as expected. Follow these simple tests to verify your new CPU’s health and performance.
Powering On The Laptop
Turn on the laptop carefully after installing the new CPU. Listen for any unusual sounds or beeps. Check if the screen lights up and shows the startup logo. If the laptop does not power on, recheck the CPU installation and connections.
Checking Bios For Cpu Recognition
Enter the BIOS setup by pressing the correct key at startup. Look for the CPU information section. Confirm the BIOS shows the new CPU model and speed. This step ensures the system recognizes the new processor correctly. Save and exit the BIOS once confirmed.
Running Performance Tests
Run simple performance tests to check the CPU’s stability. Use built-in tools or free software to test CPU speed and temperature. Monitor the laptop for any crashes or overheating. These tests help confirm the CPU runs efficiently under load.
Troubleshooting Tips
Replacing a CPU in a laptop is a delicate task. Sometimes, things might not work perfectly after the upgrade. Troubleshooting helps fix common problems quickly. Here are simple tips to solve issues after installing a new CPU.
Handling Boot Issues
After replacing the CPU, the laptop may not start. Check if the CPU is seated properly in its socket. Ensure all cables and connectors are secure. Clear the CMOS by removing the battery or using a jumper. This resets the BIOS and can fix boot problems. Verify that the laptop’s BIOS supports the new CPU. Update the BIOS if needed before trying to boot again.
Addressing Overheating Problems
New CPUs may run hotter. Apply thermal paste correctly between the CPU and heat sink. Use the right amount, not too much or too little. Clean the cooling fan and vents to improve airflow. Check if the fan spins properly after reassembly. Monitor the CPU temperature with software tools. If overheating continues, consider better cooling solutions or reduce CPU speed.
Ensuring Software Compatibility
Some software may not work well with the new CPU. Update all drivers, especially chipset and graphics drivers. Install the latest operating system updates. Certain older programs might need patches or upgrades. Run a system compatibility check to identify issues. If problems persist, contact software support or look for alternatives.
Frequently Asked Questions
How Do I Know If My Laptop Cpu Is Replaceable?
Most laptops have soldered CPUs that can’t be replaced. Check your laptop’s service manual or manufacturer website. If the CPU is socketed, it is likely replaceable. Always verify compatibility before attempting a replacement.
What Tools Are Needed To Replace A Laptop Cpu?
You need a small Phillips screwdriver, thermal paste, and an anti-static wrist strap. A plastic pry tool helps open the laptop safely. Having a clean workspace is also essential to avoid losing screws.
How To Apply Thermal Paste Correctly On A New Cpu?
Apply a small pea-sized amount of thermal paste in the center of the CPU. Spread it evenly when you attach the heatsink. Too much paste can cause overheating, while too little reduces heat transfer.
Can Replacing A Cpu Void My Laptop Warranty?
Yes, opening your laptop and replacing the CPU often voids the warranty. Check your warranty terms before proceeding. If unsure, consider professional service to avoid losing coverage.
Conclusion
Replacing a laptop CPU takes patience and care. Follow each step slowly and double-check your work. Use the right tools and avoid rushing. Doing this can improve your laptop’s speed and performance. Stay safe by grounding yourself to prevent static damage.
With practice, this task becomes easier. Remember, small mistakes can cause big problems. Keep your workspace clean and organized. Now you know how to replace your laptop’s CPU confidently. Give your device a fresh start today.