
Replacing your motherboard and CPU might sound tricky, but it doesn’t have to be. If your computer is running slow or you want to upgrade to better parts, knowing how to swap these key components can save you time and money.
In this guide, you’ll get clear, step-by-step instructions that anyone can follow—even if you’re not a tech expert. By the end, you’ll feel confident handling your own hardware upgrades and giving your PC a fresh start. Ready to take control of your computer’s performance?
Let’s dive in.

Credit: www.youtube.com
Tools And Materials Needed
Replacing a motherboard and CPU requires the right tools and materials. These items make the process easier and safer. Preparing everything beforehand helps avoid mistakes. Below are the key tools and materials you will need.
Essential Tools
A Phillips screwdriver is a must-have for most screws inside your PC. A flathead screwdriver might help with some parts. An anti-static wrist strap prevents static damage to sensitive components. Tweezers assist in handling small screws or connectors. Thermal paste is needed to ensure proper heat transfer from the CPU to the cooler.
Compatible Components
Choose a motherboard compatible with your CPU socket type. Check RAM and power supply compatibility with the new motherboard. Ensure the CPU matches the motherboard’s chipset and socket. Using compatible parts avoids installation problems and system failures. Verify the BIOS supports your CPU model for smooth operation.
Safety Gear
Wear an anti-static wrist strap to protect electronics from static shock. Work on a non-conductive surface like a wooden table. Avoid carpeted areas to reduce static build-up. Keep your workspace clean and organized to prevent damage. Handle components gently to avoid physical harm.
Preparing Your Workspace
Preparing your workspace is the first step in replacing your motherboard and CPU. A well-prepared area helps avoid mistakes and protects your parts. It also makes the process smoother and faster.
Take time to create a safe and clean environment. This will help keep your new components safe and working well.
Clean And Organized Area
Choose a flat, stable surface to work on. Clear away any clutter or dust from the area. Use a clean cloth or mat to lay your parts on. Keep your tools and screws organized in small containers. This will prevent losing tiny pieces during the replacement.
Static Electricity Precautions
Static electricity can damage sensitive computer parts. Ground yourself by touching a metal object before handling parts. Use an anti-static wrist strap if available. Avoid working on carpet or other static-prone surfaces. Handle components by their edges and avoid touching contacts.
Power Off And Unplug
Turn off your computer completely before starting. Unplug the power cable from the wall outlet. Disconnect all peripherals like keyboard, mouse, and monitor. Double-check that no power is running through the system. This prevents electric shocks and protects the parts.
Removing The Old Motherboard And Cpu
Removing the old motherboard and CPU is the first step to upgrade your computer. This process requires care and attention to avoid damage. Take your time and follow the steps carefully.
Start by preparing a clean workspace. Ground yourself to prevent static electricity. Gather tools like a screwdriver and a container for screws.
Disconnecting Cables And Components
Begin by unplugging all cables connected to the motherboard. This includes power cables, data cables, and fan connectors. Handle cables gently to avoid breaking connectors.
Label cables if needed. This helps when connecting the new motherboard later. Remove any attached components like the CPU cooler or heat sink carefully.
Removing Expansion Cards
Next, remove expansion cards like the graphics card and sound card. Unscrew the card bracket from the case. Gently pull the card straight out of the slot.
Keep screws safe for reassembly. Avoid bending or touching the card’s gold connectors. Place cards in an anti-static bag if possible.
Unscrewing The Motherboard
Locate the screws that hold the motherboard to the case. Use a screwdriver to remove all screws. Keep them in a small container to avoid losing them.
Lift the motherboard carefully from the case. Avoid forcing it out. Check for any remaining cables or screws before fully removing it.
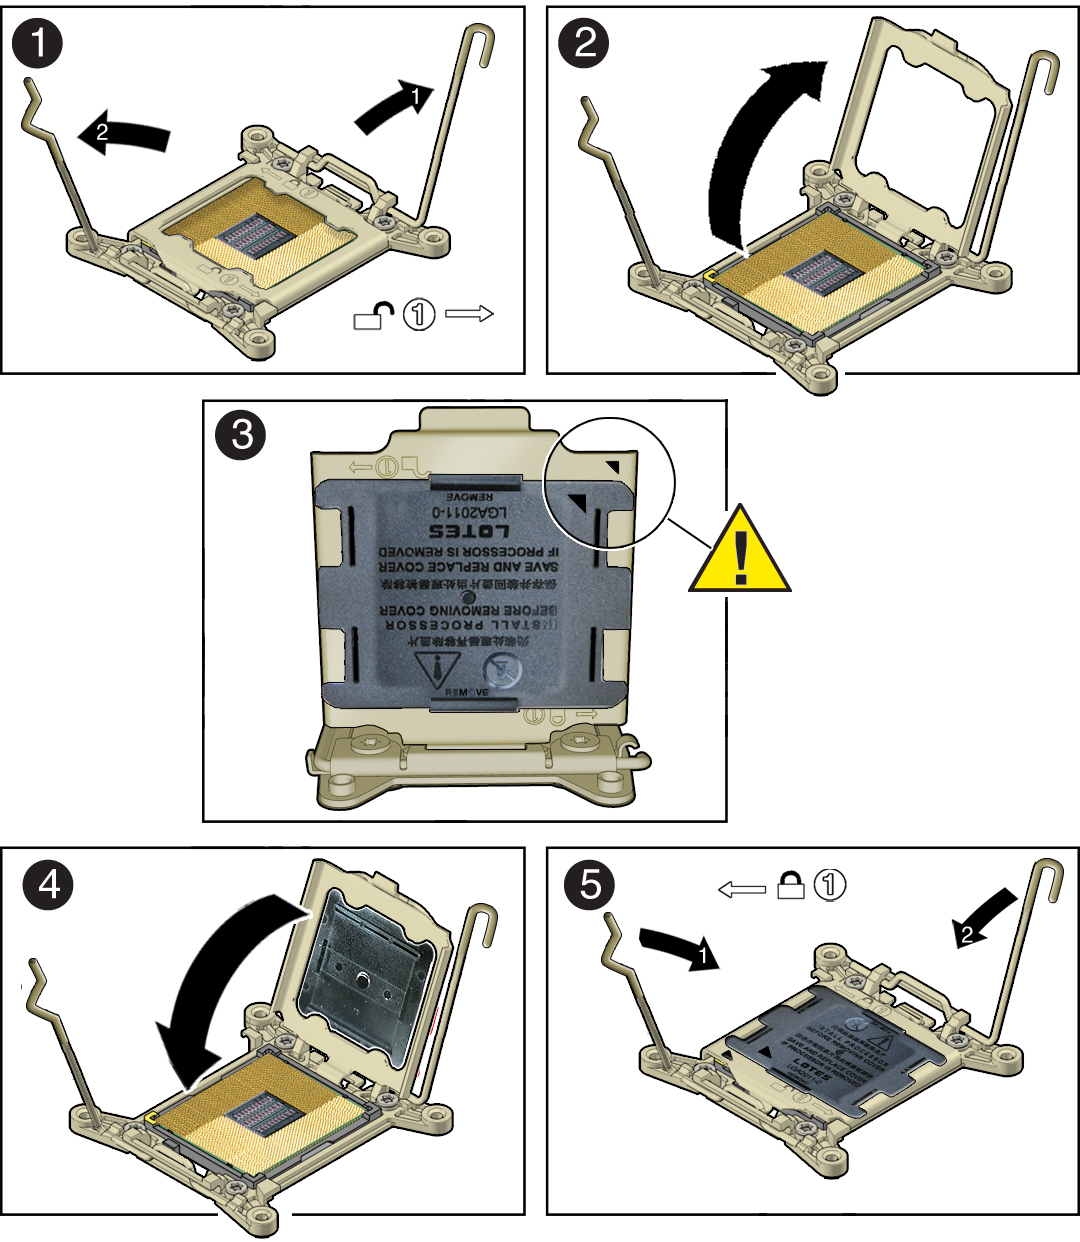
Extracting The Cpu
Find the CPU socket on the motherboard. Unlock the CPU retention lever or latch gently. Lift the CPU straight out of the socket.
Place the CPU on a clean, static-free surface. Avoid touching the pins or contacts. Clean off old thermal paste from the CPU and cooler before reuse.
Installing The New Cpu
Installing the new CPU is a key step when replacing your motherboard and processor. It requires care and attention to avoid damage. This process ensures your computer runs smoothly and efficiently.
Follow these steps to install the CPU correctly. Proper installation helps prevent overheating and hardware failure. Take your time and handle all parts gently.
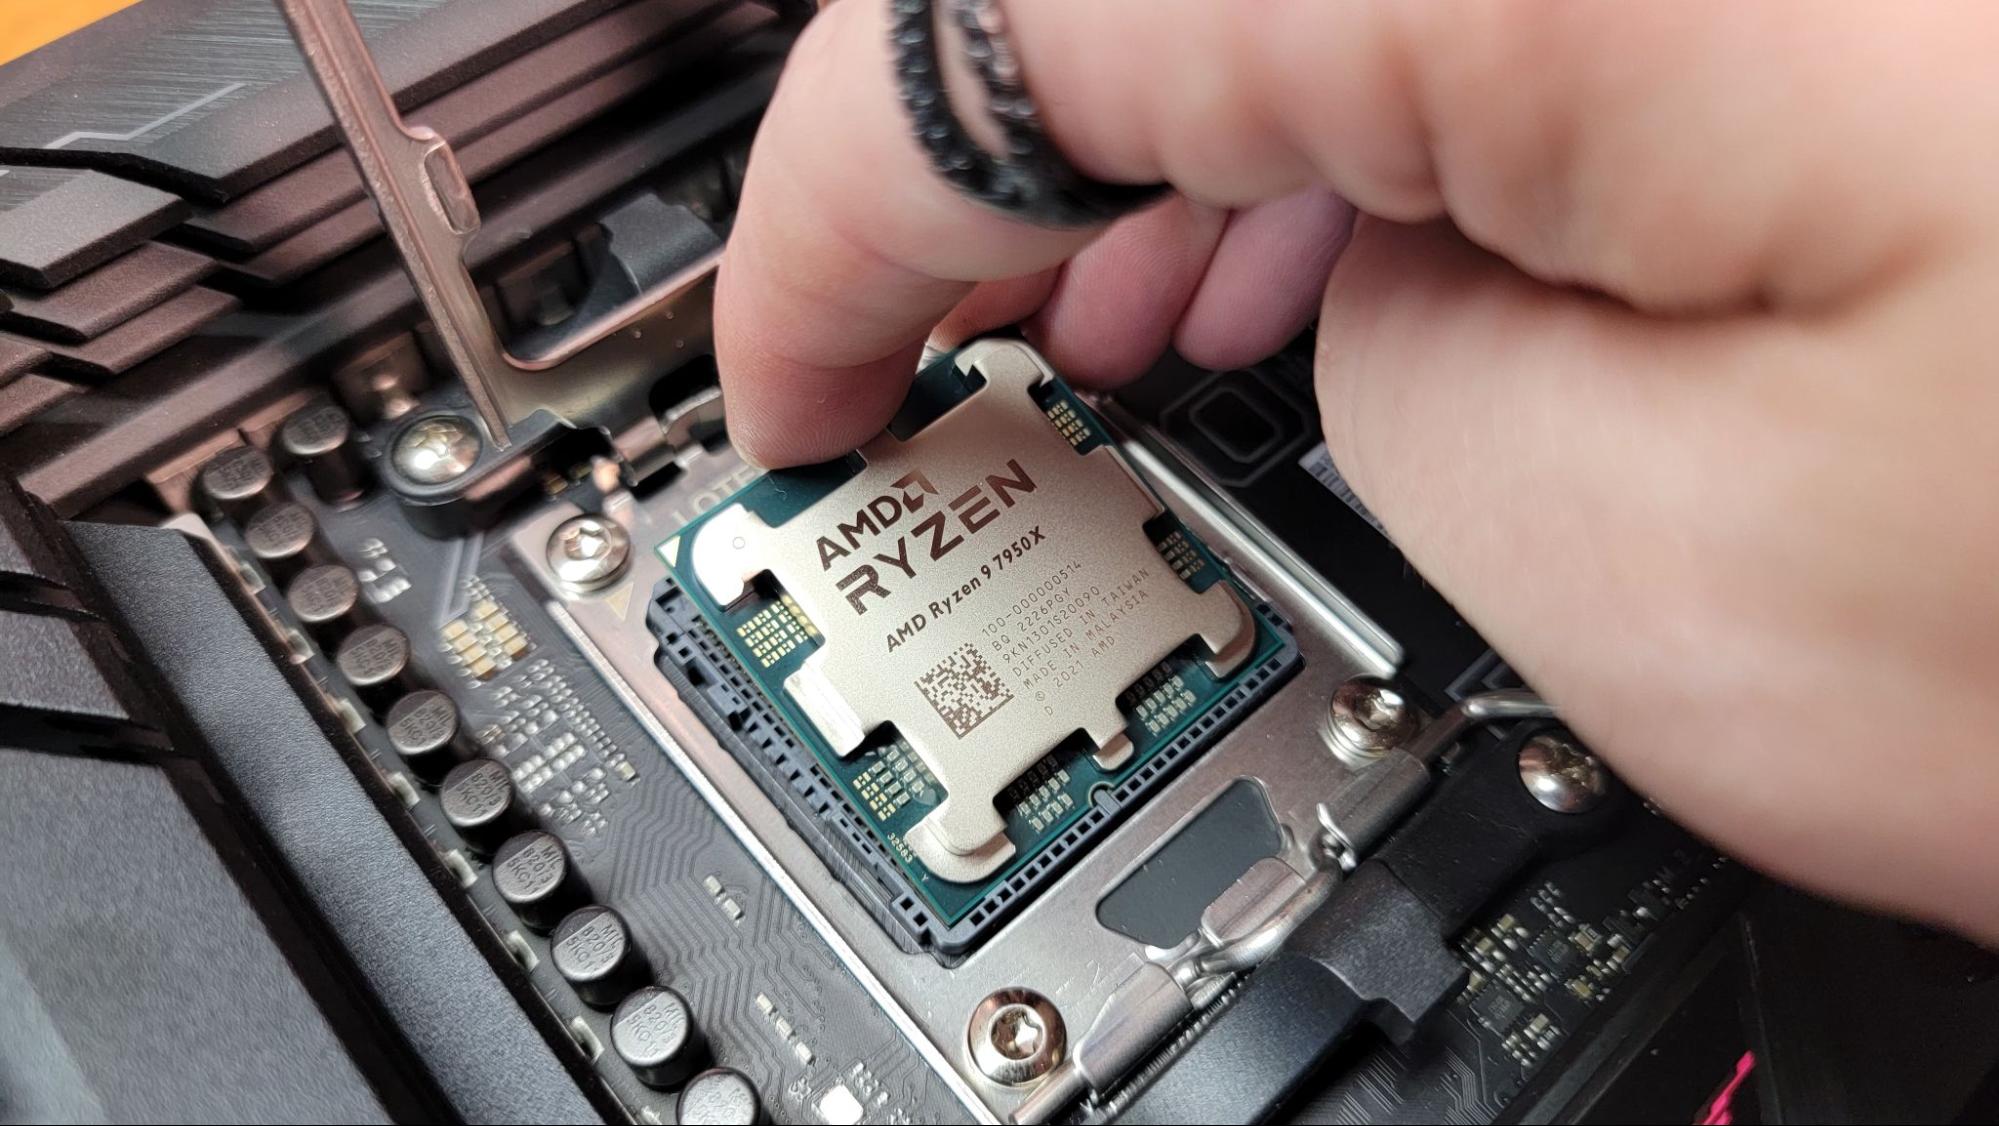
Aligning And Seating The Cpu
First, open the CPU socket on the motherboard by lifting the lever. Check the CPU for a small triangle or mark. Match this mark with the triangle on the socket. Place the CPU carefully into the socket without forcing it. It should fit perfectly and sit flat. Lower the lever to secure the CPU in place.
Applying Thermal Paste
Thermal paste helps transfer heat from the CPU to the cooler. Apply a small pea-sized amount of paste in the center of the CPU. Avoid spreading it yourself; the cooler will spread it evenly. Too much paste can cause overheating. Too little paste reduces heat transfer.
Attaching The Cpu Cooler
Place the cooler gently over the CPU. Align it with the mounting points on the motherboard. Press down evenly to spread the thermal paste. Secure the cooler with screws or clips. Connect the cooler’s fan cable to the motherboard header. This keeps your CPU cool and prevents damage.
Installing The New Motherboard
Installing the new motherboard is a key step in upgrading your computer. This process needs care and attention. A well-installed motherboard ensures your PC runs smoothly. Follow each step carefully to avoid damage and ensure proper setup.
Positioning And Securing The Motherboard
Place the motherboard inside the case, aligning it with the screw holes. Make sure the ports fit perfectly in the back panel. Use screws to secure the motherboard firmly. Do not overtighten screws to avoid damage.
Connecting Power Cables
Attach the main power cable from the power supply to the motherboard. Connect the 24-pin connector first for full power. Then, plug in the CPU power cable near the processor socket. Check each connection is tight and secure.
Reattaching Components And Cables
Reconnect all cables removed earlier, like SATA cables for storage drives. Plug in front panel connectors for USB, audio, and power buttons. Carefully reattach RAM sticks and expansion cards to their slots. Confirm each component is firmly seated and connected.
Post-installation Checks
After replacing your motherboard and CPU, checking everything is crucial. These post-installation checks help avoid problems and ensure smooth operation.
Follow each step carefully. It saves time and prevents damage to your new parts.
Verifying Connections
Check all cables and connectors are firmly in place. Power cables must connect to the motherboard securely. Data cables for storage drives need a tight fit.
Look at the CPU fan plug. It should be attached to the correct header. Double-check RAM modules. They must click into their slots fully.
Initial Power-on
Turn on your PC for the first time after installation. Watch for signs like fan movement and LED lights. No noise or lights may indicate a loose connection.
Listen for beep codes if your motherboard supports them. These sounds can signal hardware issues. If the system powers on smoothly, proceed to the next step.
Bios Setup And Configuration
Enter the BIOS setup by pressing the key shown during startup. Confirm the new CPU is detected correctly. Check the system date and time.
Adjust settings like boot order to match your needs. Save changes before exiting BIOS. This step ensures your PC runs correctly with the new hardware.
Troubleshooting Common Issues
Troubleshooting common issues after replacing your motherboard and CPU can save time and frustration. Problems may arise even if the installation seems correct. Understanding these issues helps fix them faster and ensures your system runs smoothly.
No Power Or Boot Failures
No power or boot failures are frequent problems after replacement. Check if the power cables are connected securely. Make sure the power supply is switched on and working. Verify the CPU and motherboard are seated properly in their sockets. Reset the CMOS by removing and reinserting the battery. Listen for beep codes; they can indicate the exact problem. Try booting with minimal hardware to isolate the issue.
Hardware Compatibility Problems
Compatibility issues can prevent your system from starting. Confirm the CPU and motherboard support each other. Check the motherboard manual for the supported CPU list. Ensure the RAM type and speed match the motherboard specifications. Update the BIOS if the CPU is newer than the motherboard. Use compatible power connectors for the CPU and motherboard. Incorrect hardware combinations often cause errors or failure to boot.
Overheating And Performance Issues
Overheating can damage your new CPU quickly. Apply thermal paste correctly between the CPU and cooler. Check that the CPU cooler is firmly attached. Ensure all fans are working and airflow is clear. Monitor CPU temperatures using BIOS or software tools. Poor cooling leads to throttling and poor performance. Replace or upgrade cooling if temperatures stay high.
Credit: docs.oracle.com
Credit: www.tomshardware.com
Frequently Asked Questions
How Do I Safely Remove The Old Motherboard?
First, power off and unplug your PC. Disconnect all cables and components. Unscrew the motherboard carefully. Handle it by the edges to avoid static damage. Store it safely if needed for backup.
What Tools Are Needed To Replace Motherboard And Cpu?
You will need a Phillips screwdriver, thermal paste, an anti-static wrist strap, and a clean workspace. These tools help avoid damage and ensure proper installation.
How To Apply Thermal Paste Correctly On The Cpu?
Apply a small pea-sized amount of thermal paste in the center of the CPU. When the cooler is mounted, it spreads evenly. Avoid using too much paste to prevent overheating.
Can I Reuse My Old Cpu With A New Motherboard?
It depends on the socket compatibility. Check if the new motherboard supports your CPU’s socket type. Incompatible sockets require a new CPU.
Conclusion
Replacing a motherboard and CPU can seem hard at first. Take your time and follow each step carefully. Double-check connections before powering on your computer. This helps avoid common mistakes and damage. With patience and care, your PC will run smoothly again.
Remember, practice builds confidence in hardware work. Keep your tools ready and work in a clean space. Now, you have the basics to replace key parts safely. Keep learning and improving your computer skills.