
Is your computer running hotter than usual or making more noise? The culprit might be old or dried-out CPU thermal paste.
Replacing the thermal paste can quickly improve your CPU’s cooling and boost its performance. But if you’ve never done it before, the idea might seem tricky or risky. Don’t worry—this guide will walk you through each step in a simple, clear way.
By the end, you’ll know exactly how to replace your CPU thermal paste safely and effectively, giving your system a fresh start. Ready to keep your CPU cool and running smoothly? Let’s get started!

Credit: tehnoblog.org
Signs Of Old Thermal Paste
Thermal paste helps keep your CPU cool by transferring heat to the cooler. Over time, the paste can dry out or lose its effectiveness. This causes problems with your computer’s temperature and performance. Knowing the signs of old thermal paste helps you decide when to replace it.
Overheating Symptoms
Your computer feels hotter than usual. Fans run loudly and often. The CPU temperature rises quickly during tasks. Sudden shutdowns or restarts may happen to protect the CPU. These are common signs of old thermal paste causing poor heat transfer.
Reduced Performance
The CPU slows down to avoid damage from heat. Programs take longer to open or run. Games and videos lag or stutter. You might notice your system is less responsive. This slowdown often points to overheating issues linked to worn-out thermal paste.
Visual Inspection
Open your computer case carefully. Remove the CPU cooler to see the paste. Old thermal paste looks dry, cracked, or flaky. It may appear hard or crumbly instead of smooth. Clean off the old paste and apply a fresh layer for better cooling.

Credit: www.instructables.com
Tools And Materials Needed
Replacing CPU thermal paste requires specific tools and materials. Having the right items makes the process smooth and effective. Prepare everything before starting to avoid interruptions.
Thermal Paste Types
Thermal paste comes in different types. Most common are silicone-based, metal-based, and ceramic-based. Silicone paste is easy to use and cheap. Metal-based paste offers better heat transfer but needs careful handling. Ceramic paste is safe and works well for most CPUs. Choose one that fits your needs and budget.
Cleaning Supplies
Cleaning the old thermal paste is important. Use isopropyl alcohol with 70% or higher concentration. Soft, lint-free cloth or coffee filters help remove residue gently. Avoid paper towels as they leave fibers. Cotton swabs are good for small spots. Clean carefully to avoid damage.
Application Tools
You need a small plastic spatula or a card to spread the paste evenly. Some thermal paste tubes come with a spreader. A pair of gloves keeps oils from your skin off the CPU. Have a screwdriver ready to remove the CPU cooler. Keep tools organized to save time.
Preparing Your Workspace
Preparing your workspace is the first step to replace CPU thermal paste safely. A clean and organized area helps prevent mistakes. It also protects your computer parts from damage. Take time to set up everything before you start. This makes the process smoother and faster.
Static Safety Measures
Static electricity can harm your CPU and other parts. Use an anti-static wrist strap to stop static build-up. If you do not have one, touch a metal object to discharge static. Avoid working on carpet or near fabrics that create static. Keep your workspace clean and dry to reduce static risks.
Organizing Components
Place all tools and parts in one spot. Use small containers or trays to hold screws and small pieces. Label each part if possible. This helps you remember where everything goes. Clear space around your work area to avoid losing components. Organizing saves time and prevents frustration.
Powering Down Properly
Turn off your computer fully before opening the case. Unplug the power cable from the wall socket. Press the power button for a few seconds to discharge any leftover power. Wait a few minutes for components to cool down. This step protects you and your hardware from damage.
Credit: www.youtube.com
Removing The Old Thermal Paste
Removing the old thermal paste is a key step before applying a new layer. It ensures good contact between the CPU and cooler. Old paste can dry out and lose effectiveness. Cleaning it properly helps keep your CPU cool and safe.
Detaching The Cpu Cooler
Start by turning off your computer and unplugging it. Find the screws or clips holding the CPU cooler in place. Carefully loosen and remove them. Gently lift the cooler straight up. Avoid twisting or pulling sideways to prevent damage.
Cleaning With Isopropyl Alcohol
Use a soft cloth or coffee filter with isopropyl alcohol. Gently wipe the old thermal paste off the CPU surface. Also clean the bottom of the cooler. Repeat until all residue is gone. Let it dry for a minute before moving on.
Avoiding Damage
Handle the CPU and cooler with care. Avoid touching the CPU pins or contacts. Use only isopropyl alcohol with 90% or higher purity. Do not use water or other cleaners. Work in a static-free area to protect your parts.
Applying New Thermal Paste
Applying new thermal paste is a crucial step in keeping your CPU cool. It helps fill tiny gaps between the CPU and the cooler. This improves heat transfer and prevents overheating. Doing this correctly ensures your computer runs smoothly and lasts longer.
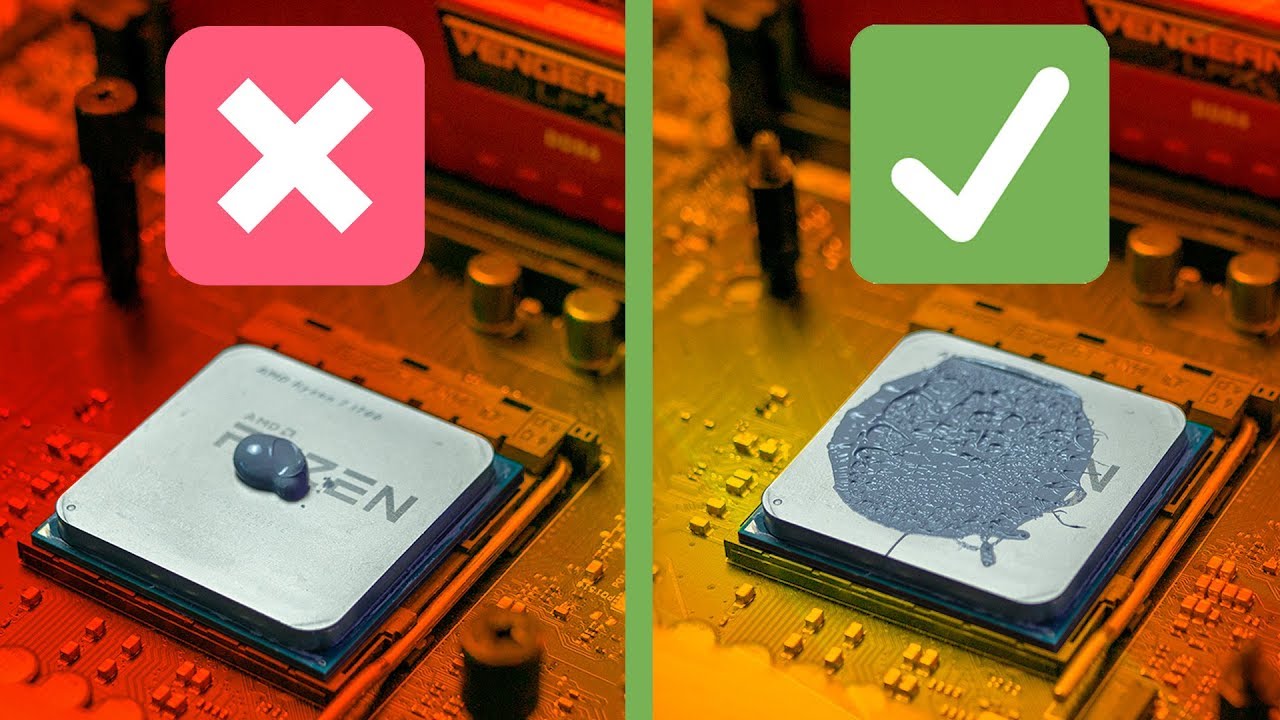
Correct Amount To Use
Use a small pea-sized amount of thermal paste. Too much paste can block airflow. Too little paste leaves gaps that reduce cooling. The right amount covers the CPU surface evenly once pressed.
Application Techniques
Place the paste in the center of the CPU. Avoid spreading it before attaching the cooler. When you press the cooler down, the paste spreads naturally. This method avoids air bubbles that reduce cooling.
Spreading Methods
Some prefer to spread the paste with a plastic card or finger. This can help cover the surface evenly. Use a light touch to avoid air pockets. Spreading works well if you want full coverage before attaching the cooler.
Reattaching The Cpu Cooler
Reattaching the CPU cooler is a key step after applying new thermal paste. It helps keep the CPU cool and ensures your computer runs smoothly. Doing this carefully avoids damage and keeps everything working well.
Aligning Properly
Place the cooler gently on the CPU. Check that the cooler fits the socket. Make sure the screws line up with the holes. Proper alignment prevents pressure on the CPU. Take your time to avoid mistakes.
Securing Evenly
Tighten the screws slowly and in a cross pattern. This means tightening opposite screws step-by-step. It spreads the pressure evenly on the CPU surface. Avoid tightening one screw fully at once. This method keeps the cooler stable and safe.
Testing Stability
After securing, check if the cooler feels firm. Try to move it gently to see if it shifts. A loose cooler can cause overheating. Turn on your computer and watch the temperature. Stable cooling means proper installation and safe CPU use.
Testing Cooling Performance
Testing cooling performance is key after replacing CPU thermal paste. It shows if the paste spreads heat well. Proper testing helps avoid overheating problems. It ensures your CPU runs cooler and lasts longer.
Monitoring Temperatures
Use temperature monitoring software to check CPU heat. Programs like HWMonitor or Core Temp work well. Watch temperatures while the computer is idle and under load. Note the highest temperatures reached during tests. This data helps see if thermal paste works properly.
Benchmarking Tools
Run stress tests to push your CPU hard. Tools like Prime95 or AIDA64 create heavy workloads. These tests show how well the cooling handles heat. Watch the temperature rise during the test. Stop if the CPU gets too hot to avoid damage.
Adjusting If Needed
If temperatures stay high, check the paste application again. Too much or too little paste can cause poor heat transfer. Reapply a thin, even layer of thermal paste. Also, check if the cooler is mounted tightly. Tighten screws carefully to improve contact.
Maintenance Tips For Longevity
Keeping your CPU cool is key for a long-lasting computer. Thermal paste helps move heat from the CPU to the cooler. Over time, the paste can dry out or lose its power. This section shows simple tips to maintain and extend the life of your thermal paste and CPU.
Regular Checks
Check your CPU temperature often. High temperatures can signal paste problems. Use software tools to see how hot your CPU gets. Watch for sudden spikes or constant heat. Clean dust from the cooler and fan to keep airflow strong. A clean system runs cooler and lasts longer.
When To Reapply
Thermal paste does not last forever. Reapply it every 2 to 3 years. If you notice high CPU temperatures or system crashes, consider reapplying sooner. Always clean off the old paste before adding new. A fresh layer helps heat move better and keeps the CPU safe.
Avoiding Common Mistakes
Do not use too much thermal paste; a small pea-sized amount is enough. Too much paste can block heat flow. Do not skip cleaning the old paste. Use isopropyl alcohol and a soft cloth for cleaning. Avoid touching the CPU or cooler surface with bare hands. Oils from skin can reduce paste effectiveness.
Frequently Asked Questions
What Is The Best Thermal Paste For Cpu Replacement?
The best thermal paste offers excellent heat transfer and easy application. Popular options include Arctic Silver 5, Noctua NT-H1, and Thermal Grizzly Kryonaut. Choose a paste with high thermal conductivity for optimal CPU cooling and performance.
How Often Should I Replace Cpu Thermal Paste?
Replacing thermal paste every 2 to 3 years is recommended. This prevents drying and maintains effective heat transfer. If your CPU temperatures rise significantly, it’s a good sign to reapply thermal paste immediately.
Can I Reuse Old Cpu Thermal Paste?
Reusing old thermal paste is not recommended. Old paste can dry out and reduce heat transfer efficiency. Always clean the old paste completely before applying a fresh, even layer for best cooling results.
How Much Thermal Paste Should I Apply On The Cpu?
Apply a pea-sized amount of thermal paste at the center of the CPU. This size ensures proper coverage without excess paste spilling over. Too much paste can hinder heat transfer and damage components.
Conclusion
Replacing CPU thermal paste keeps your computer cool and running well. Clean the old paste fully before applying new paste. Use a small amount to avoid mess and ensure good contact. Tighten the cooler evenly to spread the paste right.
Regular maintenance like this helps prevent overheating and slows down wear. Stay patient and careful during the process. Your CPU will thank you with better performance and longer life. Simple steps, big benefits. Give it a try to keep your PC healthy.