
Removing the CPU from your motherboard might seem tricky, but with the right steps, you can do it safely and easily. Whether you’re upgrading your computer or fixing a problem, knowing how to handle your CPU is essential.
In this guide, you’ll learn exactly what to do, what tools you need, and common mistakes to avoid. By the end, you’ll feel confident taking your CPU out without risking damage. Ready to get started? Let’s dive in and make this process simple for you.

Credit: softwareg.com.au
Prepare Your Workspace
Preparing your workspace is the first step to safely remove a CPU from the motherboard. A clean and organized area helps prevent damage and makes the process easier. Taking time to set up properly can save you frustration later.
Gather Necessary Tools
Collect all tools before starting. You will need a screwdriver, usually a Phillips head. Have a small container to hold screws. Use a soft cloth to place the motherboard on. Avoid using sharp or heavy objects near the CPU.
Ensure Static-free Environment
Static electricity can harm computer parts. Work on a non-carpeted surface to reduce static. Use an anti-static wrist strap if possible. Touch a metal object to discharge static from your body. Keep parts in anti-static bags until use.

Credit: www.youtube.com
Power Down And Unplug
Before removing the CPU from the motherboard, powering down and unplugging your computer is crucial. This step protects both you and your components from electrical damage. It ensures a safe environment to work inside your computer case.
Always handle computer parts with care. Electricity can harm sensitive parts. Taking time to power off and disconnect prevents accidents and data loss.
Shut Down The Computer
Turn off your computer using the operating system’s shutdown option. Avoid pressing the power button directly. Wait until all lights on the case turn off. This guarantees the system is fully powered down. Do not open the case while the computer is still on.
Disconnect All Cables
Unplug the power cable from the back of the computer. Remove all other cables, including monitor, keyboard, mouse, and USB devices. Clearing cables gives better access and prevents accidental pulls. Double-check that no power source is connected before opening the case.
Open The Computer Case
Opening the computer case is the first step to remove the CPU. It gives you access to the internal parts. Handle the case carefully to avoid damage or static electricity. Follow safety steps before touching any components.
Keep your workspace clean and organized. This makes the process easier and safer.
Remove Side Panel
Most computer cases have a removable side panel. Check for screws on the back of the case. Use a screwdriver to take them out. Some cases have clips or latches instead of screws. Gently slide or lift the panel off to expose the inside.
Place the panel aside in a safe spot. Avoid touching any parts inside yet.
Locate The Motherboard
The motherboard is a large circuit board inside the case. It holds the CPU, RAM, and other parts. Look for a big flat board with many small chips and slots. The CPU is usually under a fan or heatsink on the motherboard.
Identifying the motherboard helps you find the CPU socket quickly. This makes the next steps smoother and faster.
Remove The Cooling System
Removing the cooling system is the key step before taking out the CPU. The cooling system keeps the CPU cool during use. It usually consists of a fan and a heatsink. These parts must be carefully detached to avoid damage.
Detach Fans And Heatsink
First, unplug the fan’s power cable from the motherboard. This cable is small and easy to miss. Next, unscrew or unclip the heatsink from the CPU socket. Be gentle to prevent harming the motherboard or CPU. The heatsink may feel stuck due to thermal paste. Twist it slightly to break the seal. Lift the fan and heatsink off slowly and evenly.
Clean Thermal Paste Residue
Thermal paste sticks the heatsink to the CPU. After removal, some paste remains on both parts. Use isopropyl alcohol and a soft cloth or paper towel. Gently wipe the residue until surfaces are clean. This step ensures proper cooling when reassembling. Avoid scratching or damaging the CPU surface.
Unlock The Cpu Socket
The first step in removing the CPU from the motherboard is unlocking the CPU socket. This step is important to safely release the processor without damage. The socket holds the CPU firmly in place using a locking mechanism. Understanding how to unlock it makes the process smooth and secure.
Take your time to identify the parts of the socket. Careful handling helps avoid bending pins or breaking components. Let’s look at how to find and release the locking lever.
Identify The Socket Lever
Look closely at the CPU socket. You will see a small metal lever on one side. This lever controls the locking mechanism. It is usually thin and flat with a small curve at the end. The lever may have a tiny hook that holds it down.
This lever keeps the CPU locked in place. It moves up and down to lock or unlock the socket. Find this lever before trying to open the socket. Do not force anything without locating the lever first.
Release The Locking Mechanism
Gently lift the socket lever upward. Use your fingers to pull the lever away from the socket. The lever will rise a little and release the hook. Once the hook is free, the socket locking mechanism is unlocked.
Do not push or bend the lever too hard. It only needs a small lift to release the CPU. After unlocking, the CPU can be safely lifted from the socket. Handle the CPU carefully to avoid damage.
Carefully Remove The Cpu
Removing the CPU from the motherboard needs care and attention. A wrong move can damage the CPU or the socket. Follow these steps to remove the CPU safely and correctly.
Lift Cpu Straight Out
First, unlock the CPU socket lever gently. Do not force it. Once unlocked, hold the CPU by its edges. Lift the CPU straight up without tilting it. Tilting can bend the pins or damage the socket. Take your time and lift slowly. Keep your hands steady to avoid dropping the CPU.
Avoid Touching Pins
The underside of the CPU has many tiny pins. These pins are very fragile and easy to bend. Never touch the pins with your fingers. Oils and dirt can cause poor contact later. Hold the CPU only by its top edges. Keep the pins clean and safe. If any pins bend, the CPU might not work properly.
Store Or Replace The Cpu
After removing the CPU from the motherboard, you need to decide what to do next. You can store the CPU safely for future use or prepare it for a new installation. Proper care helps keep the CPU working well and prevents damage.
Use Protective Case
Always place the CPU in a protective case right after removal. This case shields the pins from bending or breaking. Avoid touching the pins directly. Keep the CPU in a dry, dust-free place inside the case. This simple step protects your CPU from physical harm and dust buildup.
Prepare For New Installation
Before installing a new CPU, clean the socket on the motherboard carefully. Remove old thermal paste from the CPU and heatsink using a soft cloth with isopropyl alcohol. Check the new CPU for any dirt or damage. Handle it by the edges only. Align the CPU correctly with the socket to avoid bending pins. These steps ensure a smooth and safe new installation.
Reassemble The System
After removing the CPU, you need to reassemble the system carefully. This step ensures your computer works properly again. Take your time and follow each part closely. Proper reassembly protects your hardware and avoids damage.
Reattach Cooling System
Place the cooling system back on the CPU socket. Make sure the thermal paste is fresh or cleaned before reapplying. Align the cooler correctly over the CPU. Secure the cooler using the screws or clips provided. Connect the fan cable to the motherboard header. This step keeps your CPU cool and prevents overheating.
Close The Case And Reconnect
After securing the cooling system, close your computer case. Fasten all screws to hold the case firmly. Reconnect all cables to the power supply and peripherals. Check all connections to avoid loose wires. Power on the system to test if it works. Your computer should start without errors now.
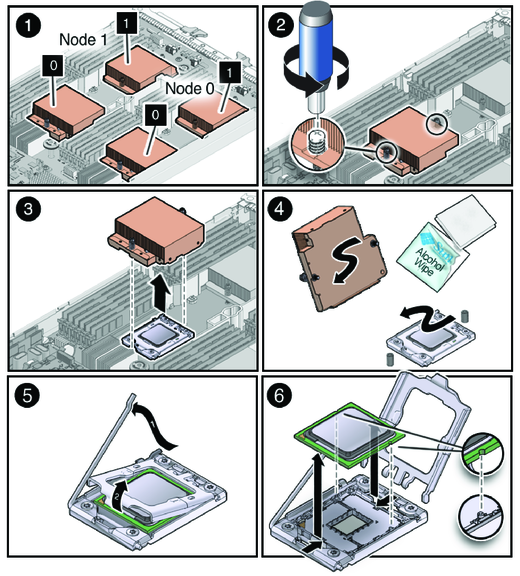
Credit: docs.oracle.com
Frequently Asked Questions
How Do I Safely Remove The Cpu From The Motherboard?
To safely remove the CPU, first power off and unplug the PC. Release the CPU socket lever carefully. Gently lift the CPU straight out without bending pins. Handle the CPU by its edges to avoid damage or static discharge.
What Tools Are Needed To Remove A Cpu From Motherboard?
Typically, no special tools are required to remove a CPU. You only need a clean, static-free workspace. A screwdriver may be needed to remove the case or cooler. Always ground yourself to prevent static damage.
Can Removing The Cpu Damage The Motherboard?
If done carefully, removing the CPU will not damage the motherboard. Avoid force or bending pins during removal. Improper handling or static discharge can harm components, so take precautions and work slowly.
How Do I Unlock The Cpu Socket Lever?
The CPU socket lever is usually a small metal arm. Gently push it down and away from the socket to release. Lift it slowly to unlock the CPU without applying excessive force.
Conclusion
Removing a CPU from the motherboard is simple with care and patience. Always turn off the power and ground yourself first. Unlock the CPU socket gently to avoid damage. Lift the CPU straight up without force. Keep the CPU safe in an anti-static bag or container.
Taking these steps helps protect your computer parts. Now, you can move on to upgrades or repairs with confidence. Practice makes this process easier over time. Stay careful, and your hardware will last longer.