
Are you looking to remove your computer’s RAM memory but don’t know where to start? Whether you want to upgrade your system or troubleshoot a problem, removing RAM can seem tricky if you’ve never done it before.
Don’t worry—this guide will walk you through the exact steps you need to take. By the end, you’ll feel confident handling your computer’s memory safely and easily. Keep reading to discover how simple it really is to remove your RAM and improve your device’s performance.
Tools Needed
Removing RAM memory requires a few simple tools. These tools help you work safely and easily. Having the right tools makes the process smooth and quick.
Using proper tools also prevents damage to your computer parts. Some tools are common and easy to find. Prepare them before you start removing RAM.
Anti-static Wrist Strap
This strap stops static electricity from harming computer parts. Static can damage delicate memory chips. Wear the strap on your wrist and clip it to a metal part of the case.
Screwdriver
A small Phillips-head screwdriver helps open the computer case. Most cases use screws to hold panels. Keep the screwdriver handy to remove these screws quickly.
Plastic Pry Tool
A plastic pry tool helps open clips or remove covers without scratching. Metal tools can cause damage. Use plastic tools to work gently around sensitive parts.
Clean Cloth
A soft, clean cloth removes dust from inside the case. Dust can block airflow and cause overheating. Wipe surfaces carefully before and after removing RAM.
Credit: www.avadirect.com
Preparing Your Workspace
Preparing your workspace is the first step to safely remove RAM memory. A clean and organized area helps avoid damage to your computer parts. Taking time to set up the right space makes the process smoother and safer.
Gather all tools and materials before starting. This prevents interruptions and keeps your focus on the task.
Choose A Clean, Flat Surface
Select a desk or table with enough room to spread out parts. A flat surface stops small pieces from rolling away. Clean the area to remove dust and dirt that could harm your computer.
Ensure Proper Lighting
Good lighting helps you see small components clearly. Use a bright lamp or natural light. Avoid dark or shadowy places that cause eye strain and mistakes.
Gather Necessary Tools
Prepare a screwdriver, anti-static wrist strap, and a soft cloth. These tools protect your computer and help remove RAM safely. Having them ready avoids last-minute searching.
Ground Yourself To Prevent Static
Static electricity can damage computer parts. Wear an anti-static wrist strap or touch a metal object to release static. This simple step protects your RAM and motherboard.
Organize Your Components
Keep screws and small parts in a container or on a magnetic pad. This stops loss and keeps everything in one place. Label parts if needed for easier reassembly.
Powering Down Safely
Powering down your computer safely is the first step before removing RAM memory. This step prevents damage to your hardware and protects your data. Turning off the device properly ensures no electricity runs through the system during the process.
It is important to avoid sudden power cuts or unplugging the device directly. Such actions can cause electrical shorts or data loss. Taking a moment to shut down correctly saves you from potential problems later.
Shutting Down The Operating System
Click the Start menu or power icon on your screen. Select the option to shut down the computer fully. Wait until the screen turns off completely before proceeding.
Unplugging The Power Cable
After the system is off, disconnect the power cable from the wall outlet or computer. This step stops any electricity flow. It adds an extra layer of safety before opening the computer case.
Removing The Laptop Battery
If working on a laptop, remove its battery next. This prevents power from running through internal parts. Press the battery release latch and gently pull the battery out.
Grounding Yourself To Avoid Static
Static electricity can damage sensitive computer parts like RAM. Touch a metal object or use an anti-static wristband before opening the case. This action discharges any built-up static from your body.
Credit: www.crucial.com
Opening The Pc Case
Opening the PC case is the first step to removing RAM memory. This step gives you access to the computer’s internal parts. Careful handling is important to avoid damage or injury.
Make sure the PC is turned off and unplugged from the power source. This prevents electric shock and protects the hardware. Work on a clean, flat surface to keep screws and parts safe.
Gather The Right Tools
You usually need a screwdriver to open most PC cases. Check the screws on the back panel. Some cases use Phillips head screws, while others use thumbscrews that can be removed by hand.
Remove The Side Panel
Locate the screws holding the side panel in place. Unscrew them carefully and set them aside. Slide or pull the panel away gently. Some cases have clips; press them softly to release the panel.
Check For Cables And Obstructions
Look inside the case for cables near the panel. Disconnect any cables blocking access to the RAM slots. Avoid pulling on wires directly; use the connectors to unplug safely.
Ground Yourself To Avoid Static
Touch a metal part of the case to discharge static electricity. Static can damage computer parts easily. Use an anti-static wrist strap if you have one for extra safety.
Locating The Ram Modules
Locating the RAM modules is the first step in removing or upgrading your computer’s memory. Knowing where the RAM sits inside your device helps you handle it carefully and avoid damage. Most computers have a simple layout, making the RAM easy to find.
Understanding where to find the RAM modules saves time and reduces frustration. It also ensures you follow the right steps to remove or install memory sticks safely.
Opening The Computer Case
Turn off the computer and unplug all cables. Place the computer on a clean, flat surface. Use a screwdriver to remove the screws holding the case cover. Slide or lift the cover off gently to expose the internal parts.
Identifying The Ram Slots
Look for long, thin slots near the processor. RAM modules fit into these slots vertically. They usually have clips on both ends to hold the RAM in place. The modules are often green or black with chips on one or both sides.
Noting The Number Of Modules
Count the RAM sticks installed in the slots. Some computers have one or two modules, while others have four or more. Knowing the number helps you decide how many to remove or replace.
Releasing The Ram Clips
Releasing the RAM clips is the key step to safely remove your RAM memory. These clips hold the RAM stick firmly in place on the motherboard. Knowing how to release them gently prevents damage to your hardware.
Each RAM slot has small plastic clips on both sides. They lock the RAM stick tightly. You need to push these clips outward to release the RAM. This frees the RAM so you can pull it out easily.
Locate The Ram Clips
Open your computer case carefully. Look for the long RAM sticks on the motherboard. On each side of the RAM slot, find the small plastic clips. They usually snap into place around the edges of the RAM.
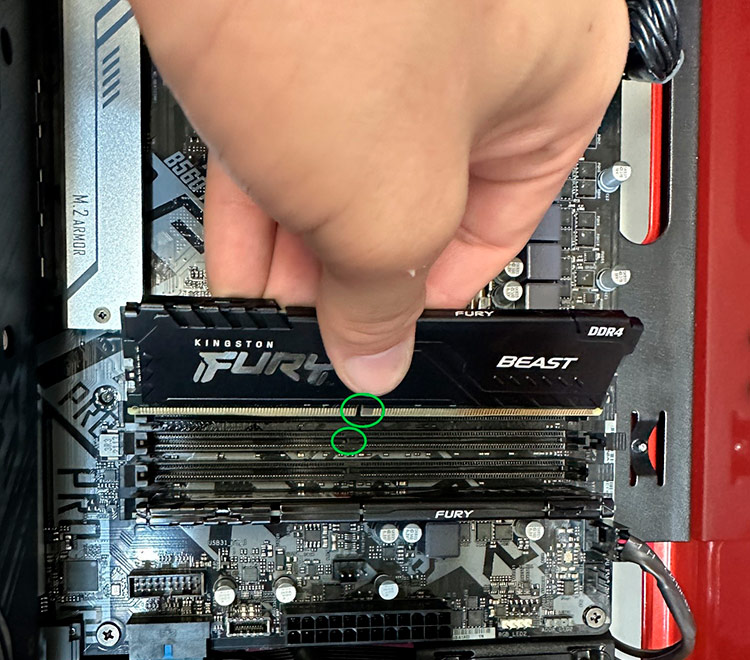
Use Your Fingers To Push The Clips
Place your thumb and index finger on each clip. Push both clips away from the RAM stick. Do this gently and slowly. The clips will pop open with little force. Avoid using tools that may damage the clips or RAM.
Ensure Clips Are Fully Released
Check that both clips have moved outward fully. The RAM stick will pop up slightly. This means it is no longer locked. If clips remain tight, the RAM will not come out easily. Never force the RAM out without releasing the clips.
Removing The Ram Modules
Removing RAM modules is a simple task anyone can do. It helps to upgrade or fix your computer’s memory. You only need to follow a few careful steps. This guide will show you how to remove RAM safely and easily.
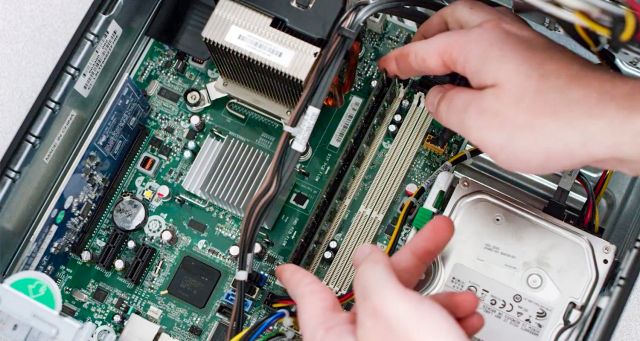
Preparing Your Computer
Turn off your computer completely. Unplug the power cable and any other connected devices. This stops electric shocks and protects your hardware. Place your computer on a clean, flat surface. Open the case by removing screws or sliding panels. Always handle parts with clean hands to avoid damage.
Inside the case, find the long, thin sticks sitting in slots. These are the RAM modules. They are usually near the processor and look like small circuit boards. Some computers have clips on each side holding the RAM. Know their position before you try to remove the modules.
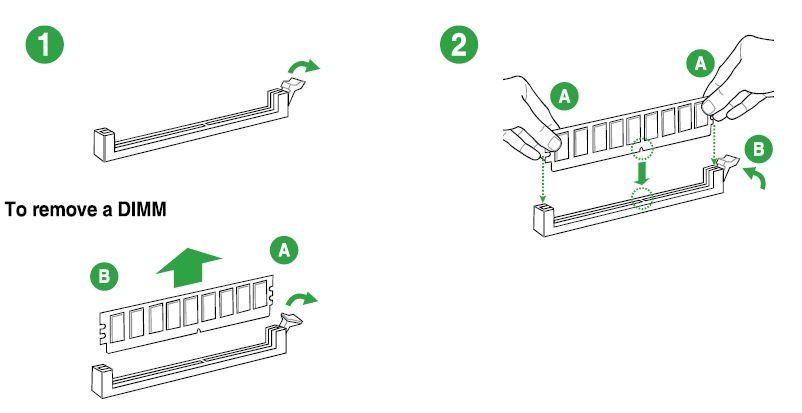
Push the clips at both ends of the RAM slot outward. The RAM stick will pop up slightly. Hold the module by its edges. Pull it out gently and straight. Do not bend or touch the gold connectors. Store the RAM in an anti-static bag or safe place.
Credit: northernmicro.com
Installing New Ram
Start by turning off your computer and unplugging it. Gently push the clips on each side of the RAM stick to release it. Then, carefully pull the RAM out in a straight motion.
Preparing Your Computer For New Ram Installation
Turn off your computer and unplug all cables. Press the power button for a few seconds to remove leftover power. Open the case carefully using a screwdriver if needed. Touch a metal part to discharge static electricity. This step protects your computer parts from damage.
Inserting The New Ram Module
Locate the RAM slots on the motherboard. Align the notch on the RAM stick with the slot. Hold the RAM by its edges to avoid touching the chips. Insert the RAM at a 45-degree angle, then press it down firmly. You should hear a click when it locks in place.
Securing And Testing The New Ram
Make sure the clips on the sides snap into place around the RAM. Close your computer case and reconnect all cables. Turn on your computer and check if it recognizes the new RAM. Open system settings or BIOS to confirm the memory size. The new RAM should improve your computer’s speed.
Closing The Pc Case
Closing the PC case is the final step after removing or installing RAM memory. It protects the internal parts from dust and damage. A properly closed case keeps your computer safe and running well.
Take your time to close the case carefully. Avoid forcing any parts. A smooth closing helps maintain the PC’s condition and performance.
Check All Cables And Components
Before closing the case, look inside. Make sure all cables are plugged in firmly. Confirm no wires block the case from closing. Check that the RAM sticks are seated correctly.
Align The Case Panels
Hold the side panel in line with the case frame. Gently place it without pushing too hard. The panel should fit snugly with the edges of the case.
Secure The Screws
Use a screwdriver to tighten the screws. Do not over-tighten to avoid damage. Secure all screws for a firm fit. This keeps the panel stable and the PC safe.
Final Inspection
Look over the case once more. Ensure no gaps or loose parts remain. The case should feel solid and closed tight. This completes the process of closing your PC case.
Powering Up And Testing
After removing or installing RAM memory, powering up and testing the computer is vital. This step checks if the RAM works correctly and the system runs smoothly. It helps find any errors early, saving time and effort.
Turn on the computer carefully. Watch for any unusual sounds or error messages. The system should start without delays or beeps. A smooth start means the RAM is properly seated and functioning.
Power On The Computer
Press the power button to start the computer. Observe the startup process closely. Look for any error beeps or warning lights. These signals can point out RAM problems. If the computer does not start, double-check the RAM placement.
Check System Bios Or Uefi
Enter the BIOS or UEFI setup after powering on. This screen shows installed hardware details. Confirm the system recognizes the new RAM size. If the RAM is missing, reseat the modules and test again.
Run Memory Diagnostic Tools
Use built-in or third-party tools to test the RAM. These tools scan for faults or errors in memory. Complete the test for accurate results. Fix or replace faulty RAM modules as needed.
Frequently Asked Questions
How Do I Safely Remove Ram From My Computer?
To safely remove RAM, first power off and unplug your PC. Open the case, release the RAM clips gently, and pull the module out straight. Avoid touching gold connectors to prevent static damage.
What Tools Are Needed To Remove Ram Memory?
You generally need no special tools, just a screwdriver to open the computer case. Handle RAM modules carefully to avoid static damage. An anti-static wrist strap is recommended for safety.
Can Removing Ram Improve Computer Performance?
Removing RAM alone doesn’t improve performance. Upgrading or adding more RAM enhances speed. Removing faulty or incompatible RAM can fix system crashes and instability.
How Do I Identify The Ram Slot In My Pc?
RAM slots are long, thin sockets on the motherboard, usually near the CPU. They have clips on both ends holding the RAM sticks. Consult your motherboard manual for exact locations.
Conclusion
Removing RAM memory is simple with the right steps. Turn off your computer first. Open the case carefully to avoid damage. Find the RAM sticks and gently release the clips. Pull the RAM out slowly and evenly. Keep the RAM safe if you plan to reuse it.
Clean the slots before adding new RAM. Doing this helps your computer run better and last longer. Follow these steps to handle RAM safely and easily.