Are you looking to remove the hard drive from your CPU but don’t know where to start? You’re not alone.
Taking out a hard drive can feel tricky if you’ve never done it before. But with the right steps, it’s easier than you think. In this guide, you’ll learn exactly how to safely and quickly remove your hard drive without damaging your computer.
Keep reading, and by the end, you’ll have the confidence to do it yourself—no tech expert needed.
Credit: www.datalab247.com
Prepare Your Workspace
Preparing your workspace is the first step in safely removing a hard drive from your CPU. A clean and organized area helps avoid accidents and protects your computer parts. Taking time to set up properly makes the task easier and faster.
Clear enough space on a sturdy table or desk. Make sure the surface is flat and free from clutter. Good lighting is important to see small screws and connectors clearly.
Gather Necessary Tools
Collect all tools before you start. A Phillips head screwdriver is usually needed for most CPUs. You might also need an anti-static wrist strap to avoid static damage. Keep a small container ready for screws and small parts. Having everything nearby prevents interruptions and lost pieces.
Power Down And Unplug
Turn off your computer completely. Do not just put it in sleep mode. Unplug the power cable from the wall socket or power strip. Disconnect all other cables such as monitor, keyboard, and mouse. This stops any electrical flow and reduces the risk of shock or damage.
Open The Computer Case
Opening the computer case is the first step in removing a hard drive from a CPU. It gives you access to the inside parts where the hard drive is located. Be careful and gentle to avoid damage.
Before opening, make sure the computer is turned off and unplugged. Touch a metal part to release static electricity from your body.
Locate The Case Screws
Look at the back of the computer case. You will see screws holding the side panel in place. Usually, there are two or three screws along the edge.
These screws might be small and need a screwdriver. Some cases use thumbscrews, which you can turn by hand.
Remove The Side Panel
After removing the screws, gently slide the side panel backward or sideways. It should come off without much force.
Keep the panel and screws in a safe place. This makes it easier to close the case later.
Identify The Hard Drive
Identifying the hard drive is the first step in removing it safely from your CPU. Knowing exactly where it sits and what type it is helps you avoid damage. This section guides you through spotting the hard drive inside your computer case.
Find The Drive Bay
The hard drive sits in a part called the drive bay. It is usually a metal or plastic slot inside the CPU case. Open the case by removing screws or sliding a panel. Look for a rectangular space with cables connected to it. This space holds the hard drive firmly in place.
Drive bays can be located near the front or bottom of the case. Some computers have several bays for multiple drives. The hard drive will be screwed or clipped into one of these bays. Spotting this area helps you focus on the right spot to remove the drive.
Recognize Drive Types
Hard drives come in different types and sizes. The most common are HDDs and SSDs. HDDs are larger and often make a spinning sound. SSDs are smaller and silent because they have no moving parts.
The shape can also help you identify the drive. HDDs are usually 3.5 inches for desktops, while SSDs are often 2.5 inches. Some SSDs look like small cards and connect directly to the motherboard. Knowing the type tells you how to handle the drive during removal.
Disconnect Cables Safely
Disconnecting the cables from your hard drive is a crucial step. Doing it safely avoids damage to both the drive and the CPU. Take your time. Handle each cable with care to keep everything intact.
Unplug Data Cable
Locate the data cable connected to the hard drive. This cable transfers information between the drive and the motherboard. Gently pull the connector straight out. Avoid twisting or bending the cable. Hold the connector, not the cable, to prevent damage.
Unplug Power Cable
Find the power cable supplying electricity to the hard drive. It is usually wider than the data cable. Pull the power connector out carefully. Do not yank or force it. Pull evenly and slowly to keep the pins safe.
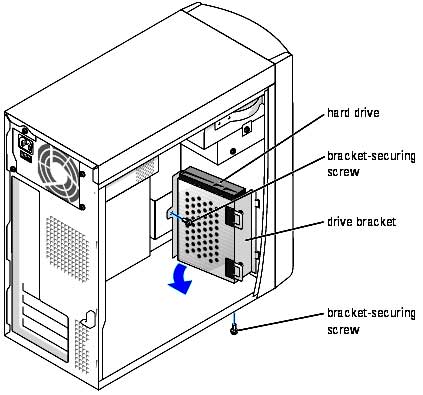
Remove The Hard Drive
Removing the hard drive from a CPU is a simple task. It helps when upgrading or replacing your storage device. Follow clear steps to do it safely and without damage.
First, you need to access the drive by loosening the screws that hold it in place. Then, gently slide the drive out of its bay. This process takes only a few minutes with basic tools.
Unscrew The Drive
Locate the screws securing the hard drive inside the CPU case. Use a screwdriver that fits the screws well. Turn each screw counterclockwise to loosen it. Keep the screws safe for later use. Do not force the screws if they feel stuck. Unscrewing allows the drive to come free from the frame.
Slide Out The Drive
After removing the screws, hold the hard drive firmly. Pull the drive straight out of its slot gently. Avoid twisting or bending the drive while sliding it out. Some drives have a pull tab to help with removal. Set the drive down carefully on a soft surface to prevent damage.
Handle And Store The Drive
Handling and storing a hard drive correctly keeps it safe and working well. A hard drive is sensitive. Rough handling or poor storage can cause damage. Protecting it from harm helps keep your data secure and your drive ready for use.
Avoid Static Damage
Static electricity can harm hard drives easily. Touch a metal object to release static before handling the drive. Hold the drive by its edges to avoid touching circuits. Use an anti-static wristband if possible. Place the drive on a non-static surface during work.
Use Proper Storage
Store the hard drive in an anti-static bag to protect it. Keep it in a cool, dry place away from direct sunlight. Avoid stacking heavy items on top of the drive. Use a padded container or box for extra protection. Proper storage extends the life of the hard drive and prevents damage.
Troubleshooting Tips
Troubleshooting helps solve problems when removing a hard drive from a CPU. Small issues can stop the process or cause damage. It is important to know common problems and how to fix them. This saves time and keeps your computer safe.
Following simple tips can make the removal easier and safer. If problems become too hard, it is best to get expert help. Understanding these points keeps your hardware in good shape.
Common Issues
Sometimes the hard drive does not come out easily. Screws may be stuck or missing. Dust and dirt can block the drive’s path. Cables might be connected too tightly. Using too much force can break parts inside the CPU. Another common problem is not turning off the computer before starting. This can cause electric shock or data loss.
Check all screws and connections first. Use the right screwdriver to avoid damage. Clean the area around the drive gently. Always turn off and unplug the CPU before removing the hard drive.
When To Seek Professional Help
If the hard drive still won’t come out, ask for help. Experts have the right tools and skills. They can avoid damage to the drive and the CPU. If you see sparks or smell burning, stop immediately. This is a sign of an electrical problem.
Data on the hard drive is valuable. Professionals can help recover data safely. Do not try to fix serious issues alone. This can cause more harm than good.

Credit: www.youtube.com

Credit: www.youtube.com
Frequently Asked Questions
How Do I Safely Remove A Hard Drive From A Cpu?
To safely remove a hard drive, first power off and unplug the CPU. Open the case, disconnect cables carefully, and unscrew the drive. Handle the drive gently to avoid damage.
What Tools Are Needed To Remove A Hard Drive?
You typically need a Phillips-head screwdriver to remove screws securing the hard drive. Anti-static wristbands are recommended to prevent static damage during removal.
Can I Remove A Hard Drive Without Losing Data?
Yes, removing the hard drive does not erase data. Always power down properly to avoid data corruption before removal.
How Do I Identify The Hard Drive Inside A Cpu?
Look for a rectangular metal box connected by power and data cables inside the CPU. It’s usually mounted in a drive bay.
Conclusion
Removing a hard drive from a CPU is simple with the right steps. Always turn off and unplug your computer first. Handle the hard drive carefully to avoid damage. Keep track of screws and cables during the process. Taking your time helps prevent mistakes.
Now, you can replace or upgrade your hard drive easily. This guide makes the task clear and safe. Try it yourself and gain confidence with hardware.