
Is your CPU fan making too much noise or not working properly? Knowing how to remove the fan from your CPU can save you time and money.
Whether you want to clean dust, replace a broken fan, or upgrade your cooling system, this task is easier than you think. In this guide, you’ll learn simple, step-by-step instructions that anyone can follow. By the end, you’ll feel confident handling your CPU fan like a pro.
Ready to get started? Let’s dive in!
Credit: www.reddit.com
Tools Needed
Removing a fan from a CPU requires a few simple tools. Having the right tools makes the process safer and faster. Each tool serves a specific purpose during removal and cleaning. Prepare these tools before starting to avoid interruptions.
Screwdrivers
Screwdrivers are essential for loosening and removing screws. Most CPU fans use small Phillips-head screws. A set with various sizes helps if screws differ. Using the correct screwdriver prevents damage to screws and parts.
Thermal Paste Remover
Thermal paste remover cleans off old thermal paste from the CPU surface. It ensures better heat transfer when applying new paste. Use a gentle, alcohol-based remover made for electronics. Avoid harsh chemicals that can harm the CPU or motherboard.
Cleaning Cloth
A soft, lint-free cloth helps wipe away dust and thermal paste residue. Microfiber cloths work best to avoid scratches. Keep the cloth dry or slightly damp with thermal paste remover. Clean surfaces carefully for a neat and safe reassembly.
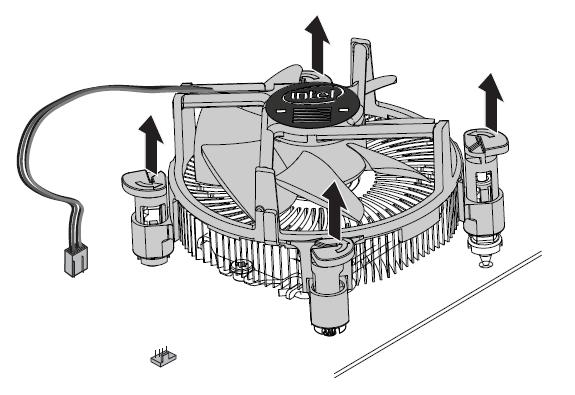
Credit: www.intel.com
Prepare Your Workspace
Clear your desk and gather tools like a screwdriver before starting. Ensure the computer is off and unplugged for safety. Create enough space to work comfortably without rushing.
Preparing your workspace is the first step to safely remove a fan from your CPU. A clean and organized area helps prevent damage to delicate parts. It also makes the process quicker and less stressful.
Set up a flat surface with enough light. Keep tools and materials close by. Avoid clutter that can cause accidents or lose small screws.
Power Down And Unplug
Turn off your computer completely. Do not just put it to sleep or hibernate. Next, unplug the power cable from the wall or power strip. This stops electricity from flowing into the system. It reduces the risk of electric shock or hardware damage.
Ground Yourself
Static electricity can harm computer parts. Touch a metal object that is grounded, like a computer case or metal table. This removes static charge from your body. Use an anti-static wrist strap for better protection. Grounding yourself keeps your CPU and fan safe during removal.
Clear The Area
Remove any items that might get in the way. Keep pets and children away from your workspace. Avoid liquids and food near your computer parts. Clearing the area prevents accidents and keeps everything clean. It also helps you focus on the task.
Access The Cpu Fan
Removing the CPU fan starts with gaining clear access to it. The fan sits inside the computer case, attached to the CPU on the motherboard. Accessing it requires careful steps to avoid damage. Follow these instructions to open the case and locate the fan safely.
Open The Computer Case
First, turn off your computer and unplug it from the power source. Place the computer on a clean, flat surface. Most cases have screws or latches on the back or side panel. Remove these screws or release the latches. Gently slide or lift the panel off to expose the inside of the computer. Handle the case carefully to avoid bending or breaking parts.
Locate The Cpu Fan
Inside the case, look for the motherboard, a large circuit board mounted inside. The CPU fan sits directly on top of the CPU, usually near the center of the motherboard. It is a small fan attached to a heatsink. The fan connects to the motherboard with a small cable. Identifying the CPU fan is important before removing it. Avoid touching other components to prevent damage.
Disconnect The Fan
Disconnecting the fan from the CPU is a simple but important step. It helps avoid damage to the fan or motherboard during removal. Taking care while unplugging ensures smooth reinstallation later.
Unplug The Fan Cable
Locate the small cable connecting the fan to the motherboard. This cable usually has a 3 or 4-pin connector. Gently pull the connector straight out. Avoid twisting or pulling the wires. A steady, even pull prevents damage.
Note Fan Orientation
Look closely at how the fan sits on the CPU. Notice the direction it faces and how it is attached. This helps when putting the fan back later. Taking a picture can be useful for reference.
Remove The Fan
Removing the fan from the CPU is an important step for cleaning or replacing parts. It helps keep your computer cool and running well. Follow these simple steps carefully to avoid damage.
Handle the fan gently. It connects tightly to the CPU to ensure good contact. Taking it off requires patience and the right approach.
Unscrew The Fan
Locate the screws holding the fan to the CPU. Use a small screwdriver that fits well. Turn each screw counterclockwise to loosen it. Keep the screws safe for later use. Do not force the screws; they should come out smoothly.
Detach From Cpu
After unscrewing, gently lift the fan from the CPU. Sometimes, the fan is attached with clips or a connector wire. Carefully unplug the wire from the motherboard. Avoid pulling on the cable itself. Lift the fan straight up to prevent damage.
Clean The Cpu Surface
Cleaning the CPU surface is a key step before installing a new fan. A clean surface helps the fan cool the CPU better. Dirt or old paste can block heat transfer and cause overheating. Take your time to clean it carefully for best results.
Remove Old Thermal Paste
Start by removing the old thermal paste from the CPU. Use a soft cloth or paper towel. Apply a small amount of isopropyl alcohol to help dissolve the paste. Gently rub the surface until no paste remains. Avoid using sharp objects to prevent damage.
Wipe The Surface
After removing the paste, wipe the CPU surface clean. Use a lint-free cloth for best results. Ensure no dust or residue is left on the CPU. The surface should look smooth and shiny. This prepares the CPU for fresh thermal paste and a new fan.

Credit: www.youtube.com
Frequently Asked Questions
How Do I Safely Remove A Cpu Fan?
First, turn off and unplug your PC. Then, disconnect the fan’s power cable. Unscrew or unclip the fan from the heatsink carefully. Gently lift the fan away without forcing it. Avoid damaging the CPU or motherboard during removal.
What Tools Are Needed To Remove A Cpu Fan?
Typically, you need a Phillips-head screwdriver for screws. Some fans use clips, so no tools are required. An anti-static wrist strap is recommended to prevent static damage. Having a clean workspace helps maintain organization and safety.
Can I Remove The Cpu Fan Without Removing The Heatsink?
It is not advisable to remove the fan without the heatsink. The fan is usually attached to the heatsink. Removing only the fan may damage the assembly or CPU. Always remove the heatsink and fan together for safety.
How Do I Disconnect The Cpu Fan Cable Properly?
Locate the fan cable plugged into the motherboard’s fan header. Gently pull the connector straight out without twisting. Avoid pulling the wires directly to prevent damage. Ensure the system is powered off before disconnecting the cable.
Conclusion
Removing a CPU fan is simple with the right steps. Always turn off and unplug your computer first. Gently detach the fan without forcing any parts. Keep screws and connectors safe for reassembly. Cleaning or replacing the fan helps your CPU run cool.
Taking care during this process avoids damage. This guide makes the task clear and easy to follow. Now, you can remove your CPU fan with confidence.