
Removing a heatsink from your CPU might sound tricky, but it doesn’t have to be. Whether you’re upgrading your system or just need to clean it, knowing the right steps can save you time and prevent damage.
In this guide, you’ll discover simple, clear instructions to safely take off your heatsink without stress. Keep reading—your CPU will thank you for it.
Tools Needed
Removing a heatsink from a CPU requires a few simple tools. Having the right tools helps you avoid damage to the CPU or motherboard. It also makes the process faster and safer.
Prepare all tools before you start. Keep them close for easy access. Use tools designed for computer hardware work. This ensures better control and safety.
Screwdriver
A screwdriver is the main tool needed. Most heatsinks use screws or clips that require a screwdriver. A Phillips-head screwdriver is the most common type used. Use the correct size to avoid stripping screws.
Isopropyl Alcohol
Isopropyl alcohol helps clean old thermal paste from the CPU and heatsink. Use 70% or higher concentration for best results. It evaporates quickly and leaves no residue.
Lint-free Cloth Or Coffee Filter
Use a lint-free cloth or coffee filter for cleaning. These materials do not leave fibers behind. This prevents dust or threads from getting into the CPU socket.
Plastic Spudger Or Pry Tool
A plastic spudger helps gently lift the heatsink if it sticks to the CPU. Avoid metal tools to prevent scratching or damage. Work carefully to avoid bending pins.
Anti-static Wrist Strap
An anti-static wrist strap protects computer parts from static electricity. Static can damage sensitive components. Connect the strap to a grounded surface for safety.
Preparing Your Workspace
Preparing your workspace is the first step to safely remove a heatsink from a CPU. A clean, organized area helps avoid damage to delicate parts. It also makes the process faster and less stressful.
Gather the right tools and clear enough space. Proper lighting is important to see small screws and connections. Make sure you have a stable surface to work on, like a desk or table.
Clear The Desk Or Work Area
Remove all clutter from your work surface. A tidy space reduces the risk of losing screws or dropping parts. Keep only the tools and components you need nearby. This keeps your focus on the task.
Gather Necessary Tools
Have a screwdriver set ready, especially small Phillips-head screwdrivers. Thermal paste remover or isopropyl alcohol helps clean the CPU surface later. Keep a soft cloth or paper towels handy. These tools make the job easier and safer.
Ensure Proper Lighting
Good lighting helps you see tiny screws and connectors clearly. Use a desk lamp or natural light from a window. Avoid shadows and glare on your work area. Bright light prevents mistakes during removal.
Wear Anti-static Protection
Static electricity can damage computer parts. Use an anti-static wrist strap or mat to ground yourself. Touch a metal part of the case before starting work. This step protects your CPU and motherboard from static shocks.
Powering Down And Unplugging
Removing a heatsink from a CPU needs careful preparation. The first step is powering down and unplugging your computer. This step protects you and your hardware from damage or electric shock.
Powering down means shutting off the computer completely. Do not just put it to sleep or hibernate mode. A full shutdown stops all power flow to the CPU and other parts.
Unplugging the power cable is just as important. This cuts off electricity from the power source. It makes sure no current runs through the system while you work.
Turn Off Your Computer Properly
Click the Start menu and select “Shut down.” Wait for the screen to go black. Make sure all lights on the computer case turn off. This confirms the system is fully powered down.
Unplug The Power Cable From The Outlet
Find the power cable at the back of the computer. Pull the plug from the wall socket or power strip. Keep the cable away from the workspace to avoid tripping or pulling it accidentally.
Disconnect Other Cables For Safety
Remove any connected cables like monitor, keyboard, and mouse. This gives you space to work freely. It also prevents any accidental power-on or damage.
Accessing The Cpu
Accessing the CPU is the first step in removing a heatsink safely. The CPU sits beneath the heatsink, inside the computer case. You must open the case carefully to reach it. This process requires patience and a gentle touch.
Before opening the case, power off the computer and unplug all cables. This prevents any electrical damage or shock. Ground yourself to avoid static electricity, which can harm the CPU or other parts.
Opening The Computer Case
Remove screws or latches securing the side panel. Slide or lift the panel away to expose the inside. Take care not to force the panel open. Keep screws in a safe place for reassembly.
Locating The Heatsink And Cpu
The heatsink is usually a metal block with fins and a fan. It sits on top of the CPU socket on the motherboard. Identify the fan power cable connected to the motherboard. This helps in locating the heatsink easily.
Preparing For Heatsink Removal
Disconnect the fan power cable gently from the motherboard. Check if the heatsink is held by screws, clips, or a lever. Note the attachment method before attempting to remove it. This avoids damage to the CPU or motherboard.
Releasing The Heatsink
Removing a heatsink from a CPU needs care and attention. The heatsink keeps the CPU cool and is attached firmly. Releasing it safely prevents damage to the CPU or motherboard. Follow clear steps to detach it without trouble.
Locating Mounting Mechanisms
First, find how the heatsink is held in place. Look for screws, clips, or a locking lever. These parts keep the heatsink tight against the CPU. Check around the edges and corners of the heatsink carefully. Knowing the mounting type helps you remove it properly.
Loosening Screws Or Clips
Use the right screwdriver or tool to loosen screws slowly. Turn screws in a diagonal pattern to ease pressure evenly. For clips, press or lift them gently to unlock. Do not force any part to avoid breaking the motherboard or CPU socket.
Handling Thermal Paste
The heatsink sticks to the CPU with thermal paste. This paste can make removal tricky. Twist the heatsink gently to break the seal. Clean old thermal paste off the CPU and heatsink with isopropyl alcohol and a soft cloth. This keeps surfaces ready for new paste and cooling.
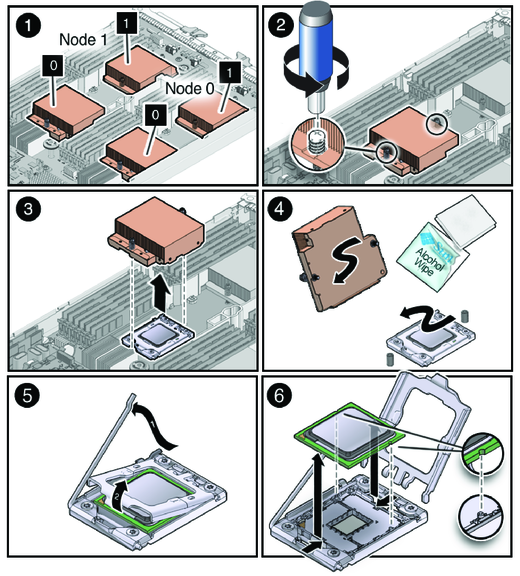
Credit: docs.oracle.com
Removing The Heatsink
Removing the heatsink from a CPU is a careful process. It requires patience and the right steps. A heatsink helps keep the CPU cool. Over time, it may need to be taken off for cleaning or replacement. Doing this properly prevents damage to your computer parts.
Gentle Detachment Techniques
Start by turning off your computer and unplugging it. Wait for the CPU to cool down. Touching a hot heatsink can cause burns or damage. Loosen the screws or clips that hold the heatsink. Do this slowly and evenly. Pulling too hard or fast can break the CPU or motherboard. Use small, gentle movements to lift the heatsink. Sometimes twisting slightly helps break the thermal paste bond. Avoid forcing the heatsink free.
Avoiding Damage To Components
Before removing the heatsink, unplug any connected fans. Keep cables away from moving parts. Avoid touching the CPU pins or pads. Oils from fingers can harm the contacts. Use an anti-static wrist strap if available. Static electricity can damage the CPU. Place the heatsink on a soft surface after removal. Clean old thermal paste with isopropyl alcohol and a soft cloth. Do not scratch the CPU surface. Handle parts with care to keep your PC safe.
Cleaning The Cpu And Heatsink
Cleaning the CPU and heatsink is a crucial step after removing the heatsink. Dirt and old thermal paste can block heat flow. This lowers the cooling efficiency and may cause your CPU to overheat. Proper cleaning helps maintain good contact between the CPU and heatsink. It also extends the life of your computer parts.
Removing Old Thermal Paste
Start by gently wiping off the old thermal paste. Use a soft cloth or paper towel. Avoid using anything rough that might scratch the CPU surface. Apply a small amount of isopropyl alcohol to help dissolve the paste. Rub lightly until all residue is gone. Be careful around the pins and contacts to prevent damage.
Recommended Cleaning Materials
Use 90% or higher isopropyl alcohol for best results. It evaporates quickly and leaves no moisture. A lint-free cloth or coffee filter works well for wiping. Cotton swabs help reach tight spaces. Avoid using water or household cleaners. These can cause corrosion or leave residues on parts.

Credit: www.youtube.com
Tips For Reinstallation
Reinstalling a heatsink on a CPU needs care and attention. A proper reinstallation keeps your CPU cool and safe. Follow these tips to make sure the heatsink fits well and works right.
Clean The Cpu And Heatsink Surfaces
Remove old thermal paste from the CPU and heatsink. Use a soft cloth and isopropyl alcohol. This ensures a clean surface for new thermal paste. Clean surfaces help heat transfer better.
Apply The Right Amount Of Thermal Paste
Use a small, pea-sized drop of thermal paste. Too much paste can cause overheating. Too little paste reduces heat transfer. Spread the paste evenly or let the pressure do it.
Align The Heatsink Properly
Place the heatsink gently on the CPU. Make sure it fits the CPU socket correctly. Misalignment can cause poor contact and heat buildup. Check the clips or screws before tightening.
Tighten Screws Evenly And Firmly
Tighten the heatsink screws in a diagonal pattern. This spreads pressure evenly on the CPU. Do not overtighten screws to avoid damage. Secure but gentle pressure is best.
Reconnect Cooling Fan And Check Function
Plug the cooling fan back into the motherboard. Make sure the fan spins freely without noise. Test the system to confirm the CPU stays cool. Proper airflow is key for good cooling.

Credit: www.wikihow.com
Frequently Asked Questions
How Do I Safely Remove A Heatsink From A Cpu?
To safely remove a heatsink, first power off and unplug your PC. Gently loosen screws or clips holding the heatsink. Avoid forcing it off to prevent CPU damage. Use slow, steady motions to separate the heatsink from the thermal paste.
What Tools Are Needed To Remove A Cpu Heatsink?
You typically need a screwdriver, usually a Phillips-head, to remove heatsink screws. Some coolers use clips that require no tools. Having isopropyl alcohol and a lint-free cloth helps clean thermal paste afterward.
Can Removing A Heatsink Damage The Cpu?
Yes, improper removal can damage the CPU or motherboard. Avoid twisting or pulling forcefully. Thermal paste can stick tightly, so apply gentle, even pressure to prevent bending pins or cracking the CPU.
Why Is It Important To Clean Thermal Paste After Removal?
Cleaning thermal paste ensures proper contact for new paste application. Old paste can dry and reduce heat transfer efficiency. Use isopropyl alcohol and a lint-free cloth to remove residue for optimal cooling performance.
Conclusion
Removing a heatsink from a CPU can seem tricky at first. Take your time and be gentle to avoid damage. Remember to unplug the power and ground yourself to prevent static. Use the right tools and follow the steps carefully.
Clean the old thermal paste before installing a new heatsink. Doing this helps keep your computer cool and running well. Practice makes it easier with each try. Stay patient and work slowly for the best results.