
Removing a GPU from your motherboard might seem tricky, but it doesn’t have to be. Whether you’re upgrading to a better graphics card or troubleshooting a problem, knowing the right steps can save you time and prevent damage.
In this guide, you’ll learn exactly how to safely and easily remove your GPU, even if you’ve never done it before. Keep reading, and you’ll gain the confidence to handle your PC like a pro.
Prepare Your Workspace
Preparing your workspace is the first step to safely remove a GPU from a motherboard. A clean and organized area helps prevent damage to your computer parts. It also makes the process smoother and faster.
Take time to arrange everything you need before you start. This reduces mistakes and keeps your hardware safe.
Gather Necessary Tools
Collect all tools before opening your computer case. You will usually need a screwdriver, preferably a Phillips head. Have a small container ready to hold screws. Avoid using too many tools that might complicate the process.
Power Down And Unplug
Turn off your computer completely. Do not leave it in sleep or hibernate mode. Unplug the power cable from the wall outlet. Disconnect any other cables connected to your PC. This step ensures no electricity runs through the system.
Ground Yourself To Avoid Static
Static electricity can damage sensitive computer parts. Touch a metal part of your computer case before handling the GPU. This helps discharge static electricity from your body. You can also use an anti-static wristband for extra safety.
Credit: www.esseg.eu
Open The Computer Case
Opening the computer case is the first step to remove a GPU from the motherboard. This step gives you access to the inside parts of your PC. It is important to work in a clean, static-free area. This prevents damage to sensitive components. Take your time and be gentle to avoid breaking anything.
Remove Side Panel
Most computer cases have screws or thumbscrews holding the side panel. Use a screwdriver to remove these screws carefully. Slide or lift the panel off to expose the inside. Keep the screws safe for later. Some cases have clips; press them gently to release the panel. Now you have a clear view inside your computer.
Locate The Graphics Card
The graphics card usually sits horizontally on the motherboard. It connects to a long slot near the bottom half of the board. The card has one or more fans and a metal bracket at the back. This bracket lines up with the case’s rear openings. The GPU is often the largest card inside. Identifying it helps to remove it properly without touching other parts.
Disconnect Power Cables
Disconnecting power cables is a key step in removing a GPU safely. Power cables supply electricity to the graphics card. Removing them stops power flow and protects your components. Handle cables carefully to avoid damage or shorts. Follow simple steps to identify and unplug these cables properly.
Identify Gpu Power Connectors
Look closely at your GPU and power supply. Most GPUs use 6-pin or 8-pin power connectors. Some high-end cards have two or more connectors. The connectors are usually black and fit only one way. Check the cable size and shape to match the GPU ports. Knowing which cables connect to your GPU prevents mistakes.
Safely Unplug Power Cables
First, turn off your PC and unplug it from the wall. Press the clip on the side of the power connector gently. Pull the connector straight out without twisting. Do not pull on the cable itself. If the connector is stuck, wiggle it slightly while pulling. Keep cables safe for reinstallation or storage.
Remove Retention Screws
Removing the retention screws is a key step to safely detach your GPU from the motherboard. These screws hold the graphics card firmly in place. You must remove them carefully to avoid damage.
Take your time to handle each screw gently. This will make the removal smooth and prevent any issues later.
Locate Mounting Screws
First, find the screws that secure the GPU to the case. They are usually at the back of your PC near the GPU ports. These screws hold the card’s bracket to the chassis. Sometimes, there are one or two screws to remove.
Check both sides of the GPU to be sure. The screws might be hidden behind cables or other parts. Clear any obstacles before you start unscrewing.
Use Correct Screwdriver
Choose a screwdriver that fits the screws perfectly. Most GPUs use a Phillips head screwdriver. Using the wrong size can strip the screws and make removal harder.
A magnetic screwdriver helps keep screws in place. This prevents them from falling inside your PC. Handle each screw with care to avoid slipping.
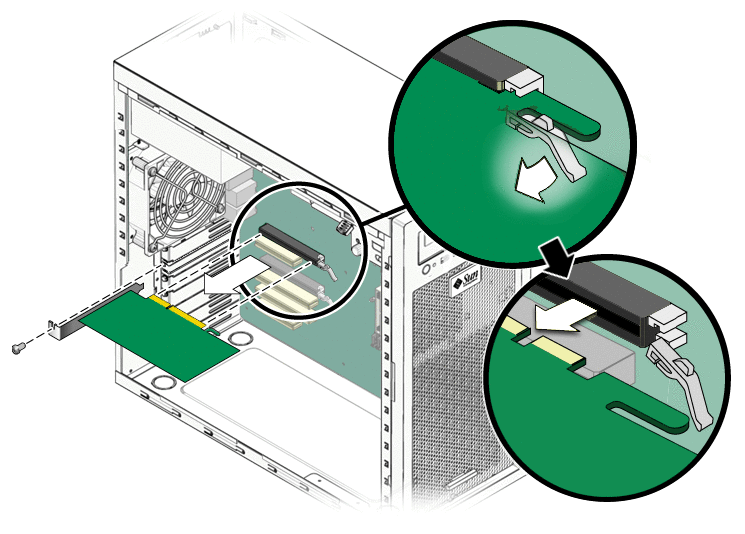
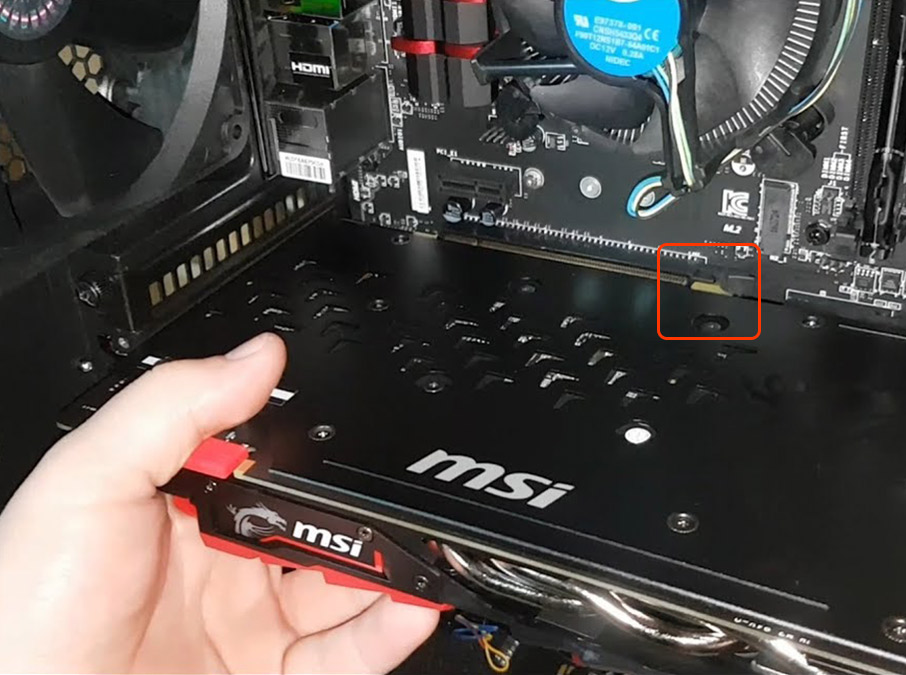
Release The Pcie Slot Clip
Removing a GPU from a motherboard requires care and attention. One key step is to release the PCIe slot clip. This clip holds the graphics card firmly in place. Releasing it lets you safely lift the GPU out without damage.
The clip prevents the card from moving during use. It clicks into a small latch on the motherboard. Knowing how to find and press this clip helps avoid breaking your hardware.
Find The Slot Latch
Look closely at the end of the PCIe slot. The latch is a small plastic piece. It usually sticks out slightly from the slot edge. On some motherboards, it sits at the back of the slot. The latch locks the GPU’s metal tab.
Check for any labels or markings near the slot. These might help you spot the latch quickly. Use a flashlight if the area is dark. Identifying the latch is the first step to removing your GPU safely.
Gently Press To Unlock
Use your finger or a small tool to press the latch. Push it gently towards the slot base. Do not force it, as the plastic can break easily. When pressed correctly, the clip should move or pop up slightly.
This action releases the GPU from its locked position. Hold the clip in the open position as you lift the card. Releasing the clip carefully reduces the risk of damage to both the card and motherboard.
Credit: www.youtube.com
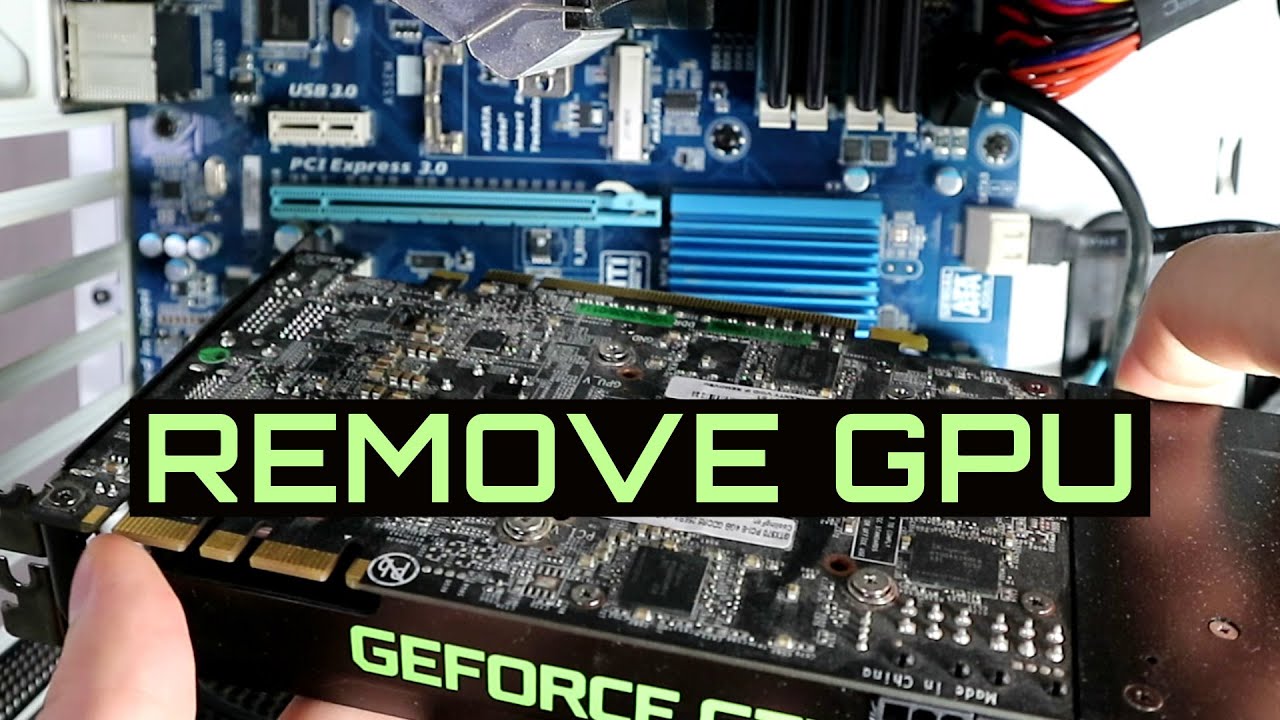
Extract The Gpu
Extracting the GPU from the motherboard needs care and attention. This step removes the card safely without damage. It requires steady hands and correct technique. Follow simple actions to pull out the GPU smoothly.
Grip The Card Firmly
Hold the GPU by its edges, not the circuits. Use your fingers to grasp both sides of the card. Avoid pressing the fan or chips on the card. A firm grip helps control the card during removal. Keep your hands steady to prevent slips.
Pull Out With Even Pressure
Pull the GPU straight out from the slot. Apply steady, even pressure on both ends of the card. Do not twist or bend the card as you pull. Uneven force can damage the slot or GPU pins. Take your time for a smooth and safe extraction.
Inspect And Store The Gpu
After removing the GPU from the motherboard, it is important to inspect and store it properly. This step helps protect the card from damage and dust. Proper care keeps the GPU working well for a long time.
Take your time to check the GPU carefully. Then store it safely to avoid any harm during storage or future use.
Check For Dust And Damage
Look closely at the GPU for dust on the fans and connectors. Clean the dust gently using a soft brush or compressed air. Check the card for any cracks or broken parts. If you find damage, avoid using the GPU until it is fixed. Dust and damage can cause the card to fail or work poorly.
Use Anti-static Bag
Place the GPU inside an anti-static bag to protect it from static electricity. Static can harm the sensitive electronic parts. If you do not have an anti-static bag, use a clean plastic bag as a last option. Store the bag in a cool, dry place away from direct sunlight. Proper storage helps keep the GPU safe until you need it again.
Credit: support.cyberpowerpc.com
Close The Computer Case
Closing the computer case is an important last step after removing the GPU. It protects the internal parts from dust and damage. A properly closed case also helps with airflow inside the computer. Taking care during this step keeps your PC safe and clean.
Follow simple actions to close the case securely. This ensures everything stays in place and your system runs smoothly.
Reattach Side Panel
Hold the side panel carefully. Align it with the edges of the case. Slide or place it back onto the frame gently. Make sure it fits well without forcing it. The panel should sit flush with the rest of the case.
Secure Screws
Find the screws you removed earlier. Use a screwdriver to tighten them back in place. Do not over-tighten to avoid damage. Secure screws keep the panel steady and prevent rattling. Check all screws are in before moving your PC.
Frequently Asked Questions
How Do I Safely Remove A Gpu From A Motherboard?
Turn off and unplug your PC first. Unscrew the GPU bracket. Release the PCIe slot latch gently. Pull the GPU straight out without force.
What Tools Are Needed To Remove A Gpu?
Typically, a Phillips-head screwdriver is enough. You might also need an anti-static wrist strap for safety. Keep a clean workspace to avoid losing screws.
Can I Remove A Gpu Without Damaging The Motherboard?
Yes, by following proper steps carefully. Avoid bending or forcing the GPU. Handle components by edges and work in a static-free environment.
Should I Disconnect Power Cables Before Removing A Gpu?
Absolutely. Always unplug all PCIe power connectors attached to the GPU. This prevents electrical damage and makes removal easier.
Conclusion
Removing a GPU from a motherboard is simple with care and patience. Turn off your computer and unplug all cables first. Unscrew the GPU and gently unlock its latch before pulling it out. Avoid force to prevent damage to parts.
Keep your workspace clean to avoid losing screws. Following these steps helps protect your computer’s components. Now, you can safely remove or replace your GPU whenever needed. Practice makes this task easier over time. Take your time, and you will do well.