
Is your computer making strange noises or running hotter than usual? It might be time to remove and clean or replace your CPU fan.
But if you’re unsure how to do this safely, don’t worry—you’re in the right place. In this guide, you’ll learn simple, clear steps to remove your CPU fan without causing damage. By the end, you’ll feel confident handling your hardware like a pro.
Ready to give your PC the care it needs? Let’s get started!

Credit: www.youtube.com
Tools Needed
Removing a CPU fan requires specific tools. Having the right tools makes the job easier and safer. Using improper tools can damage your computer parts. Prepare your workspace and gather these items before starting.
Essential Tools
A Phillips-head screwdriver is a must-have. It helps remove screws that hold the fan in place. An anti-static wrist strap prevents static electricity damage. Tweezers come in handy for small connectors and clips. A soft cloth or brush cleans dust around the fan area. These tools form the basic kit for CPU fan removal.
Optional Accessories
Thermal paste helps when reinstalling the fan or heatsink. Isopropyl alcohol cleans old thermal paste from the CPU. A flashlight or headlamp improves visibility inside the case. Cable ties keep wires organized during reassembly. These extras improve the process but are not always necessary.
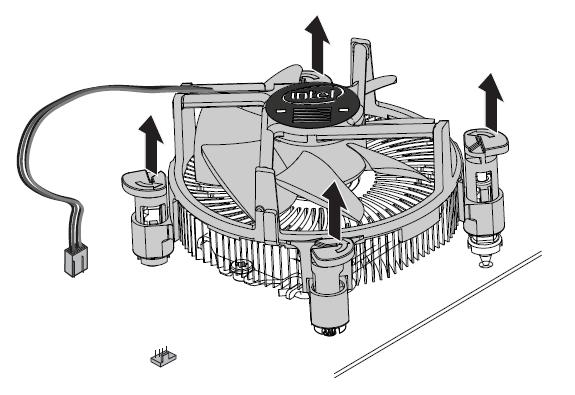
Credit: www.intel.com
Preparing Your Workspace
Preparing your workspace is the first step to remove a CPU fan safely and efficiently. A clean and organized area helps avoid mistakes and damage. It also makes the process faster and less stressful.
Clearing The Area
Start by choosing a flat, stable surface. Remove all unnecessary items from this space. Keep only tools and parts needed for the job. Clear space prevents losing small screws or parts. It also gives you room to work comfortably.
Ensuring Safety
Turn off your computer and unplug it from power. Ground yourself to avoid static electricity damage. Use an anti-static wrist strap if available. Work in a well-lit area to see details clearly. Handle the CPU fan and other parts gently to avoid damage.
Power Down And Unplug
Before removing a CPU fan, it is important to power down and unplug your computer. This step keeps you safe and protects your device. It stops electricity from flowing, which can cause damage or shock. Taking this precaution ensures a smooth and safe fan removal process.
Shutting Down The Computer
Start by closing all open programs. Then, click the Start menu and choose the Shut Down option. Wait until the screen goes completely black. This shows the computer is fully off. Avoid using the power button to turn off the PC. Proper shutdown prevents data loss and hardware issues.
Disconnecting Power Sources
Unplug the power cable from the wall outlet or power strip. Also, remove the computer’s power cord from the back of the case. If you use a laptop, take out the battery if possible. This cuts off all power sources. Double-check to ensure no cables remain connected. This step is key to avoiding electric shocks or damage.
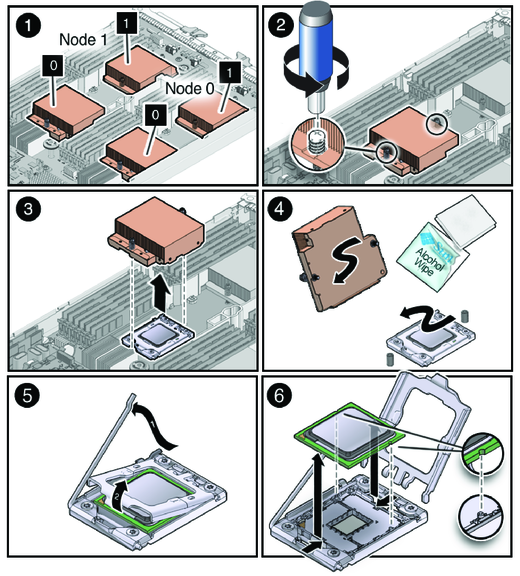
Credit: docs.oracle.com
Accessing The Cpu Fan
Accessing the CPU fan is the first step to remove or clean it. You need to open your computer case carefully. Inside, you will find the fan attached to the CPU. This part keeps the processor cool and working well.
Opening The Case
Turn off your computer and unplug all cables. Place the case on a clean, flat surface. Remove the screws at the back of the case. Slide or lift the side panel to open the case. This gives you access to the computer’s inside parts.
Locating The Cpu Fan
Look for the large fan on the motherboard. It sits directly on top of the CPU. The fan often has blades and a power cable. This cable connects to the motherboard near the CPU. The fan may have a heatsink under it. The heatsink looks like metal fins and helps cool the CPU.
Disconnecting The Fan Cable
Disconnecting the fan cable is a key step in removing a CPU fan. It stops power from reaching the fan. This keeps the system safe and prevents damage. The fan cable is small and often tucked near the CPU socket. Taking time to find and unplug it carefully saves trouble later. Follow clear steps to do this right.
Identifying The Connector
The fan cable connects the CPU fan to the motherboard. It is usually thin and has 3 or 4 wires. The connector is small and plastic. It plugs into a matching socket on the motherboard. Look near the CPU for a label like “CPU_FAN.” The connector might be tight. Spotting this connector correctly prevents unplugging the wrong cable.
Safely Unplugging
Turn off the computer and unplug it from power. This avoids electric shock and damage. Gently hold the connector, not the wires. Pull the connector straight out. Do not wiggle or use force. Tugging wires can cause breaks or shorts. Use a small tool like tweezers if needed. Keep the connector safe for reassembly. This step ensures the fan cable is off without harm.
Removing The Fan Screws Or Clips
Removing the CPU fan screws or clips is the next step after disconnecting the fan cable. This part is important because the fan holds tightly to the CPU cooler. Knowing how to handle these fasteners carefully prevents damage to the fan or the motherboard. Follow simple steps to remove them safely and avoid any problems.
Types Of Fasteners
CPU fans use two main types of fasteners: screws and clips. Screws are common and secure the fan firmly. They usually need a small screwdriver. Clips are plastic or metal hooks that snap into place. These clips hold the fan without tools. Recognizing the fastener type helps prepare the right tool and method.
Proper Removal Techniques
For screws, use a screwdriver that fits well. Turn slowly and gently to avoid stripping the screw. Keep the screws safe after removal. For clips, press or pull carefully as designed. Avoid forcing the clip. This prevents breaking the fan or the cooler. Work in a clean, static-free area to keep parts safe.
Detaching The Cpu Fan
Detaching the CPU fan is a key step in upgrading or cleaning your computer. It requires patience and care to avoid damage. This section explains how to remove the fan safely and correctly.
Loosening The Fan
Start by turning off the computer and unplugging it. Locate the screws or clips holding the fan. Use a screwdriver to gently loosen each screw. Keep the screws in a safe place. Avoid using too much force to prevent stripping the screws. If clips hold the fan, press or slide them carefully. Make sure the fan is free before attempting to pull it out.
Handling With Care
Hold the fan by its edges, not the blades. This prevents damage to the blades and motor. Slowly lift the fan from the CPU socket. Check for any attached wires or connectors. Gently unplug the fan cable from the motherboard. Avoid pulling the cable too hard to protect the connector. Place the fan on a clean, static-free surface after removal.
Cleaning And Maintenance Tips
Cleaning and maintaining your CPU fan keeps your computer running cool. Regular care helps avoid overheating and improves performance. This section covers easy steps to keep your fan clean and check for problems.
Removing Dust And Debris
Dust blocks airflow and causes the fan to work harder. Use a can of compressed air to blow dust off the blades. Hold the fan steady to prevent it from spinning too fast. A soft brush can help remove stubborn dirt. Clean both the fan and the heatsink for best results.
Checking For Damage
Inspect the fan blades for cracks or chips. Damaged blades can cause noise and reduce cooling. Check the fan’s cable and connector for wear or loose contacts. Make sure the fan spins smoothly without wobbling. Replace the fan if you find any serious damage.
Reinstalling Or Replacing The Fan
After removing the old CPU fan, the next step is to reinstall or replace it. This process helps keep your computer cool and working well. Choosing the right fan and installing it correctly is important. A good fan fits your CPU and case. It also keeps noise low and airflow high.
Choosing A Replacement
Pick a fan that matches your CPU socket type. Check the size of the fan your case supports. Look for fans with good airflow and quiet operation. Brands with positive reviews often deliver better quality. Some fans come with extra features like LED lights or speed control. Choose a fan that fits your budget and needs.
Installing The New Fan
Start by cleaning the CPU surface gently. Apply a small amount of thermal paste if needed. Align the new fan with the mounting holes on the CPU. Secure the fan using screws or clips provided. Connect the fan cable to the motherboard’s CPU fan header. Ensure the cable is not blocking other parts. Power on the computer and check if the fan spins smoothly.
Frequently Asked Questions
How Do I Safely Remove A Cpu Fan?
First, power off and unplug your computer. Ground yourself to avoid static damage. Unscrew or unclip the fan from the heatsink carefully. Disconnect the fan’s power cable from the motherboard. Handle all components gently to prevent damage.
What Tools Are Needed To Remove A Cpu Fan?
You typically need a small Phillips screwdriver and an anti-static wrist strap. Optional tools include a plastic pry tool and thermal paste cleaner. These tools help avoid damage and ensure safe, effective removal of the CPU fan.
Can I Remove A Cpu Fan Without Damaging The Motherboard?
Yes, by grounding yourself and handling parts gently. Avoid pulling cables forcefully. Use proper tools and unscrew fans carefully. Disconnect power cables slowly and keep track of screws to prevent damage.
How Do I Clean A Cpu Fan After Removal?
Use compressed air to blow away dust and debris. Avoid using liquids directly on the fan. A soft brush can help clean hard-to-reach areas. Allow the fan to dry completely before reinstalling.
Conclusion
Removing a CPU fan is simple with the right steps. Always turn off your computer first. Handle parts gently to avoid damage. Keep track of screws and cables carefully. Clean the area around the fan before installing a new one.
Taking your time helps prevent mistakes. This guide makes the process clear and easy. You can keep your computer cool and running well. Regular maintenance helps your PC last longer. Try these tips next time you work inside your computer.