
Is your Windows 10 computer running slow or overheating? High CPU usage might be the reason behind it.
When your CPU is working too hard, everything feels sluggish, and your system struggles to keep up. But don’t worry—you can fix this. You’ll discover simple and effective ways to reduce CPU usage on your Windows 10 PC. By following these steps, you’ll speed up your computer and enjoy smoother performance.
Keep reading to find out how to take control of your CPU and get your system running like new again.
Check Task Manager
Checking the Task Manager is a simple way to see which programs use most of your CPU power. This tool helps find apps that slow down your computer. You can watch real-time data about CPU use. It shows all running processes and how much CPU each one uses. This information helps decide which tasks to stop. Reducing CPU load can make Windows 10 faster and more responsive.
Identify High Cpu Processes
Open Task Manager by pressing Ctrl + Shift + Esc. Look at the “Processes” tab. Sort the list by CPU column to see the highest users first. Some apps or background processes may use too much CPU. These can cause your computer to run slow. Spotting these processes is the first step to fix the problem. Note the names of apps with high CPU usage.
End Unnecessary Tasks
Select the process that uses too much CPU. Click the “End Task” button at the bottom right. This stops the program from running and frees up CPU power. Only end tasks you recognize and do not need at the moment. Be careful not to stop system or important apps. Ending unnecessary tasks lowers CPU load and speeds up your PC.

Credit: www.avast.com
Disable Startup Programs
Disabling startup programs helps reduce CPU usage on Windows 10. Many apps start automatically and slow down your computer. Turning off unnecessary programs at startup frees up CPU power.
This step improves your PC’s speed and responsiveness. It also helps your system boot faster. You can control which apps run at startup easily.
Access Startup Settings
Press Ctrl + Shift + Esc to open Task Manager. Click the Startup tab at the top. This shows all programs set to run at startup.
You can see the app name, publisher, and impact on startup. This information helps decide which programs to disable.
Manage Startup Apps
Select any app you do not need at startup. Click Disable in the bottom-right corner. This stops the app from running automatically.
Focus on apps with high startup impact to reduce CPU load. Leave essential programs, like antivirus, enabled for safety.
After disabling, restart your PC to see the changes. Your system will use less CPU and start faster.
Update Windows And Drivers
Keeping Windows and drivers up to date helps reduce high CPU usage. Updates fix bugs and improve system performance. Old software can cause your CPU to work harder than needed. Regular updates keep your computer running smoothly and efficiently.
Run Windows Update
Open the Start menu and go to Settings. Click on Update & Security. Select Windows Update from the sidebar. Click Check for updates to find new patches. Install any available updates and restart your PC. These updates often include fixes for CPU issues.
Update Device Drivers
Outdated drivers can cause your CPU to spike. Press Windows + X and choose Device Manager. Find the hardware with a yellow warning sign. Right-click and select Update driver. Choose Search automatically for updated driver software. Follow on-screen steps to complete the update. This keeps your hardware working properly and reduces CPU load.
Scan For Malware
High CPU usage can slow down your Windows 10 computer. Malware often causes this problem. Scanning your PC for malware helps find and remove harmful files. This step is crucial to keep your system fast and safe.
Use Windows Defender
Windows Defender is built into Windows 10. It offers good protection against malware. Open Windows Security from the Start menu. Choose “Virus & threat protection” and click “Quick scan.” This scan checks your files for threats fast. For a deeper check, select “Full scan.” Wait for the scan to finish. Follow the instructions if threats appear.
Try Third-party Antivirus
Third-party antivirus programs can find malware missed by Windows Defender. Choose a trusted antivirus with good reviews. Install the software and update its virus database. Run a full system scan to detect hidden threats. These tools often include extra features like real-time protection. Remove any malware found to lower CPU usage.
Adjust Power Settings
Adjusting power settings in Windows 10 can help lower CPU usage. It controls how your computer uses energy and manages performance. Changing these settings can balance power use and speed.
Proper power settings prevent your CPU from running at full speed all the time. This reduces heat and saves battery on laptops. Let’s explore how to change these settings for better CPU management.
Choose Balanced Or High Performance
Windows 10 offers power plans like Balanced and High Performance. Balanced plan saves energy and keeps CPU usage low. High Performance plan uses more power but boosts speed.
To reduce CPU usage, select the Balanced plan. This plan adjusts CPU speed based on tasks. It lowers CPU work during simple tasks, cutting power use.
High Performance plan is good for heavy tasks but can increase CPU load. Choose it only if you need extra speed and don’t mind higher CPU use.
Modify Advanced Power Options
Advanced power settings give more control over CPU behavior. Access these settings by clicking “Change plan settings” then “Change advanced power settings.”
In the Advanced settings, find “Processor power management.” Set the minimum processor state to 5% or lower. This lets your CPU rest when idle.
Set the maximum processor state to 80-90%. This stops the CPU from running at full power all the time. It helps reduce heat and CPU usage.
Adjusting these options carefully balances performance and power use. It keeps your PC cooler and lowers CPU load during light tasks.

Credit: www.youtube.com
Optimize Background Services
Background services run quietly on Windows 10. They often use CPU power without you noticing. Optimizing these services helps lower CPU use. This makes your PC faster and more responsive. You can control which services run and when.
Disable Unneeded Services
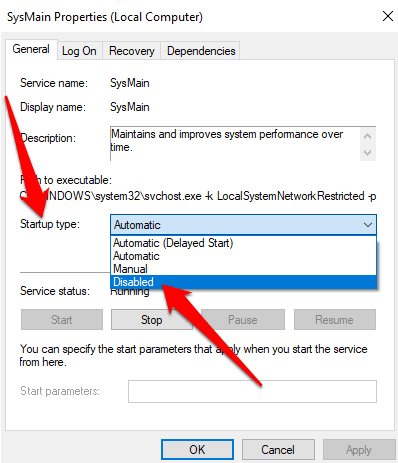
Many services start automatically but are not needed. Disabling these saves CPU resources. Open the Services app by typing services.msc in the search bar. Look through the list for services you do not use. Right-click the service and select Properties. Click Stop to halt the service. Then change the startup type to Disabled. Only disable services you understand to avoid problems.
Configure Service Startup Types
Not all services should be disabled. Some are important but don’t need to run all the time. Set these services to start manually. This means they run only when needed. In the Services app, right-click the service and choose Properties. Change the startup type to Manual. This saves CPU power without stopping important functions. Regularly review your service list to keep CPU use low.
Manage Visual Effects
Visual effects in Windows 10 make your screen look nice and smooth. But these effects can use a lot of CPU power. Managing visual effects can help your computer run faster. It lowers CPU usage and improves overall performance.
You can change how Windows uses these effects. Either turn them off completely or pick only the ones you want. This helps your PC focus on important tasks instead of fancy animations.
Adjust For Best Performance
Windows has a quick way to reduce visual effects. It is called “Adjust for best performance.” This option turns off most animations and shadows. It makes your computer use less CPU power. Your screen may look simpler but runs faster. To find this option, go to System Properties > Advanced > Performance Settings. Then select “Adjust for best performance” and click OK.
Customize Visual Settings
You do not have to turn off all effects. You can choose which ones to keep. This lets you keep some style without slowing down your PC. In the Performance Options window, click “Custom.” Then check or uncheck the effects you want. For example, keep smooth fonts but turn off animations. Save your changes to see the difference. This method balances looks and speed well.
Increase Virtual Memory
Increasing virtual memory helps reduce high CPU usage on Windows 10. Virtual memory works as extra RAM by using part of your hard drive. It helps your system handle more tasks smoothly.
This process can improve performance when physical RAM is low. Adjusting virtual memory settings is easy and can make a big difference.
Check Current Paging File Size
First, check your current virtual memory size. Open the Start menu and type Performance. Select Adjust the appearance and performance of Windows.
In the Performance Options window, go to the Advanced tab. Click Change under Virtual Memory. Here, you see the current paging file size.
Note the size before making changes. This helps you decide the new size settings.
Set Custom Virtual Memory
Uncheck Automatically manage paging file size for all drives. Choose the drive where Windows is installed.
Select Custom size and enter new values. Set the initial size and maximum size in megabytes. Use numbers slightly higher than your current RAM size.
Click Set and then OK. Restart your computer to apply the new settings.
This adjustment can reduce CPU load and improve system speed.
Clean Temporary Files
Temporary files build up on your PC over time. They use space and slow down your CPU. Cleaning these files helps your Windows 10 run smoother. It frees up memory and reduces CPU load. Regular cleaning keeps your system healthy and fast.
Use Disk Cleanup Tool
Windows 10 has a built-in Disk Cleanup tool. It finds and deletes temporary files safely. To open it, type “Disk Cleanup” in the search bar. Choose the drive you want to clean, usually C: drive. The tool shows a list of file types you can remove. Select “Temporary files” and other unwanted files. Click “OK” and then “Delete Files” to start cleaning. This tool quickly frees up space and lowers CPU use.
Clear Browser Cache
Browsers store temporary files called cache. These files speed up browsing but can grow large. A big cache can slow down your PC and CPU. Open your browser settings and find “Clear browsing data.” Choose to clear cache and temporary files. Set the time range to “All time” for a full clean. Clearing cache frees memory and helps reduce CPU usage. Do this often to keep your browser and PC fast.
Credit: helpdeskgeek.com
Check For Hardware Issues
Hardware problems can cause high CPU usage on Windows 10. Checking your hardware helps find hidden issues. Fixing these can lower CPU load and improve performance.
Monitor Cpu Temperature
High CPU temperature makes your processor work harder. Use free tools like HWMonitor or Core Temp. These show real-time CPU heat levels. Keep the temperature below 80°C for safe use. Clean dust from fans and vents to cool down the CPU. Replace faulty cooling parts if needed. Proper cooling reduces CPU strain and lowers usage.
Test Ram And Disk Health
Faulty RAM or hard drives slow your system and raise CPU use. Run Windows Memory Diagnostic to check RAM health. Use tools like CrystalDiskInfo to assess your disk’s condition. Replace damaged RAM sticks or hard drives. Healthy memory and storage devices ease CPU workload. This helps your system run smoothly and faster.
Frequently Asked Questions
How Do I Check Cpu Usage On Windows 10?
Open Task Manager by pressing Ctrl + Shift + Esc. Click the “Performance” tab to view CPU usage. This helps identify high CPU processes for troubleshooting.
What Causes High Cpu Usage In Windows 10?
High CPU usage can be caused by background apps, malware, outdated drivers, or system processes. Identifying these helps reduce CPU load effectively.
How Can I Stop Programs From Using Too Much Cpu?
Use Task Manager to end high CPU tasks. Disable startup apps via Task Manager’s Startup tab to prevent excessive CPU use during boot.
Does Updating Windows 10 Reduce Cpu Usage?
Yes, updating Windows 10 installs performance improvements and security fixes. This can resolve bugs causing high CPU usage and optimize system efficiency.
Conclusion
Reducing CPU usage helps your computer run smoother and faster. Close apps you don’t need and check for updates often. Use Task Manager to find programs using too much power. Clean up startup items to speed boot time. Keep your system free from viruses and junk files.
Small steps can make a big difference in performance. Stay patient and keep your PC well-maintained. Your computer will thank you with better speed and less lag.