
Are you ready to boost your computer’s speed but don’t know where to start? Installing RAM into your motherboard is one of the easiest and most effective upgrades you can make.
If you’re worried about breaking something or getting stuck, don’t be. This guide will walk you through each step clearly and simply, so you can do it yourself with confidence. Keep reading, and by the end, you’ll have your system running faster and smoother than ever before.
Prepare Your Workspace
Setting up your workspace is the first step to install RAM correctly. A clean, organized area helps avoid mistakes and damage. It also makes the process faster and easier.
Take time to prepare everything before touching your computer parts. This careful start protects your components and ensures a smooth installation.
Gather Necessary Tools
Collect all tools needed for the installation. Usually, a small screwdriver is enough. You might also need a flashlight to see inside the case.
Keep your tools within reach. Avoid searching for them mid-installation. This keeps your focus on the task.
Ensure Static-free Environment
Static electricity can harm your motherboard and RAM. Work on a non-carpeted surface if possible. Use an anti-static wrist strap if you have one.
Touch a metal part of the case to discharge static before handling parts. Avoid wearing clothes that create static, like wool or fleece.
Identify Compatible Ram
Identifying compatible RAM is the first step to upgrade your computer’s memory. Using the right RAM ensures your system works smoothly. It prevents errors and hardware damage. Knowing compatibility saves time and money.
Check your motherboard’s specifications carefully. This information guides you to the correct RAM type and size. Each motherboard supports specific RAM speeds and capacities. Matching these specs is crucial for proper installation.
Check Motherboard Specifications
Find your motherboard model number on its surface or box. Visit the manufacturer’s website for detailed specs. Look for supported RAM types, maximum capacity, and speed limits. Also, note the number of RAM slots available. This helps plan your memory upgrade effectively.
Choose The Right Ram Type
RAM comes in different types like DDR3, DDR4, and DDR5. Each type fits only specific motherboards. Check your motherboard specs to identify the supported RAM type. Using the wrong type can cause system failure. Select RAM modules matching the required type and speed for best results.
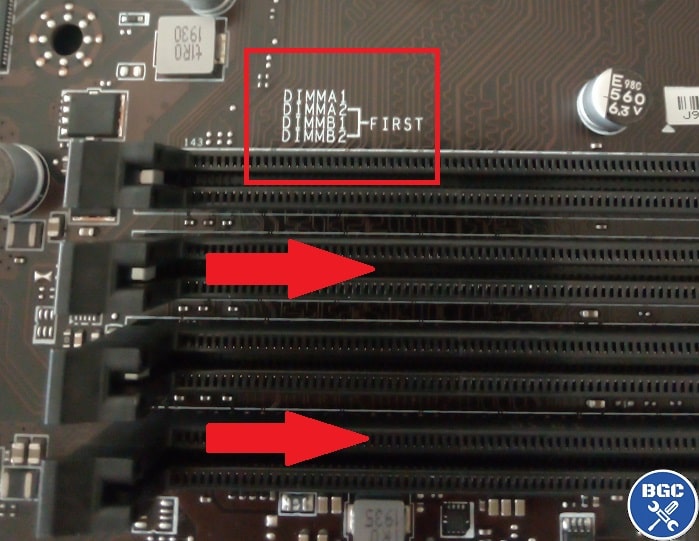
Locate Ram Slots On Motherboard
Finding the RAM slots on your motherboard is the first step to installing memory. These slots are long, thin, and usually placed near the CPU. Knowing their location helps you avoid mistakes during installation.
Motherboards may have two or more RAM slots. Each slot holds one RAM stick, so knowing how many slots you have matters. Some motherboards place the slots close together, while others spread them out.
Understand Slot Configuration
RAM slots often come in pairs or groups. This setup supports dual-channel or quad-channel memory modes. These modes improve speed by allowing simultaneous data flow.
Slots are usually color-coded or labeled. Matching colors means pairing RAM sticks for better performance. Check your motherboard manual for exact details.
Identify Slot Locks
Each RAM slot has small clips or locks on both ends. These locks hold the RAM stick firmly in place. They must open before inserting RAM and snap back after securing it.
Locks are simple to spot. They look like tiny plastic tabs. Gently push them outward to release or inward to lock the RAM.
Credit: www.villaggiolepalme.com
Install Ram Modules
Installing RAM modules is a key step in building or upgrading your computer. This process requires care and attention to avoid damage. Follow these steps carefully to ensure your RAM fits perfectly in the motherboard.
Correct installation improves your computer’s speed and performance. Handle the RAM with clean hands and avoid touching the gold contacts.
Align Ram With Slot
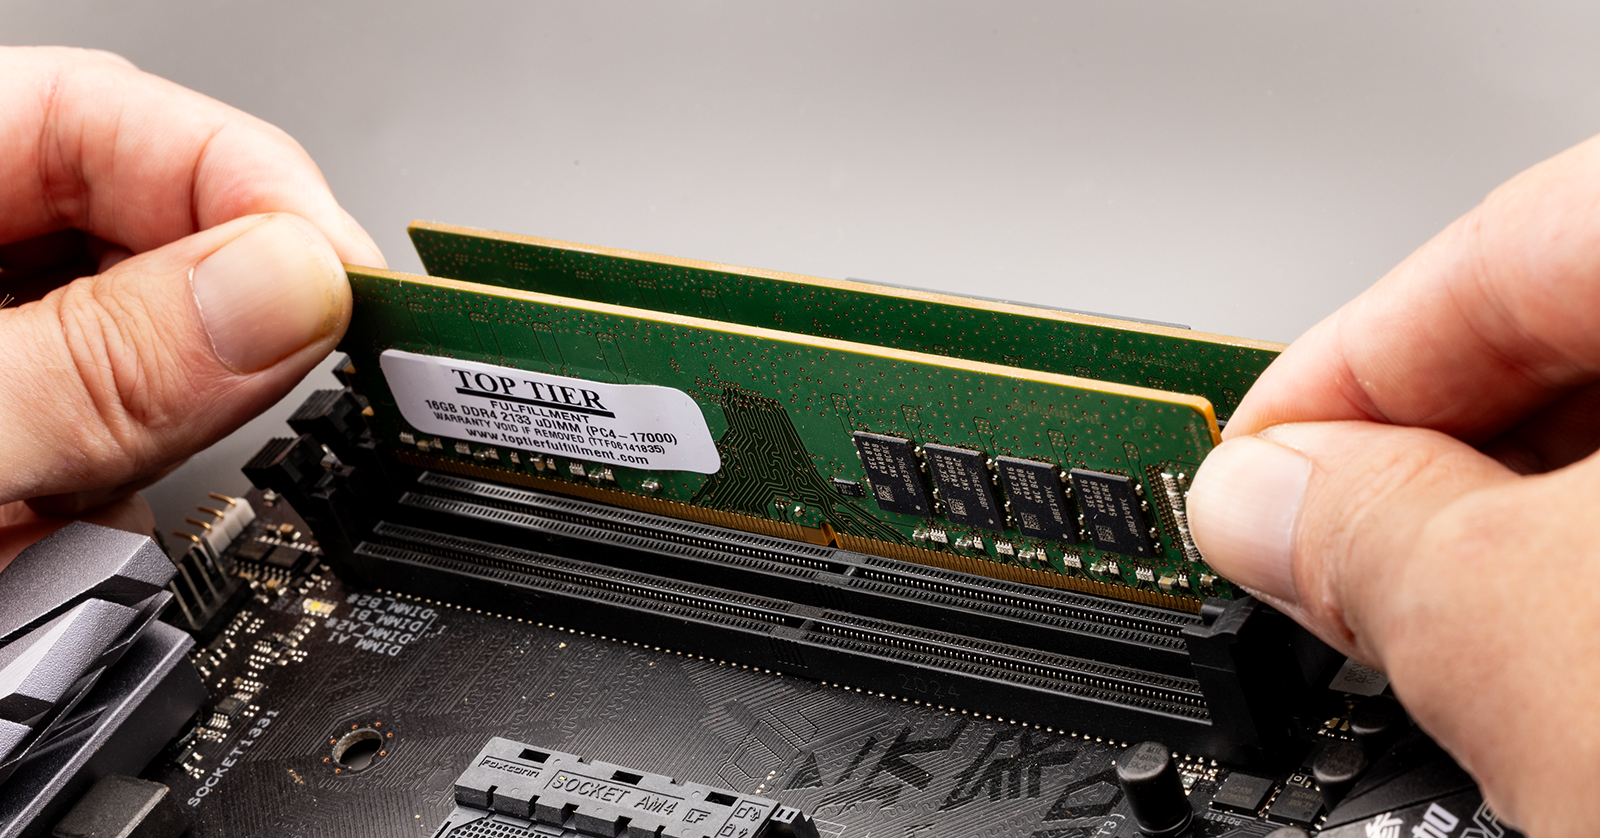
Look closely at the RAM module and the slot on the motherboard. Notice the notch on the RAM stick. This notch matches a ridge inside the slot. Align the notch with the ridge to avoid wrong placement. The RAM should fit easily without force.
Insert Ram Firmly
Hold the RAM module by the edges. Gently push the module straight down into the slot. Apply even pressure on both ends. You will feel the RAM click into place. Do not wiggle or force it harshly.
Secure Ram Locks
Most motherboard slots have small plastic locks on each side. These locks snap into place once the RAM is fully inserted. Push these locks gently until they click. This secures the RAM and prevents it from moving.
Verify Installation
After installing RAM into the motherboard, verifying the installation is key. This step ensures your system recognizes the new memory. It helps avoid problems like crashes or slow performance. Follow simple checks to confirm the RAM works properly.
Power On System
Start by powering on your computer. Listen for any unusual beeps or sounds. These sounds may indicate a problem with the RAM. Watch the screen carefully. If the system boots normally, the RAM is likely installed correctly.
If the computer does not start or shows errors, power it off. Check the RAM sticks again. Make sure they are fully seated in the slots. Repeat the power on process after reseating the RAM.
Access Bios To Check Ram
Enter the BIOS menu by pressing the key shown during startup. Common keys are Delete, F2, or Esc. In BIOS, find the system information or memory section.
Check the total RAM detected by the motherboard. It should match the amount you installed. If the number is lower, the RAM may not be installed correctly. Save and exit BIOS to restart the system.
Credit: www.youtube.com
Troubleshoot Common Issues
Troubleshooting common issues after installing RAM helps ensure your computer runs smoothly. Problems like the system not recognizing RAM or failing to boot can happen. These issues often have simple fixes. Understanding these problems saves time and stress. Follow the tips below to solve common RAM installation troubles.
Ram Not Detected
The computer may not detect new RAM for several reasons. First, check if the RAM sticks are firmly seated in the slots. Loose RAM causes detection failure. Clean the RAM contacts gently with a soft cloth. Dust or dirt can block the connection. Try placing the RAM in a different slot. This helps identify faulty slots. Verify the RAM type matches your motherboard’s specifications. Incompatible RAM will not be detected. Restart the system after reseating the RAM to check again.
System Fails To Boot
The system might fail to boot after RAM installation. This often results from improper installation. Remove the RAM and reinstall it carefully. Listen for clicks that indicate it is locked in place. Test each RAM stick individually to find a faulty module. Check the motherboard manual for the correct RAM slot order. Incorrect placement can prevent booting. Reset the BIOS by removing the CMOS battery for a few minutes. This clears settings that may block startup. Make sure power cables and other hardware are connected properly.
Credit: www.excelcare24.co.uk
Frequently Asked Questions
How Do I Install Ram Into A Motherboard?
To install RAM, first power off your PC and unplug it. Open the case, locate RAM slots, unlock the clips, align the RAM module, and firmly press it into the slot until clips snap back. Ensure correct orientation to avoid damage.
What Tools Do I Need To Put Ram Into Motherboard?
You typically need no special tools to install RAM. A screwdriver may be required to open the PC case. Handle RAM carefully by its edges to avoid static damage. Ground yourself to prevent static electricity before installation.
How To Know Which Ram Fits My Motherboard?
Check your motherboard’s manual or manufacturer website for supported RAM types and speeds. Look for DDR generation, maximum capacity, and slot configurations. Using compatible RAM ensures optimal performance and prevents compatibility issues.
Can I Install Ram Without Turning Off The Pc?
No, always turn off and unplug your PC before installing RAM. Installing RAM while powered on risks hardware damage and data loss. Safety first ensures a smooth, damage-free upgrade process.
Conclusion
Installing RAM into your motherboard is simple and quick. Just follow the steps carefully. Make sure the RAM sticks fit properly in the slots. Press down gently until you hear a click. Check that everything is secure before turning on your computer.
This small upgrade can improve your computer’s speed and performance. Take your time and handle parts with care. Now, you can enjoy a smoother and faster PC experience.