
Are you looking to boost your computer’s speed without spending a fortune on a new device? Installing RAM is one of the easiest and most effective ways to do just that.
But if you’ve never done it before, the idea might feel a little overwhelming. Don’t worry—this guide will walk you through every step, making the process simple and stress-free. By the end, you’ll know exactly how to properly install RAM and give your system the power it needs to run faster and smoother.
Ready to upgrade your computer’s performance? Let’s get started!
Choosing The Right Ram
Choosing the right RAM is important for your computer’s speed and performance. Picking the correct type helps avoid problems during installation. It also ensures your system runs smoothly without crashes or slowdowns. Here are key points to consider before buying RAM.
Check Compatibility With Motherboard
Motherboards support specific RAM types and sizes. Check your motherboard manual or website for compatible RAM models. Look for the right RAM generation, such as DDR4 or DDR5. Also, verify the maximum RAM capacity your motherboard supports. This prevents buying RAM that won’t fit or work properly.
Consider Ram Speed And Capacity
RAM speed affects how fast your computer processes information. Higher speed RAM improves performance but costs more. Choose a speed supported by your motherboard and CPU. Capacity matters too. More RAM helps with multitasking and running large programs. Pick a size that matches your needs and budget.
Single Vs Dual Channel
Dual channel means using two RAM sticks together. This setup doubles data paths, boosting performance. Single channel uses one RAM stick only. Dual channel is better for gaming and heavy tasks. Make sure your motherboard supports dual channel. Buy matching pairs of RAM sticks for best results.

Credit: www.youtube.com
Preparing Your Workspace
Preparing your workspace is the first step to install RAM safely and correctly. A clean and organized area helps avoid mistakes and damage. It also makes the installation process faster and easier. Follow these steps to get your workspace ready for RAM installation.
Gather Necessary Tools
Collect all tools before starting. You usually need a small screwdriver. Have the RAM modules ready too. Keep everything close to avoid interruptions. This prevents losing small parts during installation.
Ensure Static-free Environment
Static electricity can harm computer parts. Work on a non-carpeted floor if possible. Use an anti-static wrist strap or touch a metal object often. This discharges static from your body. Keep your workspace free of static to protect your RAM.
Power Down And Unplug System
Turn off your computer completely. Remove the power cable from the wall. Unplug all other devices connected to your PC. This step ensures your safety and protects your computer parts. Never open your computer while it is powered on.
Removing Old Ram Modules
Removing old RAM modules is the first step before installing new memory in your computer. This process helps prevent damage to the hardware. It also ensures the new RAM fits correctly and works well. Follow the steps carefully to avoid any issues.
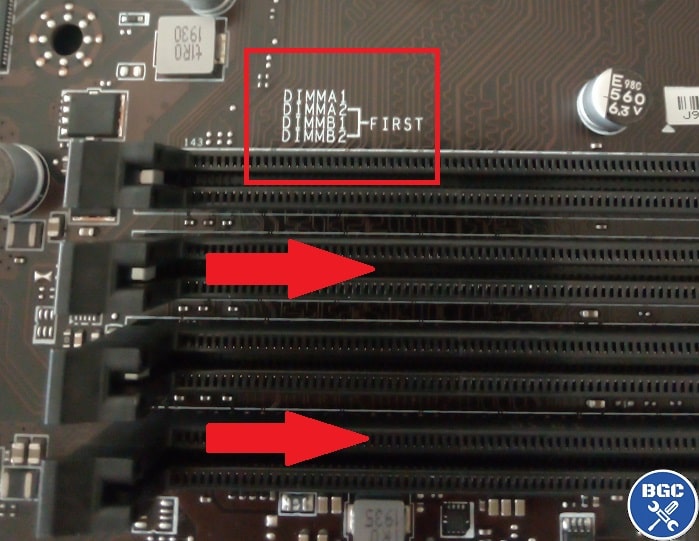
Locate Ram Slots
Open your computer case gently. Look for the long slots near the CPU. These are the RAM slots. They usually hold the memory sticks horizontally. Check the motherboard manual if you have trouble finding them.
Release Retention Clips
At each end of the RAM slots, find small plastic clips. These clips hold the RAM modules in place. Push them outward carefully. The clips will release the RAM stick. Do not use too much force to avoid breaking the clips.
Carefully Extract Modules
Hold the RAM module by the edges. Pull it straight out of the slot slowly. Avoid touching the gold connectors. Place the removed RAM on an anti-static surface. This keeps the module safe from damage.
Installing New Ram Modules
Installing new RAM modules is a key step to boost your computer’s speed. It is simple but needs care. Follow the right steps to avoid damage and ensure your system works well. This guide helps you install RAM safely and correctly.
Aligning The Module Correctly
Check the RAM module and the slot on the motherboard. Notice the small notch on the module edge. Match this notch with the slot key. The module fits only one way. Align it straight without tilting. Proper alignment prevents damage to pins and slot.
Firmly Pressing Into Slot
Hold the RAM module by its edges. Do not touch the gold contacts. Press the module down evenly on both ends. Apply firm, gentle pressure until it clicks into place. Avoid pushing too hard to prevent breakage. A secure fit ensures good connection.
Securing Retention Clips
Check the clips on both sides of the RAM slot. Push each clip inward toward the module. They will snap and lock the RAM in place. Confirm clips hold the module firmly. Loose clips can cause the RAM to disconnect later.
Verifying Installation
After installing RAM, verifying its proper installation is crucial. This step confirms the computer recognizes the new memory. It helps avoid future problems caused by incorrect setup. Follow simple steps to check if RAM works correctly.
Powering On The System
First, turn on your computer. Watch the screen carefully for any error messages. Listen for beeps, which may signal hardware problems. If the system boots without issues, it’s a good sign.
Accessing Bios Or Uefi
Next, enter the BIOS or UEFI settings. Usually, press keys like Delete, F2, or Esc right after powering on. This menu shows detailed hardware information. It’s where you confirm the system detects your RAM.
Checking Ram Recognition
In BIOS or UEFI, find the memory section. Check the total RAM listed matches the installed amount. If the numbers align, the RAM is installed correctly. If not, recheck the RAM sticks for proper seating.
Credit: www.esseg.eu
Optimizing Ram Performance
Optimizing RAM performance is key to making your computer faster and more efficient. Proper settings and tests help your RAM run at its best speed. You get smoother multitasking and better overall system stability. Follow these steps to improve your RAM’s performance after installation.
Enabling Xmp Profiles
XMP stands for Extreme Memory Profile. It allows RAM to run at higher speeds than the default. Most RAM sticks have XMP profiles stored in them. You enable XMP in the BIOS to unlock these speeds. This step helps your RAM reach the speed it was designed for.
Check your motherboard manual to find how to turn on XMP. Once enabled, your system will automatically adjust timings and voltage. This gives a noticeable boost in performance without manual tuning.
Adjusting Bios Settings
The BIOS controls hardware settings on your PC. After installing RAM, enter BIOS to fine-tune memory settings. You can set RAM frequency, timings, and voltage here. Correct settings improve speed and reduce errors.
Use values recommended by your RAM manufacturer. Avoid pushing settings too high to prevent crashes. Save changes and restart your PC for them to take effect.
Running Memory Tests
Memory tests check if your RAM works without errors. Use tools like MemTest86 or Windows Memory Diagnostic. These programs scan your RAM for faults over several passes.
Run tests after installation and after adjusting BIOS settings. If errors appear, reseat the RAM or lower the settings. Passing memory tests means your RAM is stable and reliable.
Troubleshooting Common Issues
Troubleshooting common issues with RAM installation helps keep your PC running smoothly. Problems can happen, but most are easy to fix. Simple checks and adjustments often solve these issues.
System Fails To Boot
Your computer may not start after installing new RAM. This can happen if the RAM is not seated correctly. Power off your PC and remove the RAM modules. Reinsert them firmly until they click into place.
Check for dust or debris in the RAM slots. Clean gently using compressed air. Also, confirm the RAM is compatible with your motherboard model.
Ram Not Fully Detected
The system might show less RAM than installed. This issue often occurs when modules are not in the right slots. Refer to your motherboard manual to place RAM in recommended slots.
Update your BIOS to the latest version. Sometimes, older BIOS versions fail to detect new RAM correctly. Also, run a memory test tool to confirm all RAM is working.
Addressing Compatibility Problems
Compatibility issues cause your PC to crash or freeze. Check the RAM speed and type supported by your motherboard. Mixing different brands or speeds can lead to instability.
Buy RAM with matching specifications. Use the motherboard’s QVL list to find tested modules. If problems persist, try installing one RAM stick at a time to find the faulty one.

Credit: www.sweetwater.com
Frequently Asked Questions
How Do I Prepare My Pc Before Installing Ram?
Turn off your PC and unplug it from the power source. Ground yourself to avoid static damage. Open the case carefully to access the RAM slots.
What Type Of Ram Is Compatible With My Motherboard?
Check your motherboard manual or website for supported RAM types. Consider DDR generation, speed, and maximum capacity for compatibility.
How Do I Correctly Insert Ram Sticks Into Slots?
Align the RAM notch with the slot key. Firmly press down until the clips snap into place on both sides.
Can I Mix Different Ram Brands Or Speeds?
Mixing RAM brands is possible but not ideal. Different speeds will default to the slowest RAM’s speed, potentially reducing performance.
Conclusion
Installing RAM properly improves your computer’s speed and performance. Follow each step carefully to avoid damage. Make sure the RAM matches your motherboard’s specifications. Handle the memory modules gently and insert them firmly. Double-check connections before powering on your device.
Taking time during installation saves you from future problems. Enjoy a smoother, faster computer experience with correctly installed RAM. Simple steps, big difference.