
Are you looking to boost your laptop’s speed without spending a fortune? Opening your laptop’s RAM is the first step toward upgrading and getting better performance.
But if you’ve never done it before, the idea might feel a bit intimidating. Don’t worry—this guide will walk you through each step clearly and simply. By the end, you’ll know exactly how to open your laptop’s RAM safely and confidently.
Ready to give your laptop the upgrade it deserves? Let’s dive in!
Prepare Your Workspace
Preparing your workspace is the first step before opening your laptop RAM. A clean and organized area helps you work safely and smoothly. It reduces the risk of losing small parts or damaging your laptop. Setting up the right environment also protects your laptop from static electricity, which can harm internal components.
Gather Necessary Tools
Collect all tools needed before starting. Usually, a small Phillips screwdriver works for most laptops. You might also need a plastic pry tool to open the case without scratching it. Have a small container ready to keep screws safe. Avoid using sharp metal objects that can damage your laptop.
Ensure Static-free Environment
Static electricity can damage your laptop’s RAM and other parts. Work on a hard surface, not on carpet or fabric. Touch a grounded metal object before you start to discharge static electricity from your body. Use an anti-static wrist strap for extra protection if you have one. Keep your workspace dry and clean for the best results.

Credit: www.youtube.com
Power Down And Unplug
Before opening your laptop to upgrade or check the RAM, power down and unplug it. This step is very important for your safety and to protect your laptop from damage. It stops electricity flow inside the laptop. This helps avoid shocks or short circuits while you work on the hardware.
Taking time to shut down and unplug also prevents data loss. It ensures the laptop is fully off, so no parts are still running or warm. Careful preparation makes the process smooth and safe.
Shut Down The Laptop
Turn off your laptop using the normal shutdown process. Click the Start menu, then select “Shut down.” Wait until the screen goes black and no lights blink. Do not just close the lid or press the power button briefly. These may put the laptop to sleep, not fully off.
Disconnect All Cables And Accessories
Remove the power cable from the laptop and the wall socket. Take out any connected devices, like a mouse, keyboard, or external hard drive. Also unplug any network cables or USB drives. This clears the workspace and stops any power from reaching the laptop. Your laptop is now ready to open safely.
Locate The Ram Compartment
Finding the RAM compartment is the first step to upgrade or replace your laptop memory. This part holds the RAM sticks and allows easy access. Knowing its exact location saves time and prevents damage.
Each laptop model has a different design. The RAM compartment may be under the main cover or a smaller panel. Identifying it correctly helps in opening the right section safely.
Check Laptop Manual
The laptop manual offers clear guidance on the RAM location. It often includes diagrams and step-by-step instructions. Manuals are available in print or online on the manufacturer’s site.
Look for sections titled “Memory Upgrade” or “Hardware Maintenance.” These parts explain how to find and open the RAM compartment. Reading the manual reduces guesswork and risk of damage.
Identify Access Panels
Most laptops have small screws securing the access panels on the back. These panels cover different parts like the battery, hard drive, or RAM. The RAM panel is usually smaller or labeled.
Check for a rectangle or square panel near the center or side. Use a screwdriver to remove the screws carefully. Keep screws safe for reassembly after accessing the RAM slots.
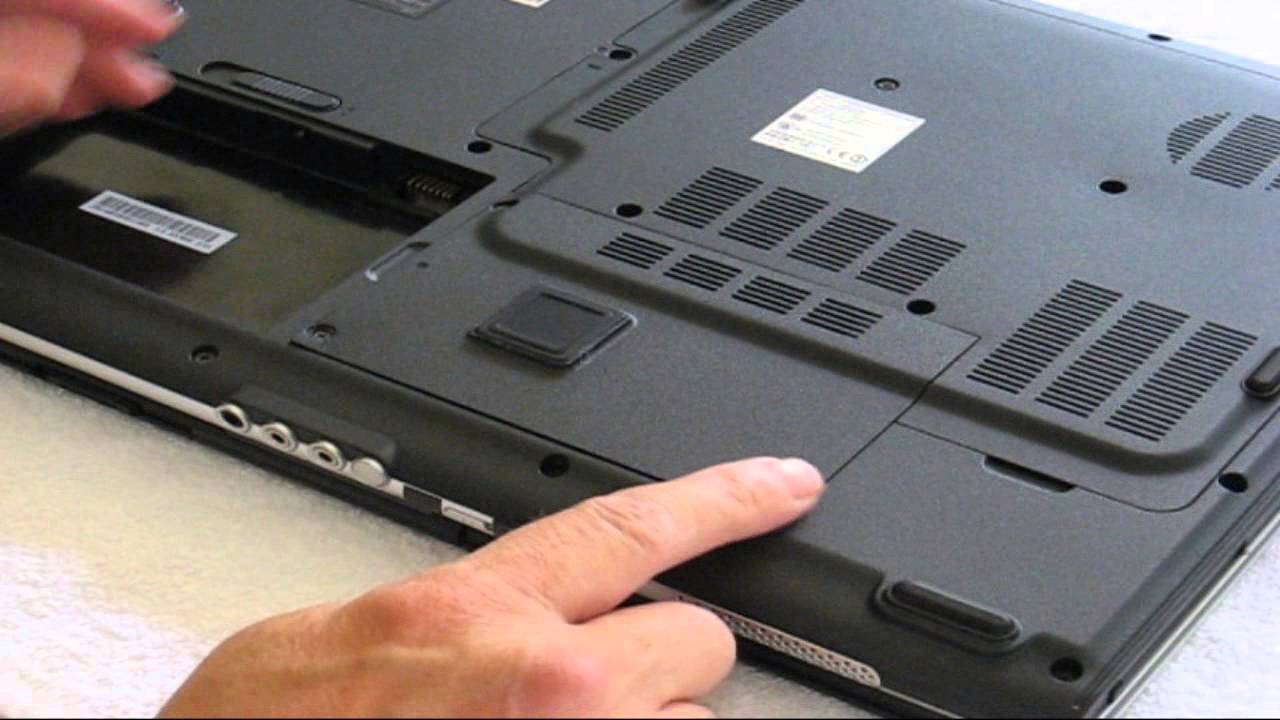
Credit: www.youtube.com
Remove The Back Cover
Removing the back cover of your laptop is the first step to access the RAM. It protects the internal parts and needs careful handling. Before you start, make sure the laptop is off and unplugged. Keep a clean workspace to avoid losing small screws.
Unscrew Fasteners
Locate all screws holding the back cover in place. Use a small screwdriver that fits the screws perfectly. Turn each screw counterclockwise to remove it. Keep the screws in a safe place. Some laptops have hidden screws under stickers or rubber feet. Check carefully to find all fasteners.
Lift The Panel Carefully
After removing the screws, gently lift the back panel. Use your fingers or a plastic pry tool to avoid damage. Start at one corner and work around the edges slowly. Do not force the panel open. It may have clips inside that need a soft pull. Set the panel aside once it is free.
Access And Remove Existing Ram
Accessing and removing existing RAM is the first step to upgrade or replace your laptop’s memory. It requires careful handling to avoid damage. Knowing how to open the RAM compartment and remove the modules safely helps ensure a smooth process.
Start by turning off your laptop and unplugging all cables. Place it on a flat surface with good lighting. Ground yourself to prevent static electricity from harming the components. Then, open the back cover to reach the RAM slots.
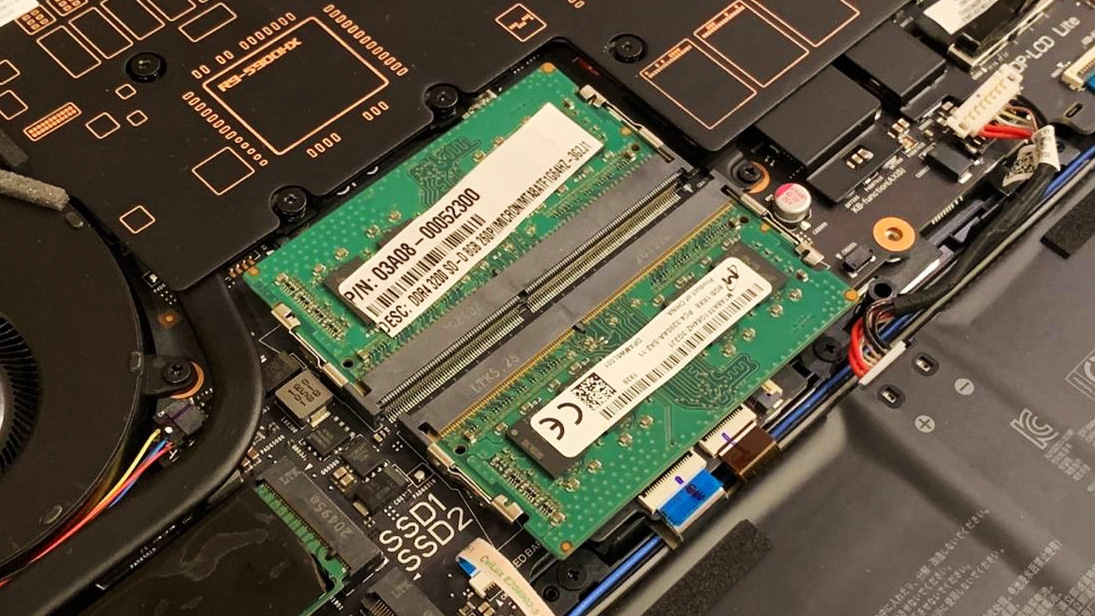
Release Ram Clips
Locate the small clips on each side of the RAM module. These clips hold the RAM firmly in place. Gently push them outward, away from the RAM. The module will pop up slightly. Do not use too much force. The clips are delicate and can break easily.
Gently Remove Ram Modules
Once the RAM module tilts up, hold it by the edges. Avoid touching the gold connectors or chips. Slowly pull the module out of the slot at an angle. Keep the module straight to prevent bending. Place the removed RAM on an anti-static surface or bag.
Install New Ram Modules
Installing new RAM modules is a simple way to improve your laptop’s speed. It helps your laptop run programs faster and handle more tasks at once. Proper installation is important for the new RAM to work well. Follow these steps carefully to add your new memory.
Align And Insert Modules
First, hold the RAM module by its edges. Avoid touching the gold connectors. Look for the notch on the module. Match the notch with the slot in your laptop’s RAM bay. This ensures you insert the RAM the right way.
Gently push the module into the slot. Do not force it. Apply even pressure until it fits snugly. The module should sit flat and straight in the slot.
Secure Ram With Clips
Locate the clips on each side of the RAM slot. These clips hold the module in place. Push the clips toward the RAM gently. They will click and lock the module.
Check that the RAM does not move. The clips keep it secure during use. Properly secured RAM prevents damage and errors.
Reassemble The Laptop
After installing or upgrading your laptop RAM, it’s important to put everything back correctly. Reassembling the laptop carefully ensures it works well and stays safe from damage. Follow simple steps to close your laptop properly.
Replace The Back Cover
Start by placing the back cover on the laptop. Match the edges carefully with the body. Press gently but firmly to snap the cover into place. Make sure it fits evenly and no gaps remain. This helps protect the inside parts from dust and damage.
Tighten Screws
Use a screwdriver to fasten all screws you removed earlier. Tighten each screw evenly without forcing it. Loose screws can cause parts to move and damage the laptop. Over-tightening might strip the screw holes. Check every screw to secure the back cover firmly.
Credit: rog.asus.com
Test The Upgrade
Testing the RAM upgrade is an important step after installing new memory. It ensures the laptop recognizes the new RAM and works well. This helps avoid problems later and confirms your effort was successful.
Power On The Laptop
First, close the laptop case and plug in the power cable. Press the power button to turn on the laptop. Listen for any unusual sounds or beeps during startup. These sounds can signal memory issues. Wait for the laptop to fully boot to the desktop or login screen.
Check System Memory
Next, check if the system detects the new RAM. On Windows, right-click on “This PC” and select “Properties.” Look at the installed memory (RAM) listed there. On Mac, click the Apple menu and choose “About This Mac.” The memory section shows the total RAM. Make sure this number matches the new amount you installed. This confirms the upgrade was successful.
Frequently Asked Questions
How Do I Safely Open My Laptop Ram Compartment?
Turn off and unplug your laptop first. Place it on a flat surface. Use a screwdriver to remove the RAM compartment cover screws. Gently lift the cover to access the RAM slots without forcing it.
What Tools Do I Need To Open Laptop Ram?
You typically need a small Phillips-head screwdriver. An anti-static wrist strap is recommended to prevent static damage. A clean, flat workspace helps keep screws and parts organized during the process.
Can I Upgrade My Laptop Ram By Myself?
Yes, if your laptop allows easy RAM access. Check your laptop manual for compatibility and maximum RAM size. Carefully remove existing RAM modules and insert new ones, ensuring proper alignment.
How Do I Identify My Laptop Ram Type?
Check your laptop’s specifications online or in the user manual. Use system information tools like CPU-Z to identify RAM type, speed, and capacity. This ensures compatibility when upgrading or replacing RAM.
Conclusion
Opening your laptop’s RAM is simpler than it seems. Take your time and follow each step carefully. Always turn off and unplug the laptop first. Handle parts gently to avoid damage. With patience, you can improve your laptop’s speed. Remember, safety comes first.
Now, you are ready to upgrade your laptop’s memory with confidence.