
Are you staring at your CPU cabinet, unsure how to open it without causing damage? Whether you want to clean dust, upgrade parts, or troubleshoot a problem, knowing how to open your CPU cabinet safely is the first step.
In this guide, you’ll discover simple, clear instructions that anyone can follow—even if you’re not tech-savvy. Keep reading, and you’ll gain the confidence to open your CPU cabinet quickly and without stress. Your computer’s health depends on it!

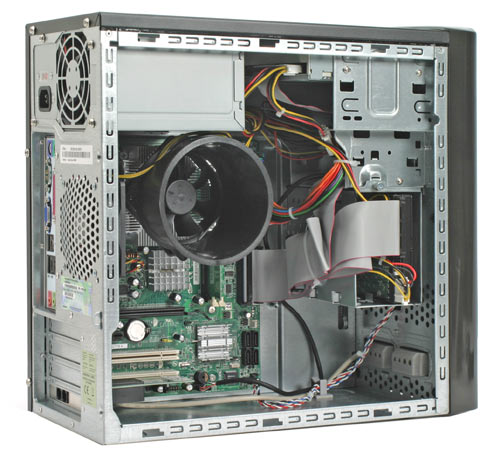
Credit: www.reddit.com
Tools Needed
Opening a CPU cabinet requires a few simple tools. Using the right tools makes the job easier and safer. Prepare these tools before you start to avoid interruptions.
Essential Tools
A screwdriver is the most important tool. Most CPU cabinets use Phillips-head screws. Have a small to medium size screwdriver ready. A flat-head screwdriver can help pry open tight spots. Tweezers are useful for handling small screws or parts. Keep a flashlight nearby to see inside the cabinet clearly. A soft brush helps remove dust from inside the case.
Safety Gear
Wear an anti-static wristband to protect computer parts from static electricity. Static can damage sensitive components. Gloves protect your hands from sharp edges inside the case. Safety glasses keep your eyes safe from dust or small debris. Work in a clean, dry area to avoid accidents. Turn off and unplug the computer before opening the cabinet.
Credit: www.build-your-own-computer.net
Preparing Your Workspace
Preparing your workspace is the first step before opening your CPU cabinet. A clean and well-lit area helps you work safely and efficiently. It reduces the risk of losing small parts or damaging components inside the cabinet.
Taking time to prepare also makes the process faster and less stressful. Focus on creating a space where you can easily reach tools and parts. Keep distractions away to maintain your attention during the task.
Clearing The Area
Start by removing all unnecessary items from your workspace. Clear the desk or table to have a flat surface. This gives you enough room to place the CPU and tools.
Free space helps prevent accidents like knocking over the CPU or dropping screws. Keep only what you need nearby, such as screwdrivers and a small container for screws.
Ensuring Proper Lighting
Good lighting is crucial for seeing small parts inside the CPU cabinet. Use a bright lamp or work near a window during daytime. Avoid shadows that can hide screws or connectors.
Proper light reduces eye strain and helps you avoid mistakes. Check that your light source does not create glare on the cabinet surface. Adjust the angle if needed for clear visibility.
Power Off And Unplug
Before opening a CPU cabinet, always start by powering off the computer. This step is crucial for safety and protects your hardware. Handling components while the computer is on can cause damage or electric shock. Unplugging the power cord fully disconnects the system from electricity. It also stops any background power flow that may harm parts inside.
Take your time with this process. It prepares your device and keeps you safe during the next steps. Powering off and unplugging is the first rule in any computer maintenance task.
Shutting Down The Computer
Press the Start menu and select “Shut down.” Wait for the screen to go completely black. This ensures the operating system closes all processes. Avoid forcing power off by holding the power button. Let the system turn off naturally to prevent data loss or damage.
Disconnecting Cables
Unplug the power cable from the wall socket or power strip. Remove all other cables connected to the CPU cabinet. This includes keyboard, mouse, monitor, and network cables. Clear the workspace around the CPU to avoid pulling wires accidentally. Keep the cables organized for easy reconnection later.
Locating The Screws
Opening a CPU cabinet starts with locating the screws. Screws hold the cabinet panels tightly in place. Knowing where they are helps you open the case safely. It prevents damage to the computer parts inside.
Every cabinet model is different. Screws can be on the back, sides, or bottom. Sometimes, screws hide under stickers or plastic covers. Taking your time to find all screws makes the process easier.
Common Screw Types
Most CPU cabinets use Phillips head screws. These have a cross-shaped slot. A Phillips screwdriver fits these screws perfectly. Some older models use flathead screws. These have a simple straight slot. Rarely, you may find hex or Torx screws. Each type needs the right tool for removal.
Finding Screw Positions
Screws usually line the edges of the cabinet’s back panel. Check the top and bottom edges too. Some screws secure side panels, often near corners. Look under rubber feet or stickers on the cabinet’s base. These can cover hidden screws. Be gentle while checking to avoid damage.
Removing The Side Panel
Removing the side panel of a CPU cabinet is the first step to access its internal parts. This task is simple but needs care. The side panel protects the inside, so handle it gently. Each computer case may have a slightly different design. Still, the basic steps to remove the side panel are similar.
Unscrewing The Panel
Look at the back of the CPU cabinet. You will see screws holding the side panel in place. Use a screwdriver to remove these screws. Keep the screws safe for later use. Some cases have thumbscrews that can be turned by hand. Unscrew all the fasteners before trying to remove the panel.
Sliding Or Lifting Off
After unscrewing, check how the panel is attached. Most panels slide backward or lift off easily. Gently push the panel toward the back. If it does not slide, try lifting it up slightly. Avoid using force to prevent damage. Once free, set the panel aside on a soft surface.
Handling Internal Components
Handling internal components inside a CPU cabinet requires care and attention. These parts are delicate and can easily get damaged. Understanding how to manage them properly helps keep your computer safe and working well.
Many parts inside the cabinet are sensitive to electrical charges. A small static shock can harm them. Knowing the key parts also helps you avoid mistakes while working inside the cabinet.
Avoiding Static Damage
Static electricity can harm your computer parts quickly. Touch a metal object to release static before opening the cabinet. Use an anti-static wristband if possible. Avoid working on carpet or dry floors. Keep your hands dry and clean. Handle parts by the edges, not the circuits.
Identifying Key Parts
Know the main components inside the CPU cabinet. The motherboard is the large board that holds many parts. The CPU sits on the motherboard under a fan. RAM sticks are long and thin, plugged into slots on the motherboard. The hard drive stores all your files and data. Power cables connect the power supply to parts. Recognizing these parts helps you work safely and confidently.
Troubleshooting Common Issues
Opening a CPU cabinet can sometimes be tricky. Many users face small problems that stop them from accessing the inside of their computer. Knowing how to fix these common issues saves time and avoids damage. This section covers two frequent problems: stuck panels and missing screws. These tips help you open your CPU cabinet safely and easily.
Stuck Panels
Panels can get stuck due to dust, rust, or tight fittings. Try pressing gently around the edges to find any spots that hold the panel. Use a flat tool like a plastic card to nudge the panel open. Avoid using metal tools that can scratch or damage the case. Sometimes, loosening nearby screws helps release the panel. Clean the edges regularly to prevent sticking in the future.
Missing Screws
Missing screws cause the panel to fit poorly or fall off. Check the screws carefully before starting work. Use small containers to keep screws safe while working. If screws are lost, find replacements at hardware stores or online. Match the size and thread type to your original screws. Avoid forcing the panel without screws, as this can bend or damage it.

Credit: softwareg.com.au
Frequently Asked Questions
How Do I Safely Open A Cpu Cabinet?
First, turn off the computer and unplug all cables. Press the power button to discharge residual energy. Remove screws or slide the side panel carefully. Avoid touching internal components directly to prevent static damage.
What Tools Are Needed To Open A Cpu Cabinet?
Typically, a Phillips-head screwdriver is required to remove screws. Some cabinets use thumbscrews or sliding panels that need no tools. Always check your CPU model for specific tools or instructions.
Can I Open A Cpu Cabinet Without Voiding Warranty?
Opening the CPU cabinet may void warranty depending on manufacturer policies. Check your warranty terms before proceeding. Some brands allow opening for upgrades, but others strictly prohibit it.
How To Avoid Static Damage When Opening A Cpu Cabinet?
Use an anti-static wrist strap or touch a grounded metal object. Work on a non-conductive surface, and avoid carpeted areas. Handle components by edges to minimize static electricity risks.
Conclusion
Opening a CPU cabinet is easier than it seems. Just follow the steps carefully and take your time. Always remember to turn off your computer and unplug it first. Use the right tools and handle parts gently. This way, you avoid damage and keep everything safe.
With practice, opening the cabinet will feel natural. Now, you can check or upgrade your computer parts with confidence. Simple and clear steps lead to success every time.