
Have you ever wondered how powerful your computer really is? Knowing how many cores your CPU has can give you a clear idea of its speed and multitasking ability.
But if you’re not sure where to look or what to check, it can feel confusing. Don’t worry—this guide will show you simple and quick ways to find out exactly how many cores your CPU has. By the end, you’ll understand your computer better and make smarter choices when upgrading or troubleshooting.
Keep reading to unlock the secret inside your machine!
Check System Information
Knowing how many cores your CPU has is simple. The easiest way is to check your system information. This information shows details about your computer’s hardware. It tells you about the processor, memory, and other parts. Each operating system has a different method to find this data. Below are clear steps for Windows, Mac, and Linux users.
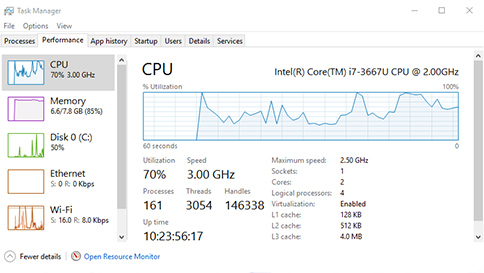
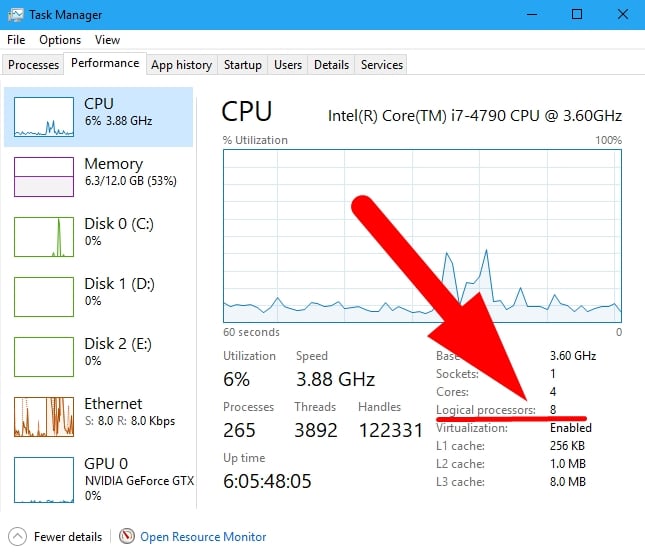
Windows Task Manager
Press Ctrl + Shift + Esc to open Task Manager. Click the “Performance” tab at the top. Select “CPU” from the left menu. Look at the bottom right corner. You will see the number of cores and logical processors. Cores represent physical cores. Logical processors include virtual cores from hyper-threading.
Mac About This Mac
Click the Apple icon in the top-left corner. Choose “About This Mac” from the menu. Click the “System Report” button. In the window, select “Hardware” then “Processor.” The processor section shows the number of cores. It also lists the processor’s model and speed.
Linux Terminal Commands
Open the terminal application on your Linux system. Type lscpu and press Enter. Look for “CPU(s)” to find total cores. “Core(s) per socket” shows physical cores per CPU. Another command is cat /proc/cpuinfo. Count the “processor” entries to see total cores.

Credit: www.cgdirector.com
Use Command Line Tools
Command line tools offer a quick way to find out how many cores your CPU has. These tools work on different operating systems and do not require extra software. They show detailed information about your processor in just a few steps.
Using the command line is simple. You just type a command and get the data immediately. This method is helpful for users who want direct and clear answers.
Windows Command Prompt
Open the Command Prompt by typing cmd in the Start menu. Then enter the command wmic cpu get NumberOfCores. This command displays the number of physical cores in your CPU.
For logical cores, use wmic cpu get NumberOfLogicalProcessors. It shows the total threads your processor can handle.
Mac Terminal
Launch Terminal from the Applications or Spotlight search. Type sysctl -n hw.physicalcpu to find the count of physical cores. To see logical cores, use sysctl -n hw.logicalcpu.
These commands give a clear picture of your CPU’s core setup quickly.
Linux Shell
Open your terminal window. Type lscpu and press Enter. This command lists many CPU details, including cores per socket and CPU sockets.
Alternatively, use cat /proc/cpuinfo | grep processor | wc -l to count all logical cores. This method works on most Linux distributions.
Identify Cores In Bios/uefi
Finding out how many cores your CPU has can be done directly in the BIOS or UEFI settings. This method shows the exact number of active cores your processor has. The BIOS/UEFI is the firmware that starts your computer before the operating system loads. It gives detailed hardware information, including CPU cores.
Accessing BIOS/UEFI is simple and does not require any software tools. It helps you see the hardware status clearly. Knowing your CPU cores here is useful for troubleshooting or checking system capabilities.
Accessing Bios/uefi Setup
Restart your computer and press the setup key during startup. Common keys are Delete, F2, or Esc, but it varies by brand. Watch the screen carefully for the prompt to enter BIOS or UEFI. Press the key quickly before the system loads the operating system.
Finding Cpu Information In Bios/uefi
Once inside BIOS or UEFI, navigate to the system information or CPU section. This page lists details about the processor. Look for terms like “Processor,” “CPU,” or “Core Count.” The number shown there is your CPU core count.
Understanding Core Count Display
Some BIOS/UEFI versions list cores as “Logical Processors.” This includes physical cores and hyper-threaded cores. Physical cores are the actual hardware cores. Hyper-threading doubles threads per core but is not the same as physical cores.
Checking Core Status And Settings
BIOS/UEFI also lets you enable or disable CPU cores. Some systems allow turning off cores for power saving or troubleshooting. Ensure all cores are enabled to get the full CPU performance. If cores are disabled here, your system shows fewer cores than physically present.
Credit: support.microsoft.com
Third-party Software Options
Third-party software offers a simple way to check your CPU cores. These tools work on Windows and other systems. They give detailed information about your processor, including core count. Using these programs can save time and avoid complex commands. Below are some popular options you can try.
Cpu-z For Windows
CPU-Z is a free tool for Windows users. It shows the number of cores and threads clearly. The interface is simple and easy to read. You can also see other CPU details like clock speed and cache size. CPU-Z works without installation, making it quick to use.
Intel Processor Identification Utility
This tool is made by Intel for Intel CPUs. It provides accurate data about your processor. Core count, processor name, and features are shown. The program runs on Windows and updates automatically. It helps verify your CPU model and specs fast.
Other Popular Tools
Many other apps can check CPU cores. Speccy is a popular choice with a user-friendly design. HWMonitor shows temperature and power details alongside cores. HWiNFO offers in-depth system info for advanced users. These tools work well for quick CPU checks.
Interpreting Core Counts
Understanding the number of cores in your CPU is key to knowing its power. Core counts affect how fast your computer runs tasks. More cores allow your CPU to handle more work at the same time. But not all cores are the same. Some are physical, and some are logical. Knowing the difference helps you understand your CPU’s true capabilities.
Physical Vs Logical Cores
Physical cores are the real, hardware parts inside the CPU. Each core can work on a task independently. Logical cores are virtual cores created by the CPU to increase efficiency. They allow one physical core to act like two. Logical cores help run more threads at once but don’t double the power.
For example, a CPU with 4 physical cores and 8 logical cores means each physical core has 2 logical cores. This setup improves multitasking but is not the same as having 8 physical cores. Physical cores handle most of the heavy work.
Hyper-threading Explained
Hyper-threading is a technology used by Intel CPUs. It lets one physical core run two threads at the same time. This creates logical cores that improve task management. Hyper-threading helps your computer run smoother with many programs open.
Not all CPUs have hyper-threading. AMD uses a similar technology called SMT (Simultaneous Multi-Threading). Both make CPUs more efficient but do not double the speed. Understanding hyper-threading clarifies why logical cores exist and their role.
Credit: softwareg.com.au
Why Core Count Matters
Understanding the number of cores in your CPU is important. It helps you know how well your computer will handle tasks. The core count affects speed and how many jobs your PC can do at once. This section explains why core count matters for your computer’s performance and multitasking.
Performance Impact
Each core in a CPU acts like a small worker. More cores mean more workers to share the job. This helps your computer finish tasks faster. Programs that use many cores run smoother and quicker. Simple tasks may not need many cores. But heavy software benefits from a higher core count.
Multitasking Benefits
More cores allow your PC to do many things at the same time. You can browse the web, watch videos, and run apps without slowdowns. Each core handles different tasks, so the computer stays fast. This is useful for people who use many programs at once. A higher core count helps keep everything running smoothly.
Frequently Asked Questions
How Can I Check My Cpu Cores On Windows?
You can check CPU cores on Windows via Task Manager. Press Ctrl+Shift+Esc, go to Performance, then CPU tab. Look for “Cores” to see the exact number of cores your CPU has.
What Command Shows Cpu Cores On Mac?
On Mac, open Terminal and type sysctl -n hw. physicalcpu. This command returns the number of physical CPU cores. It’s a quick way to find out your Mac’s core count.
Can I Find Cpu Cores Using Linux Terminal?
Yes, run lscpu or cat /proc/cpuinfo | grep “cpu cores” in Linux terminal. These commands display detailed CPU information including the number of cores.
Why Is Knowing Cpu Cores Important?
Knowing CPU cores helps optimize software and multitasking performance. More cores generally improve speed and efficiency for demanding applications.
Conclusion
Knowing how many cores your CPU has helps you understand its power. It shows how well your computer can handle tasks. Checking core count is quick and simple with the right tools. This knowledge guides you in choosing software or upgrading hardware.
Keep this info handy for better computer decisions. Now, you can easily find your CPU’s core number anytime. It’s a small step that makes a big difference in using your device.