
Installing a CPU on your motherboard might sound tricky, but with the right steps, you can do it yourself easily. Imagine boosting your computer’s power without paying a technician.
You’re just a few simple moves away from making that happen. In this guide, you’ll learn exactly how to install your CPU safely and correctly, avoiding common mistakes that could cost you time and money. Ready to take control of your PC build?
Let’s dive in and make your setup flawless from the start.
Prepare Your Workspace
Clear a clean, flat surface to work on. Gather all tools and parts before starting. Keep your hands dry and avoid static electricity.
Gather Necessary Tools
Start by collecting all tools you need to install the CPU. Common tools include a screwdriver, thermal paste, and an anti-static wrist strap. Check the motherboard and CPU manuals for specific requirements. Having tools ready helps avoid delays and mistakes during installation. Keep everything close to your workspace for easy access.
Ensure Static-free Environment
Static electricity can harm your CPU and motherboard. Create a static-free area by working on a clean, hard surface. Avoid carpets and rugs that generate static. Use an anti-static wrist strap connected to a grounded object. Touch a metal object to discharge static before handling parts. This simple step protects sensitive components from damage.
Credit: www.youtube.com
Check Your Cpu And Motherboard Compatibility
Checking CPU and motherboard compatibility is a key step before installation. It helps avoid damage and ensures your system works well. This process involves matching the CPU with the correct motherboard socket type. Understanding this match saves time and prevents errors during setup.
Identify Cpu Socket Type
Every CPU has a specific socket type. The socket is the physical interface on the motherboard where the CPU fits. Look at the CPU model number to find its socket type. Use the manufacturer’s website or product manual for accurate details. Knowing the CPU socket type is the first step to confirm compatibility.
Match Motherboard Socket
The motherboard must have the same socket type as the CPU. Check the motherboard box or manual for socket details. If the socket types do not match, the CPU will not fit. A matching socket ensures proper connection and function. This step avoids buying incompatible hardware parts.
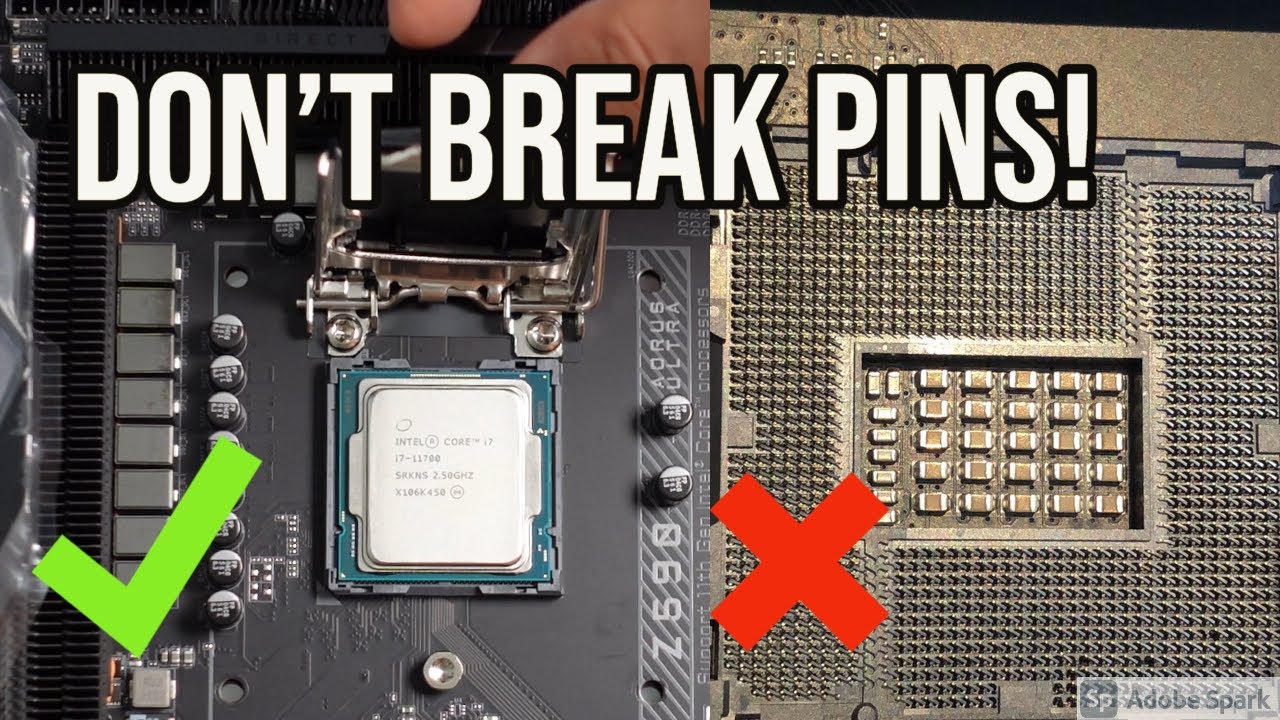
Open The Motherboard Socket
Opening the motherboard socket is a key step in installing your CPU. This step prepares the socket to receive the processor safely. Handling the socket carefully avoids damage to the delicate pins or pads. Follow these simple steps to open the socket correctly.
Locate The Cpu Socket
Find the CPU socket on the motherboard. It is a large square or rectangular area. Usually, it sits near the center of the board. The socket has many tiny holes or pins inside. These connect the CPU to the motherboard.
The socket is often covered by a protective plastic cap. This cap protects the pins before installation. Do not remove the cap until you are ready to place the CPU.
Unlock The Socket Lever
Next, look for the metal lever beside the socket. This lever locks the socket cover in place. Gently lift the lever away from the socket. It may require a little force but be careful.
Lift the lever up and out to release the socket cover. The cover will then lift up or swing open. This exposes the socket pins or pads. Now the socket is open and ready for the CPU.
Install The Cpu
Installing the CPU on the motherboard is a careful task. It needs attention and a steady hand. This step sets the foundation for your computer’s performance. Follow simple steps to ensure the CPU fits perfectly. Proper installation avoids damage and ensures the system runs smoothly.
Align Cpu Pins Correctly
Start by holding the CPU gently. Check the small triangle on one corner of the CPU. Match this triangle with the same mark on the motherboard socket. This alignment ensures the pins fit the holes correctly. Never force the CPU into the socket. Correct alignment prevents bent pins and damage.
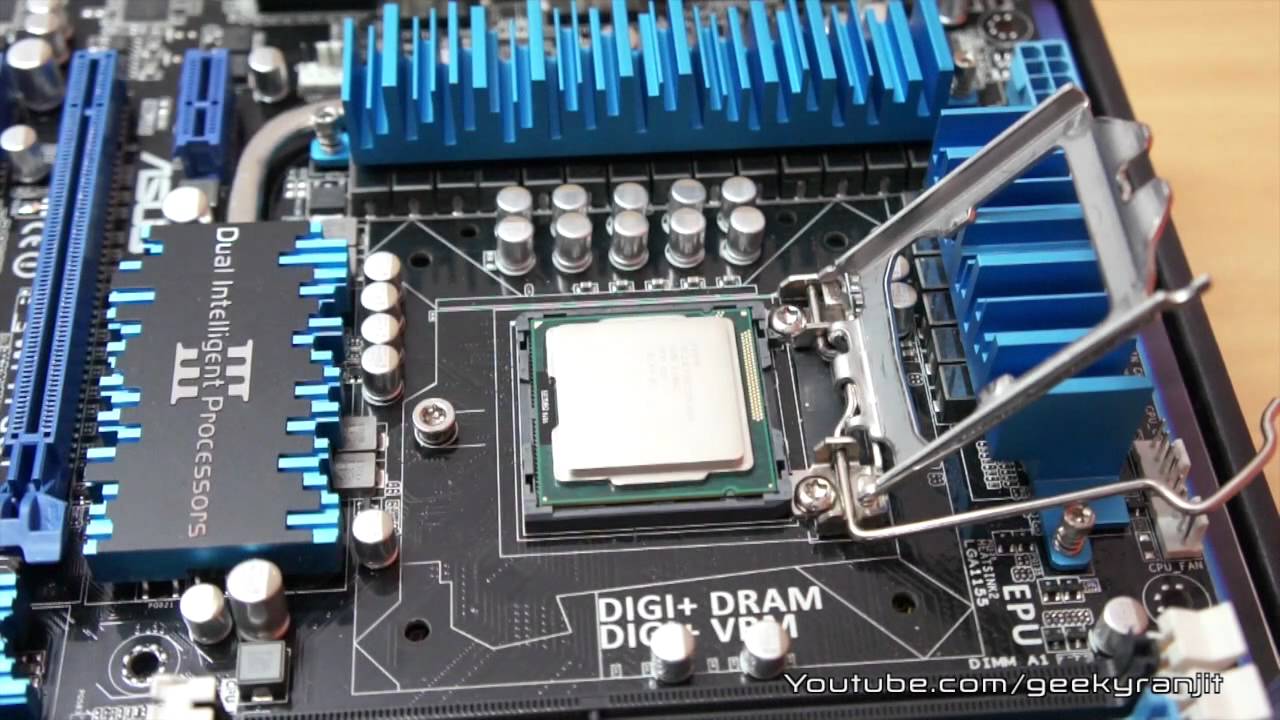
Place Cpu Into Socket
Once aligned, carefully place the CPU straight down into the socket. Let it sit naturally without pressure. The CPU should drop into place smoothly. If it does not, check the alignment again. Proper placement protects delicate pins and the socket.
Secure The Cpu With Lever
After placing the CPU, lower the locking lever. This lever holds the CPU tightly in place. Press it down gently until it clicks or locks. The CPU should not move after this step. The lever keeps the CPU stable during computer use.
Apply Thermal Paste
Applying thermal paste is a crucial step when installing a CPU on a motherboard. It helps transfer heat from the CPU to the cooler. This keeps the CPU cool and prevents overheating. Proper application improves your computer’s performance and lifespan.
Choose The Right Thermal Paste
Select thermal paste that suits your CPU and cooler. Most users prefer a non-conductive paste to avoid short circuits. Look for a brand with good heat transfer ratings. Avoid old or dried paste for best results.
Apply A Small Amount On Cpu
Use a small pea-sized drop in the center of the CPU. Too much paste can cause spills and reduce effectiveness. Too little paste will not cover the CPU properly. After applying, the cooler will spread the paste evenly.

Credit: www.hackster.io
Attach The Cpu Cooler
Attaching the CPU cooler is an important step. It helps keep the CPU cool during use. Without a cooler, the CPU can overheat and stop working. This part guides you through placing and securing the cooler properly.
Position The Cooler Over Cpu
Place the cooler carefully on top of the CPU. Align it with the CPU socket and mounting holes. Make sure the cooler’s base touches the CPU surface evenly. Avoid shifting the cooler once it touches the CPU to keep thermal paste spread well.
Secure The Cooler Firmly
Attach the cooler using the mounting brackets or screws. Tighten screws in a diagonal pattern for even pressure. Do not over-tighten as it can damage the motherboard or CPU. The cooler should feel stable and not move.
Connect Cooler Fan To Motherboard
Locate the CPU fan header on the motherboard. It is usually labeled “CPU_FAN”. Plug the cooler’s fan connector into this header. Ensure the connector fits firmly to allow proper fan control and power supply.
Final Checks Before Power On
Before powering on your computer after installing the CPU, taking some final steps is very important. These checks help avoid damage and ensure everything works correctly. A careful review can save time and prevent hardware problems.
Verify All Connections
Check the CPU power cable is firmly plugged into the motherboard. Make sure the main power cable from the power supply is secure. Confirm the CPU cooler is attached properly and its fan cable is connected to the motherboard. Look over all other cables, like those for the GPU and storage devices. Loose or missing connections can stop the computer from starting.
Clean Up Workspace
Remove any tools or extra parts near the motherboard. Clear out any dust or debris that may have fallen during installation. Avoid leaving small screws or metal objects inside the case. These can cause shorts or damage the hardware. A tidy workspace keeps your build safe and ready to power on.
Credit: www.youtube.com
Frequently Asked Questions
How Do I Prepare The Motherboard For Cpu Installation?
First, place the motherboard on a flat, static-free surface. Open the CPU socket by lifting the retention arm carefully. Ensure no dust or debris is inside the socket before placing the CPU.
How To Align The Cpu Correctly On The Motherboard?
Match the CPU’s golden triangle corner with the socket’s triangle mark. Gently place the CPU into the socket without forcing it. Proper alignment avoids bent pins and ensures correct installation.
What Precautions Should I Take During Cpu Installation?
Handle the CPU by its edges to prevent damage. Avoid touching the pins or contacts. Work in a static-free environment and ground yourself to prevent electrostatic discharge.
How To Secure The Cpu After Placing It?
Lower the retention arm slowly to lock the CPU in place. Do not use excessive force as it can damage the socket. Ensure the CPU is firmly seated and immobile.
Conclusion
Installing a CPU on a motherboard is simple when you follow clear steps. Take your time and handle parts gently. Align the CPU correctly before placing it in the socket. Secure the CPU without forcing it. Double-check connections to avoid issues later.
A well-installed CPU helps your computer run smoothly. Practice makes the process easier and less stressful. Keep your workspace clean and organized for best results. Now, you are ready to build or upgrade your PC with confidence.