
Are you ready to build your own computer but unsure where to start? Installing a motherboard and CPU might seem tricky, but with the right steps, you can do it confidently.
This guide will walk you through the process in simple, clear terms. By the end, you’ll have the skills to set up these key parts without stress. Keep reading, and take control of your PC build from the very beginning.

Credit: www.hackster.io
Preparing Your Workspace
Preparing your workspace is the first important step in installing a motherboard and CPU. A clean, organized area helps avoid mistakes and protects your parts. Taking time to get ready saves effort later and makes the process smoother.
Gathering Tools And Components
Collect all tools before starting. You will need a screwdriver, thermal paste, and your motherboard and CPU. Have extra screws and standoffs on hand. Keep everything close to avoid interruptions. Organize parts on a flat surface to see clearly.
Setting Up An Anti-static Environment
Static electricity can harm computer parts easily. Work on a non-metal surface like a wooden table. Use an anti-static wrist strap if possible. Touch a grounded metal object to release static from your body. Keep parts in anti-static bags until installation. These steps protect your components from damage.
Selecting The Right Motherboard And Cpu
Selecting the right motherboard and CPU is a key step in building a reliable computer. These parts must work well together for the system to run smoothly. Choosing the correct components saves time and prevents future problems.
This guide covers what to check and how to pick parts that fit your needs. Clear steps make the process easier for beginners and experts alike.
Checking Compatibility
Not all motherboards and CPUs fit each other. They must share the same socket type. For example, an Intel CPU needs an Intel-compatible motherboard socket.
Check the motherboard’s chipset. It controls how the CPU and other parts communicate. The chipset must support your CPU model.
Memory support is important too. Your motherboard should support the type and speed of RAM you plan to use. This avoids performance issues.
Choosing Based On Needs
Think about what you want from your computer. For basic tasks, a budget CPU and motherboard work well. For gaming or editing, choose higher-performance parts.
Consider the number of cores and clock speed in the CPU. More cores help with multitasking and heavy programs.
Look at the motherboard’s expansion options. Extra slots for graphics cards or storage can be important later.
Installing The Cpu
Installing the CPU is a key step in building a computer. It requires care and attention. A wrong move can damage the processor or motherboard. This guide breaks down the process into simple steps. Follow each step to place the CPU safely and correctly.
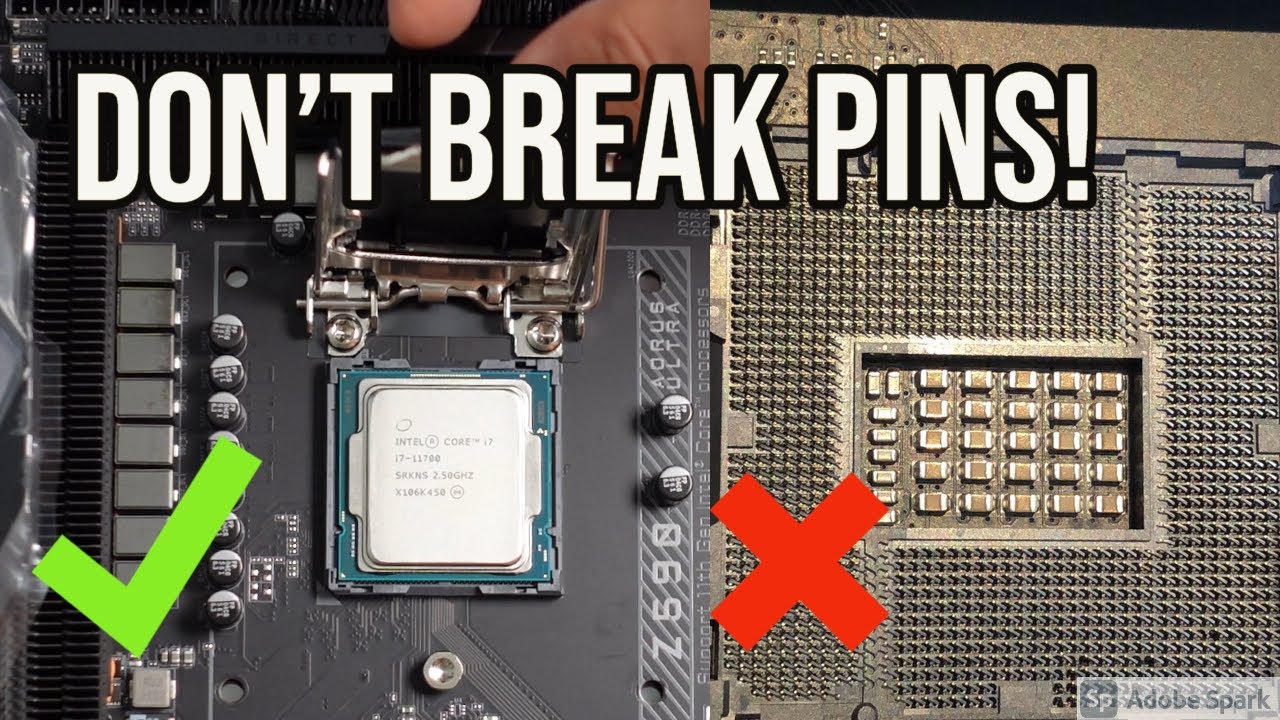
Opening The Cpu Socket
Start by finding the CPU socket on the motherboard. It looks like a square with many tiny holes or pins. There is a small lever or latch on the side. Gently lift the lever to open the socket. Do not force it. The socket is now ready for the CPU.
Aligning And Placing The Cpu
Take the CPU out of its packaging carefully. Hold it by the edges to avoid touching the pins. Look for a small triangle on one corner of the CPU. Match this triangle with the one on the socket. Place the CPU gently into the socket. It should fit without pressure or force.
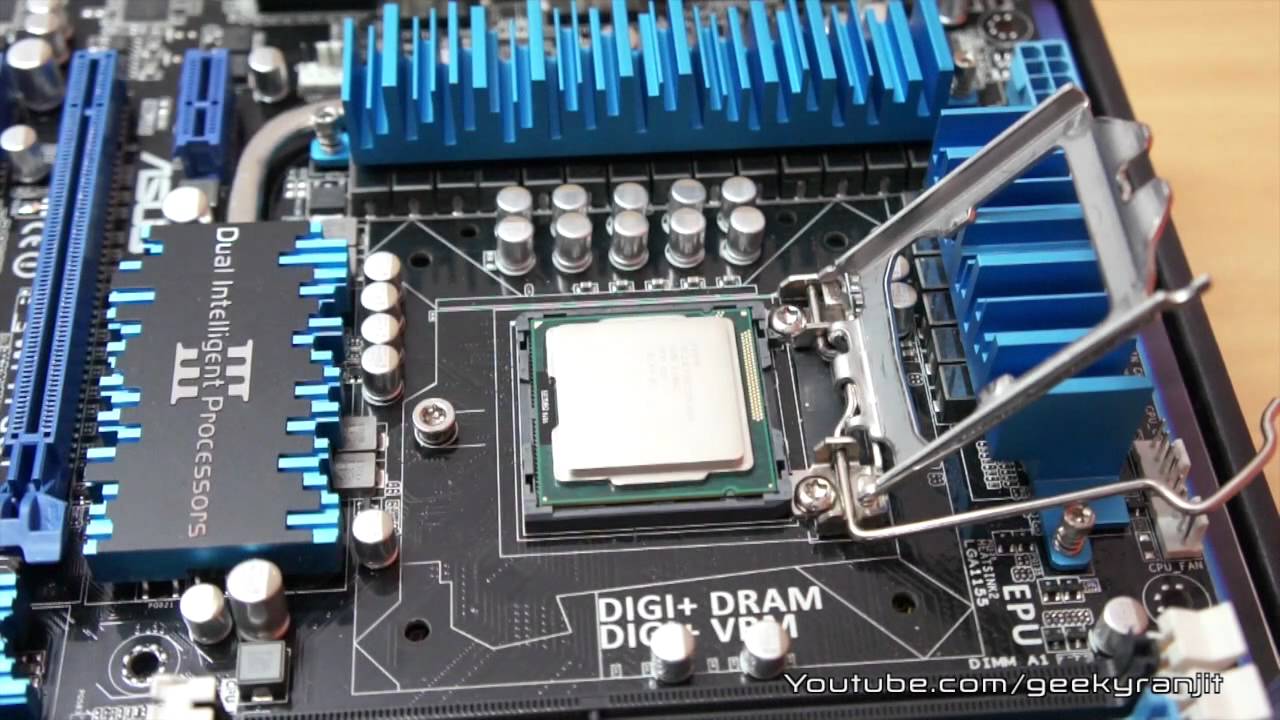
Securing The Cpu In Place
Lower the lever back down slowly to lock the CPU. You may feel some resistance, which is normal. The CPU must be firmly held by the socket. Check that the CPU sits flat and even. Now, the CPU is ready for the next steps, like adding the cooler.
Applying Thermal Paste
Applying thermal paste is a key step in installing your motherboard and CPU. This paste helps transfer heat from the CPU to the cooler. Good heat transfer keeps your CPU safe and running well. Without thermal paste, your CPU may overheat and slow down.
When And How To Apply
Apply thermal paste right after placing the CPU on the motherboard. The CPU surface and cooler base must be clean. Use a small pea-sized amount in the center of the CPU. When you attach the cooler, it spreads the paste evenly. Avoid using too much paste. It can cause poor heat transfer and mess inside the CPU socket.
Avoiding Common Mistakes
Do not skip cleaning the old thermal paste. Use isopropyl alcohol and a soft cloth to clean both surfaces. Avoid touching the CPU surface with your fingers. Dirt or oil reduces thermal paste effectiveness. Do not apply paste around the CPU edges. It can spill and cause short circuits. Lastly, never reuse old thermal paste. Always apply fresh paste for better cooling.
Mounting The Cpu Cooler
Mounting the CPU cooler is a key step in building your PC. It helps keep the CPU cool and prevents overheating. A properly installed cooler ensures your computer runs smoothly and lasts longer.
Types Of Coolers
There are two main types of CPU coolers: air coolers and liquid coolers. Air coolers use a fan and heatsink to cool the CPU. They are easy to install and cost less. Liquid coolers use water to move heat away from the CPU. They are quieter and often cool better but need careful setup.
Attaching The Cooler Securely
First, apply a small amount of thermal paste on the CPU. This helps transfer heat to the cooler. Next, place the cooler on the CPU carefully. Align it with the mounting holes on the motherboard.
Use the screws or clips that come with the cooler to secure it. Tighten them evenly, not too hard. Connect the cooler’s fan cable to the CPU fan header on the motherboard. Check that the cooler is steady and the fan spins freely.
Credit: www.youtube.com
Installing The Motherboard
Installing the motherboard is a key step in building a computer. It acts as the main hub connecting all parts. Proper installation ensures your system runs smoothly and safely. Take your time and follow each step carefully. This section explains how to prepare the case, align, and secure the motherboard.
Preparing The Case
Start by opening the computer case. Remove any panels blocking access. Check for metal standoffs inside the case. These small posts keep the motherboard from touching the case. Install or adjust standoffs to match your motherboard’s holes. Make sure all cables and screws are ready. Clean the case interior to avoid dust.
Aligning And Securing The Motherboard
Place the motherboard inside the case gently. Line up the ports with the case’s back panel. The motherboard’s holes should match the standoffs. Adjust the position carefully to avoid bending. Once aligned, use screws to fasten the motherboard. Tighten screws just enough to hold it firmly. Do not overtighten to avoid damage. Double-check the alignment before moving on.
Connecting Power And Data Cables
Connecting power and data cables is a key step in installing a motherboard and CPU. Proper connections ensure your system runs smoothly. Without correct cables, the computer won’t start or work well. Take your time and follow each step carefully.
Power Supply Connections
Start by connecting the main power cable to the motherboard. This cable usually has 20 or 24 pins. Align it carefully and press it firmly into place. Next, find the CPU power connector. It is smaller and has 4 or 8 pins. Attach this cable near the CPU socket. Make sure both cables fit snugly without forcing them.
Check for extra power cables for components like graphics cards. Connect these if your build needs them. Secure all cables to avoid loose connections that can cause errors or damage.
Connecting Sata And Other Cables
SATA cables link your storage drives to the motherboard. Find the SATA ports on the board. Connect one end of the SATA cable to the drive. Plug the other end into the motherboard port. Attach the power cable from the power supply to the drive as well.
Other cables include front panel connectors for power buttons and USB ports. Refer to the motherboard manual to match each cable to the correct header. Connect these carefully, as the pins are small and fragile.
Final Checks And Testing
After installing the motherboard and CPU, final checks and testing are essential. This step ensures everything is connected right and ready to work. It helps spot errors early, saving time and trouble later.
Careful inspection improves your build’s reliability. It also prepares the system for the first power-up. Follow the steps below for a smooth start.
Verifying All Connections
Check each cable and component connection carefully. Make sure the CPU power cable is firmly plugged in. Confirm the 24-pin motherboard power cable is secure. Verify RAM sticks are fully seated in their slots. Inspect all fan connectors and data cables. Loose connections cause boot failures or hardware errors. Double-check front panel connectors for power and reset buttons. Use a flashlight if needed to see small pins clearly.
Powering On And Bios Setup
Turn on the power supply switch before pressing the case power button. Watch for fan movement and LED lights on the motherboard. If nothing happens, recheck connections. Once powered, enter the BIOS by pressing the key shown on screen. Common keys include Del, F2, or Esc. In BIOS, confirm the CPU and RAM are detected correctly. Set the system date and time. Adjust boot order if needed. Save changes and exit BIOS. The system should now boot to your operating system or installation media.
Credit: www.youtube.com
Frequently Asked Questions
What Tools Do I Need To Install A Motherboard And Cpu?
You need a Phillips-head screwdriver, thermal paste, and an anti-static wrist strap. These tools ensure safe and precise installation, preventing damage to sensitive components. Having these ready makes the process smoother and protects your hardware from static electricity.
How Do I Properly Align The Cpu On The Motherboard?
Align the CPU’s notches with the socket’s keys. Gently place it without forcing, then lock the lever. Proper alignment ensures correct pin connection and prevents damage, enabling smooth CPU installation and optimal performance.
Should I Apply Thermal Paste Before Or After Cpu Installation?
Apply thermal paste after placing the CPU in the socket but before attaching the cooler. A pea-sized amount spread evenly improves heat transfer from the CPU to the cooler, preventing overheating and ensuring efficient cooling.
How Can I Avoid Damaging Components During Installation?
Use an anti-static wrist strap and work on a non-conductive surface. Handle components by edges only and avoid touching pins or contacts. This prevents static discharge and physical damage, keeping your motherboard and CPU safe.
Conclusion
Installing a motherboard and CPU is simple with clear steps. Take your time and handle parts carefully. Always check connections before powering on your PC. A good setup ensures your computer runs smoothly. Practice makes the process easier and faster.
Soon, you will feel confident building your own system. Enjoy the satisfaction of assembling your own computer.