
Are you ready to upgrade your computer’s brain and boost its performance? Installing an Intel CPU might sound tricky, but with the right steps, you can do it yourself quickly and safely.
In this guide, you’ll learn exactly how to install your Intel CPU without any guesswork or stress. By the end, you’ll feel confident and proud knowing your computer runs smoother thanks to your hands-on effort. Keep reading—your powerful new setup is just a few steps away!

Credit: www.corsair.com
Preparing Your Workspace
Preparing your workspace is the first step to install an Intel CPU safely and correctly. A clean and organized area helps avoid mistakes and damage. It also makes the installation process smoother and faster. Take time to set up your space before starting.
Gathering Necessary Tools
Collect all tools needed for the installation. You will need a small screwdriver to open the computer case. Thermal paste may be required to improve heat transfer between the CPU and cooler. Have a clean cloth or anti-static mat ready to place parts on. Keep all tools within reach to avoid interruptions.
Ensuring Static-free Environment
Static electricity can harm your CPU and other parts. Work on a surface that does not generate static, like wood or a static mat. Avoid working on carpets or rugs. Wear an anti-static wrist strap if possible. Touch a metal object frequently to discharge static from your body. This protects your components from damage.
Credit: www.intel.com
Identifying Compatible Components
Identifying compatible components is the first step to install an Intel CPU correctly. This step ensures all parts fit and work together smoothly. Choosing the right components prevents damage and saves time.
Understanding compatibility helps avoid common installation problems. It also improves your computer’s performance and stability.
Checking Cpu Socket Type
Every Intel CPU fits a specific socket type on the motherboard. The socket is a physical and electrical interface for the CPU. You must check the socket type before buying a CPU or motherboard.
Common Intel sockets include LGA 1151, LGA 1200, and LGA 1700. Your CPU packaging or product page shows the socket type. Match this with the motherboard socket to ensure compatibility.
Selecting The Right Motherboard
The motherboard holds the CPU and connects all parts of your PC. It must support your CPU’s socket and chipset. Chipset controls communication between CPU, memory, and other devices.
Motherboards vary in size and features. Choose one that fits your case and needs. Check for RAM type, PCI slots, and power delivery. These factors affect overall system performance.
Removing The Old Cpu
Removing the old Intel CPU is the first step before installing a new one. Handle the process with care to avoid damage. Follow each step closely for safe removal.
Powering Down And Unplugging
Turn off your computer completely. Unplug the power cable from the outlet. Disconnect all other cables to prevent accidents. This stops any power flow to the motherboard.
Unlocking The Cpu Socket
Open the computer case to access the motherboard. Locate the CPU socket, usually under a metal or plastic cover. Find the small lever or latch holding the CPU. Gently lift or push the lever to release the CPU.
Lifting The Cpu Out Carefully
Hold the CPU by its edges to avoid touching pins or contacts. Slowly lift the CPU straight up from the socket. Do not twist or force it out. Place the old CPU on an anti-static surface safely.
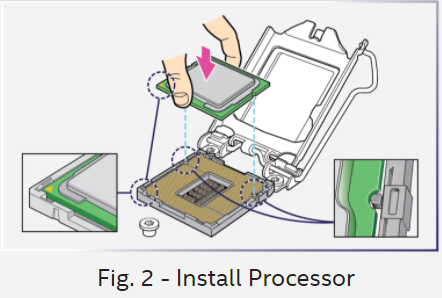
Installing The New Intel Cpu
Installing a new Intel CPU is a key step in building or upgrading a computer. The process requires care and attention to detail. Small mistakes can damage the processor or motherboard. Follow each step carefully to ensure the CPU fits perfectly and works well.
Aligning The Cpu Correctly
Start by holding the CPU gently by its edges. Avoid touching the pins or bottom side. Look for a small triangle on one corner of the CPU. Match this triangle with the one on the socket. This helps to place the CPU in the right direction.
Placing The Cpu Into The Socket
Open the CPU socket lever carefully. Do not force it open. Place the CPU straight down into the socket. It should fit easily without pressure. If it does not fit, check the alignment again.
Securing The Cpu In Place
Lower the socket lever back down slowly. This locks the CPU firmly in place. Make sure it clicks or stays down securely. Avoid pressing directly on the CPU surface. The CPU is now ready for the cooling system.
Applying Thermal Paste
Applying thermal paste is an important step when installing an Intel CPU. It helps transfer heat from the CPU to the cooler. This keeps the processor cool and prevents damage. Without thermal paste, the CPU can overheat quickly.
Proper application of thermal paste ensures good contact between the CPU and the cooler. This improves cooling efficiency and system stability. Below are tips on choosing and applying thermal paste correctly.
Choosing The Right Thermal Paste
Not all thermal pastes are the same. Some conduct heat better than others. Look for a thermal paste with high thermal conductivity. Avoid pastes that dry out fast or are too thick. Popular types include ceramic, metal-based, and silicone pastes. Metal-based pastes often offer better heat transfer. Choose one that fits your budget and cooling needs.
Applying An Even Layer
Apply a small pea-sized amount of paste in the center of the CPU. Too much paste can cause poor heat transfer. Too little paste leaves gaps. When you attach the cooler, it will spread the paste evenly. Use gentle pressure to avoid spilling paste over the CPU edges. The goal is a thin, uniform layer covering the CPU surface.
Attaching The Cpu Cooler
Attaching the CPU cooler is a key step in installing an Intel CPU. It keeps the processor cool and prevents overheating. Proper installation helps your computer run smoothly and lasts longer.
This section guides you through positioning the cooler, securing it, and connecting the fan. Follow these steps carefully for the best results.
Positioning The Cooler
Align the cooler over the CPU socket. Make sure the cooler’s base sits evenly on the CPU surface. Check that the cooler’s mounting brackets match the holes on the motherboard. Avoid touching the CPU pins or the cooler’s base.
Securing The Cooler Firmly
Press the cooler down gently but firmly. Use the screws or clips provided to fasten it tightly. Tighten screws in a diagonal pattern to spread pressure evenly. Do not overtighten, as this can damage the motherboard.
Connecting The Cooler Fan
Locate the CPU fan header on the motherboard. Plug the cooler fan’s power cable into this header. Ensure the connector fits snugly without forcing it. This connection powers the fan to keep your CPU cool.
Final Checks And Powering On
After installing your Intel CPU, final checks are essential. These steps ensure your system runs smoothly. Take your time to confirm everything is set up correctly. Powering on the computer is the moment to verify your work.
Verifying All Connections
Check that the CPU cooler is firmly attached. Ensure the power cables connect securely to the motherboard. Look over the RAM sticks to confirm they are seated properly. Double-check all other cables inside the case. Loose connections can stop the computer from starting.
Starting The Computer
Press the power button to turn on the PC. Watch for any unusual sounds or lights. The system should start without beeping errors. If the computer does not turn on, recheck all connections. Sometimes, a small mistake can cause big problems.
Accessing Bios To Confirm Installation
Enter the BIOS setup as the computer boots. This usually requires pressing a key like F2 or Delete. In BIOS, check the CPU model and speed. Confirm the system recognizes your new Intel processor. Save and exit BIOS to complete the process.

Credit: www.avadirect.com
Frequently Asked Questions
How Do I Prepare The Motherboard For Intel Cpu Installation?
First, place the motherboard on a static-free surface. Open the CPU socket lever gently. Ensure no dust or debris is in the socket. Align the CPU correctly with the socket markings before placing it. Close the lever securely to lock the CPU in place.
What Tools Are Needed To Install An Intel Cpu?
You primarily need a screwdriver to open the PC case. Anti-static wristbands help prevent static damage. Thermal paste may be required for some CPUs. Most Intel CPUs come with a compatible cooler, reducing the need for extra tools.
How To Apply Thermal Paste On An Intel Cpu?
Apply a small pea-sized amount of thermal paste in the center of the CPU. The pressure of the heatsink will spread it evenly. Avoid applying too much paste as it can cause overheating. Proper paste application ensures efficient heat transfer.
Can I Install An Intel Cpu Without A Manual?
While manuals help, installation is straightforward with online guides and videos. Ensure you identify the socket type and handle the CPU carefully. Follow standard anti-static precautions. If unsure, consult official Intel resources or seek professional help.
Conclusion
Installing an Intel CPU is simple with the right steps. Take your time and follow each instruction carefully. Use proper tools and avoid touching the pins. Secure the CPU firmly but gently in the socket. Don’t forget to apply thermal paste before closing the cooler.
Double-check all connections before powering on. A well-installed CPU helps your computer run smoothly. Practice makes perfect, so don’t worry if it feels tricky at first. Keep your workspace clean and organized for easier work. Enjoy the process and the new performance boost!