
Are you ready to unlock the full power of your computer? Enabling your GPU can boost your system’s speed and make your games, videos, and apps run smoother than ever.
But if you’re not sure how to turn it on or get it working right, don’t worry—you’re in the right place. This guide will walk you through simple steps to enable your GPU quickly, so you can enjoy a faster, more efficient experience.
Keep reading, and you’ll have your GPU up and running in no time!
Credit: www.windowscentral.com
Why Enable Gpu
Enabling a GPU can change how your computer works. It helps with many tasks, especially those involving images and videos. Many users do not know why they should enable their GPU. Understanding the reasons can help you make the best choice for your computer.
Benefits For Graphics
A GPU is built to handle graphics better than a CPU. It shows images and videos with more detail. This makes photos clearer and videos smoother. Games also look better with richer colors and sharper edges. The GPU handles complex visuals easily, giving a better experience.
Impact On Performance
Using a GPU reduces the load on your CPU. This helps the computer run faster and more smoothly. Tasks like video editing and 3D rendering finish much quicker. The system can manage multiple jobs without slowing down. Overall, performance improves in many daily activities.
Energy Efficiency
A GPU uses power more efficiently for graphic tasks. It completes work faster, then goes into a low-power state. This saves energy and reduces heat. Your computer stays cooler and uses less electricity. This is good for both the environment and your bills.
Check Gpu Compatibility
Checking GPU compatibility is the first step to enable your GPU for better performance. It helps ensure your system supports the graphics card and can run it smoothly. This step avoids errors and saves time during setup. Let’s explore how to verify your GPU compatibility.
System Requirements
Your computer must meet certain system requirements for GPU use. Check your operating system version and available hardware resources. Make sure your power supply can handle the GPU’s needs. Also, verify enough space inside your case for the GPU size.
Supported Hardware
Identify if your motherboard supports the GPU type. Most modern GPUs need a PCIe slot for connection. Confirm the slot version matches your GPU for best speed. Check if your monitor supports the GPU output ports, such as HDMI or DisplayPort.
Driver Versions
Install the correct GPU drivers to ensure full functionality. Visit the GPU manufacturer’s website for the latest driver updates. Keep drivers updated to avoid compatibility issues and improve performance. Use official drivers instead of generic or outdated versions.
Enable Gpu In Windows
Enabling your GPU in Windows helps improve computer graphics and speed. It allows your system to use the graphics card for better performance. This can be useful for video editing, gaming, and other graphic-heavy tasks. Follow these steps to enable your GPU in Windows easily.
Accessing Device Manager
First, open the Device Manager to check your GPU status. Press the Windows key and type “Device Manager.” Click on the app to open it. Look for the “Display adapters” section and expand it. You will see your GPU listed there. If it is disabled, right-click on it and select “Enable device.”
Updating Gpu Drivers
Outdated drivers can cause problems with your GPU. To update, right-click on your GPU in Device Manager. Select “Update driver” from the menu. Choose “Search automatically for updated driver software.” Windows will find and install the latest driver. Restart your computer to apply changes.
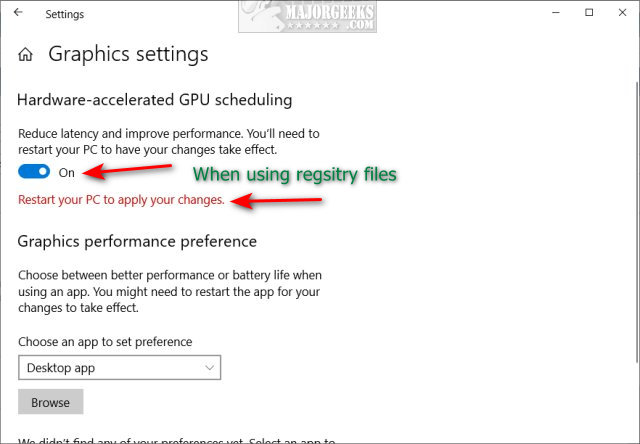
Configuring Graphics Settings
Adjust graphics settings to optimize GPU use. Right-click on the desktop and select “Display settings.” Scroll down and click “Graphics settings.” Choose the app you want to use the GPU for. Set it to “High performance” to use your dedicated GPU. Save changes and close the settings window.
Enable Gpu On Mac
Enabling the GPU on a Mac helps improve performance for graphics tasks. Using the GPU can speed up video editing, gaming, and other heavy apps. Macs with multiple GPUs let you switch between integrated and dedicated graphics. This saves battery life or boosts power as needed. Follow these steps to enable the GPU on your Mac easily.
System Preferences Setup
Open System Preferences from the Apple menu. Click on Battery or Energy Saver. Look for an option called Automatic graphics switching. Uncheck this box to force the Mac to use the dedicated GPU. This option lets your Mac prioritize power or performance. Turning it off ensures the GPU stays active for better graphics.
Using Activity Monitor
Launch Activity Monitor from the Applications > Utilities folder. Select the Energy tab to see which GPU apps use. Some apps show Requires High Perf GPU under the GPU column. Running these apps automatically enables the dedicated GPU. You can check this to confirm your GPU is active during heavy tasks. This method helps monitor GPU usage easily.
Switching Between Gpus
Macs with dual GPUs switch automatically by default. You can control this in System Preferences as mentioned. Some apps allow manual GPU selection in their own settings. Using the right GPU improves app speed and graphics quality. For manual control, close apps and reopen after changing GPU settings. This ensures the correct GPU is used for your task.
Enable Gpu In Bios
Enabling the GPU in BIOS is important for better graphics performance. The BIOS controls the basic hardware settings on your computer. By turning on the dedicated GPU here, you can improve video and gaming quality. This process requires accessing BIOS and changing some settings.
Entering Bios Setup
Start by restarting your computer. Press the BIOS key during startup. Common keys are Delete, F2, or Esc. The screen usually shows which key to press. Press the key quickly before the operating system loads. This opens the BIOS setup menu.
Locating Graphics Settings
Inside BIOS, look for a tab named Advanced or Configuration. Find the section related to graphics or video settings. The options may be under Chipset or Integrated Peripherals. Use arrow keys to navigate through menus. Look for settings like Primary Display or Graphic Device.
Enabling Dedicated Gpu
Change the graphic device option from Integrated to Dedicated or PEG. This tells the system to use the external GPU. Save changes by pressing the key shown for Save and Exit. Your computer will restart with the new GPU enabled. Check your system to see the GPU is active.

Credit: nvidia.custhelp.com
Optimize Gpu Performance
Optimizing GPU performance helps your computer run faster and smoother. It ensures your graphics card works well with games and software. Small changes can make a big difference in speed and efficiency.
Adjusting Power Settings
Set your computer’s power plan to high performance. This lets the GPU use more energy for better speed. On Windows, go to Control Panel > Power Options. Choose ‘High Performance’ to boost GPU output. Avoid power-saving modes that limit GPU power.
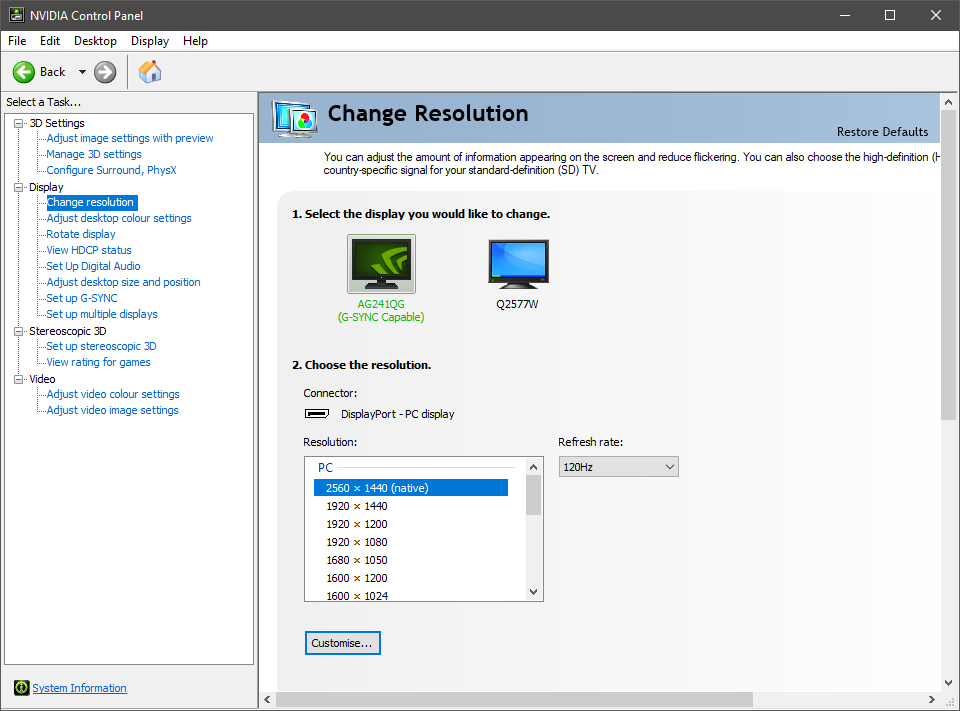
Using Gpu Management Tools
Use software like NVIDIA Control Panel or AMD Radeon Settings. These tools allow you to change GPU settings easily. You can adjust clock speeds, fan speeds, and graphics quality. Fine-tuning these options improves performance without overheating.
Monitoring Gpu Usage
Keep an eye on your GPU’s activity using Task Manager or third-party apps. Watching GPU usage helps spot problems early. If usage is too low or too high, adjust settings or close heavy programs. Regular monitoring keeps your GPU working at its best.
Troubleshoot Gpu Issues
Troubleshooting GPU issues can be simple with the right steps. GPUs may face problems that stop them from working correctly. Identifying the cause helps fix the problem faster. Below are common problems and solutions to try.
Common Problems
Sometimes, the GPU may not display images or the screen flickers. Overheating can cause the GPU to slow down or shut off. The system might freeze during games or heavy tasks. These issues show the GPU needs attention.
Driver Conflicts
Outdated or wrong drivers cause many GPU problems. Drivers connect the GPU to the computer’s system. Conflicts happen if multiple drivers clash or are corrupted. Updating or reinstalling the correct driver often solves the issue. Use the official GPU manufacturer’s website for safe downloads.
Resetting Gpu Settings
Sometimes, GPU settings can cause errors. Resetting settings to default can clear mistakes. Most GPU software has an option to reset. This step restores stable performance and clears custom changes. Try this if the GPU acts strangely after changes.
Credit: m.majorgeeks.com
Frequently Asked Questions
How Do I Enable Gpu On My Windows Pc?
To enable GPU on Windows, open Device Manager, expand Display Adapters, right-click your GPU, and select Enable. Ensure your drivers are updated via the manufacturer’s website for optimal performance.
Can I Enable Gpu Acceleration In Software Settings?
Yes, many applications allow GPU acceleration in their settings. Look for performance or graphics options and toggle GPU acceleration to improve speed and efficiency.
Why Is My Gpu Not Showing Up In Device Manager?
Your GPU may not appear due to outdated drivers or hardware issues. Try reinstalling drivers or reseating the GPU. Check BIOS settings to ensure the GPU is enabled.
How To Enable Gpu For Gaming Performance?
Enable your dedicated GPU through Device Manager or BIOS. Update your graphics drivers and set your game’s graphics settings to utilize the GPU for better gameplay.
Conclusion
Enabling your GPU can improve your computer’s speed and performance. It helps with tasks like gaming, video editing, and running apps smoothly. Make sure to update your drivers for the best results. Double-check your settings to avoid errors. Keep your system clean and free of unnecessary programs.
With these steps, your device will work better and faster. Try it today and see the difference yourself.