
Are you worried that your CPU is running too hot or using too much power? Downclocking your CPU might be the simple solution you need.
By lowering your processor’s speed, you can reduce heat, save energy, and extend your computer’s lifespan. But how exactly do you downclock your CPU safely and effectively? This guide will walk you through every step, using clear instructions that anyone can follow.
Keep reading to discover how to take control of your CPU’s performance and keep your system running cooler and smoother.
Benefits Of Downclocking
Downclocking a CPU means lowering its speed below the factory settings. This simple step brings many benefits. It can help your computer run smoother and last longer. The advantages go beyond just making your system cooler. Here are key benefits of downclocking your CPU.
Improved Longevity
Lowering the CPU speed reduces stress on its parts. This lessens wear and tear over time. As a result, the CPU can work well for many years. It helps avoid early hardware failures. This is useful if you want to keep your device longer.
Reduced Heat Output
Running the CPU slower creates less heat. This keeps your system cooler during use. Cooler parts reduce the chance of overheating. It also means fans do not need to run as fast. This makes your computer quieter and more comfortable to use.
Energy Efficiency
Downclocking lowers the power the CPU needs. Your computer uses less electricity overall. This saves money on energy bills. It also helps if you use a laptop on battery. The battery lasts longer before needing a recharge.
Enhanced System Stability
Slower CPU speeds can improve system stability. It reduces the chance of crashes and errors. This is helpful for older or less powerful computers. Your programs run more smoothly and reliably. It makes daily tasks easier and less frustrating.
When To Downclock Your Cpu
Downclocking your CPU means lowering its operating speed. This action can help solve problems and improve your computer’s health. Knowing the right time to downclock is important. It helps avoid damage and keeps your system running well.
Signs Of Overheating
One clear sign to downclock is when your CPU gets too hot. Overheating can cause your computer to shut down or slow down. If fans run loudly or heat rises quickly, the CPU may be working too hard. Lowering the clock speed reduces heat and keeps the CPU cooler.
System Instability Issues
Frequent crashes or freezes point to instability in your system. High CPU speed can cause these problems if the hardware is not stable at that level. Downclocking the CPU can make your system more stable and stop sudden shutdowns. This helps keep your work safe and your programs running.
Energy Consumption Concerns
High CPU speeds use more electricity. This can lead to bigger bills or faster battery drain on laptops. Downclocking reduces power use by running the CPU at a slower rate. It helps save energy and is better for portable devices that rely on batteries.
Extending Hardware Lifespan
Running the CPU at high speeds for long times can wear it out faster. Heat and stress shorten the life of the processor. Downclocking lowers stress and heat, helping the CPU last longer. This saves money by delaying the need for new hardware.
Preparing To Downclock
Preparing to downclock your CPU helps ensure the process goes smoothly and safely. It reduces risks of data loss or hardware issues. Taking steps before changing settings protects your system and preserves your files.
Backup Important Data
Save all important files to an external drive or cloud storage. Downclocking can cause system instability. Backup prevents data loss if your computer crashes. Keep copies of documents, photos, and software keys.
Update Bios And Drivers
Install the latest BIOS version from your motherboard maker. Updated BIOS improves hardware control and stability. Also, update CPU and chipset drivers. Fresh drivers help the system handle new settings better.
Gather Necessary Tools
Prepare tools like a screwdriver to open your PC case. Use software for monitoring CPU temperature and speed. Tools like CPU-Z or HWMonitor provide useful real-time data. Have everything ready before you start downclocking.
Check Current Cpu Settings
Record your CPU’s current clock speed and voltage. Use BIOS or software like CPU-Z to check settings. Knowing original values helps return to normal if issues arise. It also guides your downclocking adjustments step-by-step.
Downclocking Methods
Downclocking a CPU means lowering its speed to reduce heat and save power. There are several ways to do this. Each method suits different users and needs. Knowing these methods helps you choose the right one for your system.
Some methods require technical skills, while others are easier. You can downclock using BIOS, software tools, or by adjusting power settings in your operating system. Let’s explore these options.
Using Bios Settings
BIOS is the basic system control for your computer. Restart your PC and enter the BIOS menu by pressing a key during startup. Look for CPU settings or frequency controls.
Lower the CPU clock speed or multiplier values carefully. Save changes and exit BIOS. This method changes the CPU speed at the hardware level. It is very effective but needs caution.
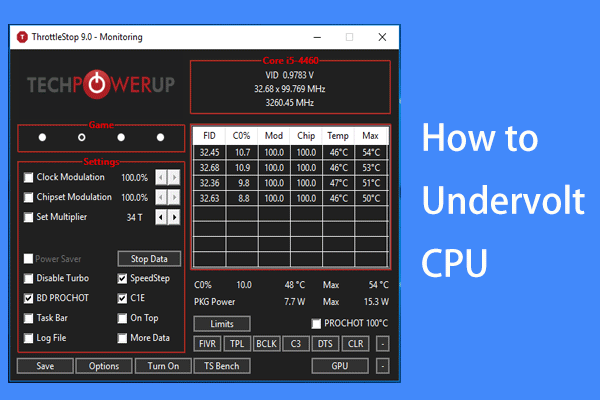
Software Utilities
Many programs let you change CPU speed inside Windows. Examples include CPU throttling tools or manufacturer software. These tools offer an easy way to downclock without rebooting.
Open the software and find CPU frequency settings. Reduce the clock speed step by step. Watch your system for stability. This method is user-friendly for beginners.
Adjusting Power Plans
Power plans affect how your CPU runs. Windows and other systems allow changing power profiles to save energy. Choose a power plan focused on energy saving or create a custom plan.
Lower the maximum processor state in the plan settings. This limits CPU speed automatically. It is a simple way to downclock without advanced tools or BIOS access.
Step-by-step Downclocking Guide
Downclocking your CPU can help reduce heat and power use. This guide shows simple steps to downclock safely. Follow each step carefully for best results.
Accessing Bios
Restart your computer and press the BIOS key during startup. Common keys are F2, Delete, or Esc. Check your motherboard manual if unsure. The BIOS menu controls hardware settings.
Modifying Cpu Frequency
Find the CPU frequency or clock speed setting in BIOS. Lower the frequency value to reduce CPU speed. Change values slowly to avoid instability. Save changes before moving to the next step.
Adjusting Voltage Settings
Locate CPU voltage controls in BIOS. Reduce the voltage slightly to match the lower speed. Do not lower voltage too much to prevent crashes. This step helps keep your CPU stable and cool.
Saving And Exiting Bios
Save all changes you made in BIOS. Use the “Save and Exit” option to reboot your PC. Your new settings will take effect after restart. Watch for any error messages during boot.
Verifying Changes
Check your CPU speed using system tools or software. Monitor temperature and performance during normal use. If problems occur, return to BIOS and adjust settings. Confirm the downclock is running as expected.

Credit: superuser.com
Testing Stability After Downclocking
After downclocking your CPU, stability testing is key. It ensures your system runs smoothly with the new settings. You want to avoid crashes, freezes, or unexpected errors. Testing helps confirm the CPU handles tasks well at the reduced speed. It also protects your data from corruption caused by instability. Follow these steps to check your CPU’s stability after downclocking.
Running Stress Tests
Stress tests push your CPU to its limits. They show if the CPU can work under heavy load without issues. Use tools like Prime95 or AIDA64 for stress testing. Run the test for at least 30 minutes. Watch out for crashes or error messages. If the system stays stable, the downclock is likely safe.
Monitoring Temperatures
Downclocking usually lowers CPU temperatures. Still, monitor temps closely to avoid overheating. Use software like HWMonitor or Core Temp. Check the CPU temperature during idle and stress tests. Keep temperatures below the maximum safe limit. High temps can cause instability even at lower speeds.
Checking System Performance
Test everyday tasks after downclocking. Open apps, browse the internet, and watch videos. Notice any slowdowns or glitches. Also, run benchmarks for a quick performance check. The goal is smooth performance without crashes or lag. Adjust downclock settings if needed for better balance.
Troubleshooting Common Issues
Downclocking your CPU can help reduce heat and save power. Sometimes, issues occur during this process. Knowing how to fix common problems makes the experience smoother. This section covers typical troubles and easy ways to solve them.
System Fails To Boot
Your PC may not start if the CPU speed is too low. The system needs a minimum speed to run properly. Try increasing the clock slightly and test again. Reset the BIOS settings to default if the problem continues. Check for BIOS updates from your motherboard maker.
Unexpected Crashes
Crashes can happen if the CPU is unstable at the new speed. Lower the clock in smaller steps to find a stable point. Make sure your cooling system works well. Faulty RAM or power supply might also cause crashes. Run memory tests and check your power source.
Performance Drops
Slower CPU speed means slower tasks. If the drop is too big, adjust the clock to a higher value. Balance power saving and performance based on your needs. Close unneeded programs to improve speed. Update drivers and software for better efficiency.
Credit: softwareg.com.au
Tips For Maintaining Optimal Performance
Downclocking your CPU helps reduce power use and heat. This can extend your computer’s life. To keep your system running well, follow these simple tips. They help balance good speed with safety.
Regular System Maintenance
Clean your computer inside and out often. Dust blocks air vents and fans. This raises temperature and slows your CPU. Update your software and drivers regularly. Updates fix bugs and improve stability. Check for malware that can use CPU power. A clean system runs smoother and cooler.
Monitoring Hardware Health
Use tools to check your CPU temperature and speed. Watch for unusual spikes or drops. These signs show if your CPU is under stress. Keep an eye on fan speeds and voltages. Faulty hardware can cause crashes and damage. Early checks prevent bigger problems later.
Balancing Performance And Longevity
Find a safe CPU speed that meets your needs. Do not push the CPU too low or too high. Too low may slow tasks; too high may cause heat. Adjust settings gradually and test your system. Use power-saving modes during light use. This keeps your computer fast and lasting longer.

Credit: www.wikihow.com
Frequently Asked Questions
What Is Cpu Downclocking And Why Use It?
CPU downclocking reduces the processor’s clock speed to lower heat and power use. It helps improve system stability and extend hardware lifespan.
How Do I Safely Downclock My Cpu?
To downclock safely, access BIOS or use software tools. Lower clock speeds gradually and test system stability after each change.
Can Downclocking Improve My Computer’s Performance?
Downclocking reduces performance but can enhance stability and reduce overheating. It’s ideal for quieter, cooler operation rather than speed.
Will Downclocking Affect My Cpu Warranty?
Downclocking generally does not void the CPU warranty since it lowers stress on the processor. Always check manufacturer policies to be sure.
Conclusion
Downclocking your CPU helps reduce heat and power use. It can make your computer quieter and last longer. Take small steps and check your system after each change. Avoid setting speeds too low to keep performance steady. Always save important files before starting.
Downclocking is a simple way to control your CPU’s speed safely. Try it carefully to find the best balance for your needs.