
If you want your computer to run cooler and faster, knowing how to clean CPU thermal paste is a must. Over time, old thermal paste can dry out and lose its effectiveness, causing your CPU to overheat.
But don’t worry—cleaning it isn’t as hard as it sounds. You’ll learn simple, step-by-step methods to safely remove old thermal paste and apply a fresh layer. By the end, your CPU will thank you with better performance and longer life.
Ready to give your computer a cool boost? Let’s get started!

Credit: www.wepc.com
Why Clean Thermal Paste
Cleaning thermal paste is a simple step that helps keep your CPU cool. Over time, thermal paste can dry out or become dirty. This reduces its ability to move heat away from the CPU. A clean layer of thermal paste keeps your computer running smoothly and avoids overheating problems.
Impact On Cpu Performance
Old or dried thermal paste does not transfer heat well. This causes the CPU to get hotter than normal. High temperatures can slow down your processor. It may also cause your computer to shut down to protect itself. Fresh thermal paste helps keep the CPU cool and fast.
Signs Of Old Thermal Paste
You might notice your computer runs louder because the fans work harder. The CPU temperature may also be higher than usual. Sometimes, the computer may freeze or restart without warning. These signs often mean the thermal paste needs cleaning and replacing.
Tools You Need
Cleaning CPU thermal paste requires the right tools. Using proper supplies makes the process easier and safer. Avoid damage to your CPU and motherboard by preparing well. The tools help remove old paste completely and apply new paste smoothly.
Essential Cleaning Supplies
Isopropyl alcohol (90% or higher) is a must. It dissolves old thermal paste quickly and leaves no residue. Cotton swabs or lint-free cloths help wipe the paste gently. Avoid paper towels as they leave fibers behind. A plastic or nylon scraper removes thick paste without scratching the CPU. Have a small container or plate to hold the used cloths and swabs.
Optional Helpful Tools
Thermal paste remover kits can speed up cleaning. They include special solvents and pads designed for CPUs. Compressed air helps blow away dust from the CPU and fan. Gloves protect your hands and avoid oil transfer to the CPU. A magnifying glass checks for leftover paste in tiny spots. A small brush can clean hard-to-reach areas around the CPU socket.
Preparing Your Workspace
Preparing your workspace is the first step to cleaning CPU thermal paste effectively. A clean and organized area helps prevent mistakes and keeps your components safe. Taking time to set up properly makes the process smoother and faster.
Ensuring Safety
Safety is very important when working with computer parts. Choose a clean, dry, and static-free place to work. Avoid carpeted floors to reduce static electricity risk. Wear an anti-static wristband if possible. Always unplug your computer before starting. Keep liquids and food away from your workspace.
Organizing Your Materials
Gather all necessary tools and supplies before you begin. You will need isopropyl alcohol, lint-free cloths, cotton swabs, and thermal paste remover if available. Have a small container for screws and other tiny parts. Arrange everything within easy reach. This helps you stay focused and avoid losing important items.
Credit: koolingmonster.com
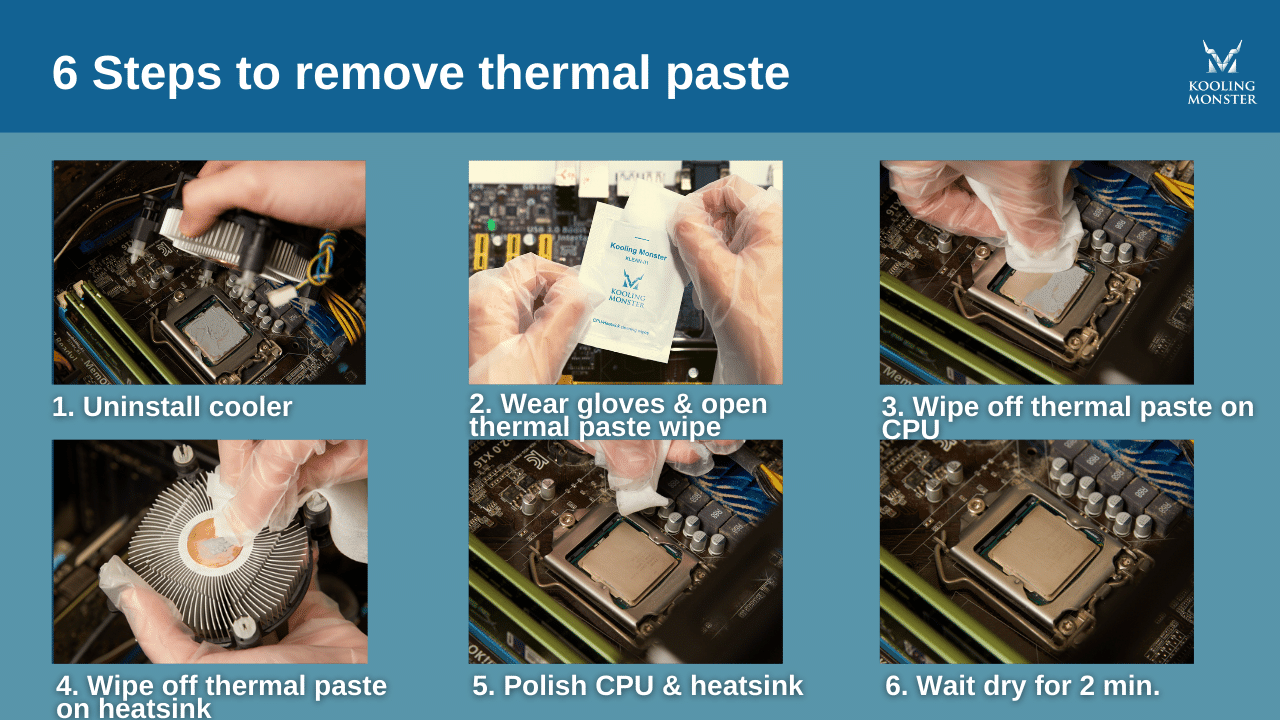
Removing The Cpu Cooler
Removing the CPU cooler is the first step to clean old thermal paste. It needs care to avoid damage. The cooler holds the CPU tightly. Pulling it out too fast can harm the CPU or motherboard. Follow safe steps to detach it properly.
Take your time and work in a clear space. Keep track of screws and clips. This process prepares you for cleaning and reapplying new thermal paste.
Steps To Detach Safely
Turn off the computer and unplug the power. Ground yourself to avoid static electricity. Check the cooler for screws or clips. Loosen screws evenly in a diagonal pattern. This reduces pressure on the CPU. If clips hold the cooler, release them gently. Avoid pulling the cooler straight up fast. Twist it slightly to break the paste seal. Lift the cooler slowly once it feels loose.
Handling The Cpu And Cooler
Handle the cooler with clean hands or gloves. Avoid touching the bottom surface with thermal paste. Keep the CPU socket area clean and dry. Do not touch the CPU pins or contacts. Place the cooler on a clean surface. Keep it safe from dust and dirt. The CPU stays in the socket during cooler removal. Do not try to remove the CPU now. These steps protect your hardware for the next phase.
Cleaning The Old Paste
Cleaning the old thermal paste from your CPU is a key step before applying new paste. It helps keep the CPU cool and improves performance. The process needs care to avoid damage to the CPU or motherboard. Use the right tools and materials for a clean job.
Using Isopropyl Alcohol
Isopropyl alcohol is the best cleaner for old thermal paste. Choose 90% or higher concentration for fast drying. Apply a small amount on a soft cloth or cotton swab. Gently rub the paste off the CPU surface. Avoid pressing too hard to prevent scratches.
Let the alcohol dissolve the paste slowly. This makes removal easier and safer. Avoid using water or other cleaners as they can cause damage.
Removing Residue Thoroughly
Check the CPU surface after the first cleaning round. Some paste spots may remain stuck. Use a fresh cloth with isopropyl alcohol to clean these areas. Repeat gently until no residue is visible.
Make sure the CPU is completely dry before applying new paste. Any leftover residue can reduce heat transfer. Take time and do the job carefully for best results.
Applying New Thermal Paste
Applying new thermal paste is a key step in keeping your CPU cool. It helps transfer heat from the processor to the heat sink. This process improves the performance of your computer and prevents overheating. Doing it right ensures your PC runs smoothly and lasts longer.
Choosing The Right Amount
Use a small pea-sized drop of thermal paste. Too much paste can cause spills on the CPU. Too little paste will not cover the surface properly. A small, centered dot is enough for most CPUs. This amount spreads out when you attach the heat sink.
Techniques For Even Spread
Place the heat sink carefully and press it down evenly. The pressure spreads the paste across the CPU surface. Avoid moving the heat sink side to side. This can create air bubbles and reduce cooling. Some prefer to spread paste using a plastic card. Both methods work if done gently and evenly.
Reattaching The Cpu Cooler
Reattaching the CPU cooler is an important step after cleaning off old thermal paste. The cooler helps keep the CPU cool and working well. Putting it back correctly stops overheating and keeps the computer safe. Take your time and follow the steps carefully.
Aligning And Securing Properly
Place the cooler gently on top of the CPU. Make sure it lines up with the mounting points. Check that the cooler sits flat on the CPU surface. Press down evenly to spread the new thermal paste. Fasten the screws or clips in a cross pattern. Tighten them slowly to avoid uneven pressure.
Avoiding Common Mistakes
Do not overtighten screws; this can damage the CPU or motherboard. Avoid moving the cooler too much after placement. This can create air bubbles in the thermal paste. Make sure the cooler’s fan cable is plugged in securely. Double-check all connections before turning on the computer.

Credit: www.youtube.com
Testing And Monitoring
Testing and monitoring your CPU after cleaning and applying thermal paste is vital. It helps confirm the paste spread correctly and the CPU runs cool. This step prevents overheating and system crashes. Monitoring also ensures the paste maintains its performance over time. Let’s explore how to check CPU temperatures and ensure stability for long periods.
Checking Cpu Temperatures
Start by installing temperature monitoring software. Programs like HWMonitor or Core Temp work well. Run your computer under normal use and watch the temperature readings. Ideal CPU temps should stay below 80°C during heavy tasks. High temperatures may mean the paste was applied incorrectly. You might need to clean and reapply if temps stay too high.
Ensuring Long-term Stability
Run stress tests using tools like Prime95 or AIDA64. These tests push the CPU to its limits to check cooling efficiency. Monitor the temperatures during the test for any spikes. Stable temps under load show the thermal paste is working well. Repeat testing every few months to catch any early signs of thermal paste drying out. Keeping an eye on temps helps maintain your CPU’s health and performance.
Frequently Asked Questions
How Often Should You Clean Cpu Thermal Paste?
It is best to clean CPU thermal paste every 1-2 years. Regular cleaning ensures optimal heat transfer and prevents overheating. If you notice high temperatures or replace the CPU cooler, cleaning the paste is essential.
What Materials Do I Need To Clean Thermal Paste?
To clean thermal paste, use isopropyl alcohol (90%+), lint-free cloth or coffee filters, and a plastic card or cotton swabs. These materials effectively remove old paste without damaging CPU surfaces.
Can I Reuse Old Thermal Paste After Cleaning?
Reusing old thermal paste is not recommended. Old paste loses thermal conductivity and causes poor cooling. Always apply a fresh layer after cleaning for best CPU performance.
How Do I Safely Remove Thermal Paste From Cpu?
Apply isopropyl alcohol on a lint-free cloth or cotton swab. Gently wipe the CPU surface until all paste is removed. Avoid scratching or using excessive force to protect the CPU.
Conclusion
Cleaning CPU thermal paste helps keep your computer cool and fast. Use a soft cloth and alcohol to remove old paste gently. Avoid scratching the CPU or leaving residue behind. Apply new thermal paste carefully for better heat transfer. Regular cleaning prevents overheating and improves performance.
Remember, a clean CPU means a longer-lasting PC. Simple steps make a big difference in your device’s health. Keep your computer running smoothly with proper care.