
Are you looking to boost your laptop’s speed without buying a new one? Changing the CPU might be the answer.
It sounds tricky, but with the right steps, you can upgrade your laptop’s brain and make it run faster and smoother. In this guide, you’ll learn exactly how to change the CPU in your laptop, even if you’ve never done it before.
Keep reading to discover simple tips and clear instructions that will help you get the job done right. Your laptop’s best performance is just a few steps away.
Preparing For The Upgrade
Preparing for a CPU upgrade in a laptop is an important step. It helps avoid mistakes and ensures the process goes smoothly. Taking time to prepare saves effort and protects your device.
Before starting, check if your new CPU will work with your laptop. Gather the right tools to avoid damage. Back up your data to keep it safe during the upgrade.
Checking Compatibility
Not all CPUs fit every laptop. Check your laptop’s model and motherboard specifications. Look for the socket type and chipset support. Use reliable sources or the laptop manual. This step prevents buying a CPU that won’t work.
Gathering Necessary Tools
Use the right tools to open your laptop safely. Common tools include small screwdrivers, an anti-static wristband, and thermal paste. Avoid using large or improper tools. Proper tools reduce the risk of damage.
Backing Up Important Data
Upgrade work can cause data loss. Save your important files on an external drive or cloud service. Double-check your backup before starting. This protects your data if something goes wrong.

Credit: www.youtube.com
Disassembling The Laptop
Disassembling a laptop is the first step in changing its CPU. This process requires care and attention. It helps to work in a clean and static-free space. Follow each step carefully to avoid damage.
Powering Off And Unplugging
Turn off the laptop completely. Do not just close the lid or put it to sleep. Unplug the power adapter from the laptop. This stops any power from running through the device.
Removing The Battery
Flip the laptop upside down. Find the battery release latch or screws. Slide the latch or unscrew to release the battery. Remove the battery gently and set it aside.
Opening The Laptop Case
Locate the screws that hold the case together. Use a small screwdriver to remove them carefully. Keep the screws in a safe place. Gently lift or slide off the case cover. This exposes the internal parts, including the CPU.
Removing The Old Cpu
Removing the old CPU is the first step in upgrading your laptop’s processor. This process requires care and attention to avoid damaging delicate components. Follow the steps carefully to ensure a smooth removal.
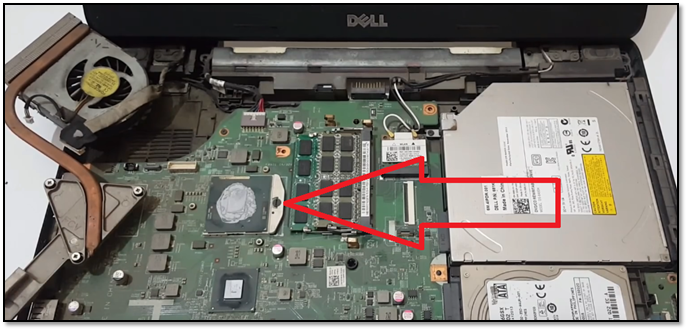
Locating The Cpu Socket
Start by opening your laptop’s back panel. The CPU socket sits on the motherboard. Look for a square chip covered by a heat sink or fan. This is the CPU area you will work on.
Releasing The Cpu Lock
Next, find the small lever or screw holding the CPU in place. Gently lift or turn it to unlock the CPU. This step frees the CPU from the socket without force.
Carefully Extracting The Cpu
Hold the CPU by its edges only. Slowly lift it straight up from the socket. Avoid bending any pins under the chip. Place the CPU on a safe, static-free surface.
Installing The New Cpu
Installing the new CPU in your laptop is a delicate step. It requires care and precision. This process ensures your laptop runs smoothly with the new processor. Follow each step carefully to avoid damage. Proper installation helps your laptop perform better and stay cool.
Aligning The Cpu Correctly
First, check the CPU socket on the motherboard. Look for a small triangle or mark on one corner of the CPU. Match this mark with the corresponding mark on the socket. Never force the CPU into the socket. It should fit easily when aligned correctly. Proper alignment prevents bent pins and hardware damage.
Securing The Cpu In Place
Once aligned, gently place the CPU into the socket. Avoid pushing or sliding it. Use the locking mechanism to secure the CPU. This might be a lever or a latch. Lock it firmly but do not apply too much pressure. Securing the CPU prevents movement and connection issues.
Applying Thermal Paste
Thermal paste helps transfer heat from the CPU to the cooler. Apply a small pea-sized dot in the center of the CPU. Spread it evenly if needed, but usually, the cooler will spread it. Too much paste can cause overheating. Too little paste reduces cooling efficiency. Proper application keeps your CPU safe and cool.
Reassembling The Laptop
After replacing the CPU, reassembling the laptop is a key step. This process needs care and patience. Proper reassembly ensures your laptop works well and stays cool.
Reattaching The Cooling System
Start by putting the cooling system back in place. Align the heatsink over the new CPU carefully. Tighten the screws gently but firmly to secure it. Reconnect any fans or cables you removed earlier. This step stops your laptop from overheating.
Closing The Laptop Case
Next, close the laptop case with care. Check that no wires or parts are in the way. Snap the case edges together without forcing them. Use the screws you set aside to fasten the case firmly. This keeps the laptop safe and solid.
Reinserting The Battery
Finally, put the battery back in its place. Slide it gently into the battery slot. Make sure it clicks or locks securely. Power on your laptop to check if it starts up well. The battery must fit tightly for proper power supply.

Credit: www.reddit.com
Post-installation Steps
After installing a new CPU in your laptop, several important steps must follow. These steps ensure your laptop works well and stays safe. They help check the CPU’s function, update software, and keep the system cool. Taking time for these steps will improve your laptop’s stability and speed.
Powering On And Testing
Turn on your laptop carefully after installation. Watch for any unusual sounds or error messages. Enter the BIOS screen to check if the new CPU is detected. Run basic tests like booting into the operating system. This confirms the CPU is working properly without errors.
Updating Bios And Drivers
Visit your laptop manufacturer’s website for BIOS updates. A newer BIOS version can improve CPU compatibility. Download and install the latest BIOS carefully. Also, update your chipset and CPU drivers. This helps your system run smoothly with the new processor.
Monitoring Temperature And Performance
Use software tools to monitor CPU temperature. Keep an eye on heat levels during normal use. High temperatures can cause damage or slow down your laptop. Check CPU performance with simple benchmarks. This ensures your new CPU runs at full speed and stays cool.
Troubleshooting Common Issues
Changing the CPU in a laptop can improve performance. Sometimes, issues arise after the swap. Troubleshooting common problems helps fix these quickly. Here are some frequent issues and how to solve them.
Laptop Fails To Boot
The laptop may not start after the CPU change. Check if the CPU is correctly seated in the socket. Make sure the pins align properly. Confirm the thermal paste is applied and the heatsink is secure. Remove and reinstall the battery to reset power. Test with one stick of RAM to rule out memory problems.
Overheating Problems
New CPUs can run hotter. Verify the cooling system is clean and functioning. Reapply thermal paste evenly on the CPU surface. Ensure the fan spins freely and the vents are clear. Use software to monitor temperatures. If overheating persists, reduce the CPU load or improve ventilation.
Performance Not Improving
The laptop may not feel faster after the upgrade. Check if the BIOS supports the new CPU. Update the BIOS to the latest version if needed. Confirm the CPU speed matches the laptop’s capabilities. Close unnecessary programs and background tasks. Run a benchmark test to compare speeds before and after the change.
Credit: www.easeus.com
Frequently Asked Questions
How Do I Know If My Laptop Cpu Is Replaceable?
Most laptops have soldered CPUs, making replacement difficult. Check your laptop’s service manual or manufacturer website to confirm if the CPU is socketed and replaceable.
What Tools Are Needed To Change A Laptop Cpu?
You typically need a small screwdriver, thermal paste, an anti-static wrist strap, and a clean workspace. These tools help ensure safe and effective CPU replacement.
How To Apply Thermal Paste When Changing A Cpu?
Apply a small pea-sized amount of thermal paste on the CPU’s center. Spread it evenly to ensure proper heat transfer between the CPU and heatsink.
Can Changing A Laptop Cpu Void The Warranty?
Yes, opening the laptop and replacing the CPU can void the manufacturer’s warranty. Always check warranty terms before attempting CPU replacement.
Conclusion
Changing the CPU in a laptop can improve speed and performance. Take time to prepare your tools and workspace carefully. Follow each step slowly and double-check connections. This task needs patience and care to avoid damage. After installing, test your laptop to ensure it runs well.
Regular updates keep your system stable and secure. Remember, a careful approach leads to better results. You can handle this with focus and the right instructions.