
Are you ready to boost your computer’s speed and performance by changing your CPU? Whether your current processor is slowing you down or you want to upgrade for gaming or work, knowing how to change your CPU can save you time and money.
But don’t worry if you’re not a tech expert—this guide breaks down each step clearly and simply. By the end, you’ll feel confident to open up your PC and make the switch yourself. Keep reading to discover how easy it can be to give your computer a powerful new heart.
Choosing The Right Cpu
Choosing the right CPU is an important step before changing your processor. It affects how well your computer runs. Pick a CPU that fits your needs and system. Consider what tasks you want to do and how much power you require. Also, think about your budget and compatibility with your motherboard.
Compatibility With Motherboard
Check your motherboard’s socket type. The CPU must fit this socket exactly. Also, verify the chipset supports the CPU model. Look at the motherboard manual or website for details. Using a CPU that does not match can damage your computer.
Performance Needs
Identify what you use your PC for most. Simple tasks like browsing need less power. For gaming or video editing, choose a CPU with more cores and speed. Higher clock speeds mean faster processing. Balance core count and speed based on your work.
Budget Considerations
Set a clear budget before buying a CPU. Prices vary widely between models and brands. Higher prices usually mean better performance but not always. Find a CPU that offers good value for your money. Avoid spending too much on features you do not need.
Credit: www.tomsguide.com
Gathering Necessary Tools
Changing a CPU requires the right tools. Without them, the task becomes harder and riskier. Preparing all tools before starting saves time and avoids mistakes.
Careful preparation helps protect the CPU and other computer parts. It also keeps you safe during the process. Below is a list of essential tools and safety tips to guide you.
Essential Tools List
A small screwdriver set is key for opening your computer case. Most CPUs need a Phillips-head screwdriver.
Thermal paste helps the CPU cool properly. Get a small tube of it for applying on the new CPU.
An anti-static wrist strap prevents static electricity from damaging parts. It connects you to the computer case ground.
Clean, lint-free cloths help remove old thermal paste without scratching the CPU or cooler.
A plastic spudger or a soft tool aids in gently lifting the CPU from its socket.
Safety Precautions
Work in a dry, clean area with no carpets to reduce static buildup. Static can harm computer parts easily.
Disconnect the power supply before opening the case. Never work on a plugged-in computer.
Wear the anti-static wrist strap during the entire process. Attach it firmly to a grounded metal part.
Handle the CPU by its edges only. Avoid touching the pins or contacts to prevent damage.
Keep all screws and small parts in a container. Losing them can delay your work and cause problems.
Preparing Your Workspace
Preparing your workspace is the first step to changing your CPU safely. A clean and organized area helps you work smoothly. It reduces risks of losing small parts or damaging components. Taking time to prepare saves effort and avoids mistakes.
Cleaning And Organization
Clear your desk or table completely. Remove any dust or dirt with a soft cloth. Gather all tools you will need, like screwdrivers and thermal paste. Keep small parts in a container to avoid losing them. A tidy workspace helps focus and speeds up the process.
Static Electricity Prevention
Static electricity can harm your CPU and other parts. Touch a metal object before handling components to discharge static. Use an anti-static wristband if possible. Work on a non-carpeted surface to reduce static build-up. Avoid wearing clothes that create static, like wool or polyester.

Credit: www.youtube.com
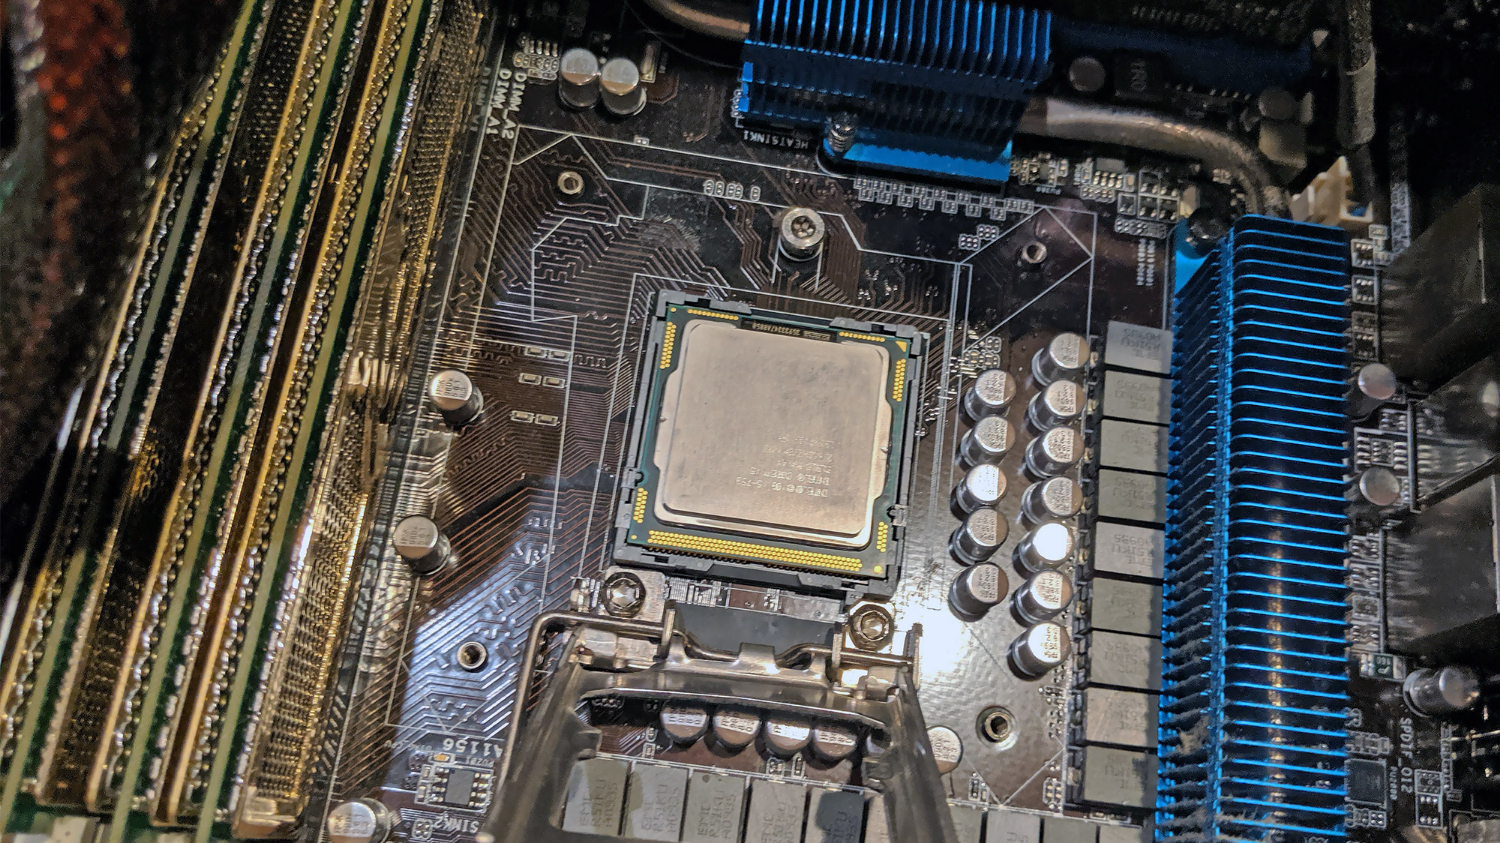
Removing The Old Cpu
Removing the old CPU is the first step in upgrading your computer’s processor. This process requires care and attention to avoid damage. Follow each step slowly and carefully. Your goal is to safely disconnect the CPU without harming the motherboard or other parts.
Accessing The Cpu Socket
First, open your computer case. Locate the motherboard inside. The CPU socket is usually near the center. It holds the processor firmly in place. Remove any covers or shields that block access. Use a flashlight for better visibility if needed. Make sure the computer is off and unplugged before you start.
Detaching The Cooling System
The cooling system sits on top of the CPU. It keeps the processor cool during use. This system must be removed carefully. Unscrew or unclip the cooler from the motherboard. Gently lift the cooling unit off the CPU. Avoid pulling hard to prevent damage. If thermal paste sticks, do not force it. Clean the paste after removal.
Releasing The Cpu
The CPU is locked in place with a small lever or latch. Find this locking mechanism beside the socket. Carefully lift the lever to unlock the CPU. Do not use too much force. Once unlocked, the CPU will lift out easily. Hold the CPU by its edges only. Avoid touching the pins or contacts underneath.
Installing The New Cpu
Installing the new CPU is a careful process. It requires attention to detail and patience. This step is critical for your computer’s performance. Follow each part carefully to avoid damage. Proper installation helps the CPU work at its best.
Aligning The Cpu Correctly
Look for the small triangle on the CPU corner. Match it with the triangle on the socket. Do not force the CPU into place. It should fit gently and perfectly. Correct alignment prevents pins from bending or breaking.
Securing The Cpu In Place
Lower the metal arm or lever on the socket. This locks the CPU securely. Apply even pressure, but do not press too hard. A loose CPU can cause errors. A firmly secured CPU ensures stable performance.
Applying Thermal Paste
Thermal paste helps transfer heat from the CPU to the cooler. Place a small pea-sized dot in the center of the CPU. Spread it evenly if needed, but a small amount works best. Too much paste can cause overheating. Too little paste reduces cooling efficiency.
Reattaching The Cooling System
Reattaching the cooling system is a key step after changing your CPU. The cooler helps keep your processor at a safe temperature. Without proper cooling, your CPU can overheat and stop working well.
Take your time with this part. Make sure everything fits right and is secure. A loose cooler can cause problems later.
Mounting The Cooler
Place the cooler carefully on top of the CPU. Align it with the mounting holes on the motherboard. Press the cooler down gently but firmly. Use screws or clips to secure it in place. Tighten evenly to avoid damaging the CPU or motherboard. Do not over-tighten the screws. Check if the cooler sits flat on the CPU surface.
Connecting Power Cables
Locate the cooler’s power cable, usually a small fan connector. Find the CPU fan header on the motherboard. It is often labeled “CPU_FAN.” Plug the cooler’s cable into this header. Make sure it fits snugly. This powers the fan and helps your system monitor temperature. Double-check the connection before closing your case.
Testing The Upgrade
Testing the upgrade is a key step after changing your CPU. It ensures your new processor works well with your system. You want to avoid any problems early on. Testing helps you find and fix issues fast. Follow clear steps to check everything carefully.
Booting Up The System
Turn on your computer and watch closely. The system should start without errors. Listen for any unusual beeps or sounds. These can signal hardware problems. If your PC does not start, recheck the CPU installation.
Once the system boots, it may take longer than usual. This is normal as it detects the new CPU. Wait patiently for the desktop to load fully.
Checking Bios Settings
Enter the BIOS menu right after booting. This step is vital to confirm the CPU is recognized. Look for the CPU model and speed in the BIOS information. Make sure they match your new processor.
Check if the BIOS version supports your new CPU. Update the BIOS if needed to avoid compatibility issues. Save any changes and exit the BIOS carefully.
Monitoring Temperatures And Performance
Use software tools to monitor CPU temperature. Keep it below the maximum safe limit. High temperatures can cause crashes or damage.
Run simple performance tests to check speed and stability. Watch for any system freezes or errors. Stable performance means the upgrade was successful.
Troubleshooting Common Issues
Changing your CPU can sometimes cause issues. These problems can stop your computer from working right. Troubleshooting these issues helps you fix them fast. Here are common problems and how to solve them.
No Boot Problems
Your computer may not start after changing the CPU. Check if the CPU is placed correctly in the socket. Make sure the power cables are connected well. Verify that the motherboard supports your new CPU model. Reset the BIOS by removing the CMOS battery for a few minutes. This can clear any settings blocking the boot process.
Overheating Concerns
New CPUs can get hot quickly if not cooled well. Check the CPU cooler is installed tightly and correctly. Apply fresh thermal paste between the CPU and cooler. Clean any dust from fans and heat sinks. Ensure your case has good airflow to keep temperatures low. Overheating can cause the computer to shut down suddenly.
Performance Drops
Your PC may run slower after a CPU change. Confirm the BIOS is updated to support the new CPU. Check for any software or driver updates for your motherboard. Look at your system settings to ensure the CPU runs at full speed. Disable any power-saving modes that limit CPU performance. These steps can restore your PC’s speed.

Credit: djpv.com.br
Frequently Asked Questions
How Do I Safely Remove My Old Cpu?
To remove your old CPU safely, first power off and unplug your PC. Open the case and carefully unlock the CPU socket lever. Gently lift the CPU straight out, avoiding bending pins or damaging contacts. Handle it by the edges to prevent static damage.
What Tools Do I Need To Change My Cpu?
You need a screwdriver to open the PC case, thermal paste for heat transfer, and an anti-static wrist strap. A clean cloth or alcohol wipes help clean the old thermal paste. These tools ensure a safe and effective CPU replacement process.
How Do I Apply Thermal Paste On A New Cpu?
Apply a small pea-sized dot of thermal paste in the center of the CPU. When you install the cooler, it spreads the paste evenly. Too much paste can cause overheating, so less is more for effective heat conduction.
Can I Change My Cpu Without Reinstalling The Operating System?
Yes, you can often change your CPU without reinstalling the OS. Modern systems support hardware changes, but some may require driver updates or BIOS adjustments. Always back up your data before upgrading to avoid potential issues.
Conclusion
Changing your CPU can improve your computer’s speed and performance. Take your time and follow each step carefully. Use the right tools and stay grounded to avoid damage. Don’t forget to handle the CPU and motherboard gently. Double-check connections before turning your PC back on.
With patience, you can complete this task safely. Enjoy a faster, smoother computer once done. Keep learning and upgrading to make the most of your device.