
If your laptop’s graphics are slowing you down or you want better performance for gaming or design, changing your laptop GPU might be the solution. You might think it’s complicated or risky, but with the right steps, you can do it yourself.
This guide will walk you through everything you need to know, making the process clear and simple. Keep reading, and soon you’ll have your laptop running smoother and faster than ever before.
Signs You Need A Gpu Upgrade
Knowing when to upgrade your laptop GPU is important. A better GPU can improve your laptop’s performance and keep it running smoothly. Some signs show that your GPU needs an upgrade. Watch for these signs to keep your laptop working well.
Performance Drops In Games And Apps
Your games start to lag or freeze. Programs take longer to open or run slowly. Graphics look blurry or pixelated. Frame rates drop during gameplay. These issues show your GPU is struggling. Upgrading the GPU can fix these performance problems.
Overheating And Noise Issues
Your laptop gets very hot during use. Fans run loudly and constantly. The system may shut down to avoid damage. Overheating can harm your GPU and other parts. A new GPU often runs cooler and quieter.
Compatibility With New Software
New apps or games need better graphics support. Some programs may not run at all. Your current GPU might not support new features. Upgrading ensures your laptop can handle the latest software. This keeps your system useful and up to date.

Credit: www.youtube.com
Types Of Laptop Gpus
Laptop GPUs come in different types. Each type affects performance and upgrade options. Understanding these GPU types helps you know what to expect from your laptop.
Some GPUs are built into the laptop’s main chip. Others come as separate parts. Some laptops even support external GPUs to boost graphics power.
Integrated Vs Dedicated Gpus
Integrated GPUs share memory with the laptop’s main processor. They use less power and produce less heat. Integrated GPUs handle everyday tasks like browsing and watching videos well.
Dedicated GPUs have their own memory and power. They are faster and better for gaming or heavy graphics work. These GPUs are separate chips inside the laptop, designed for high performance.
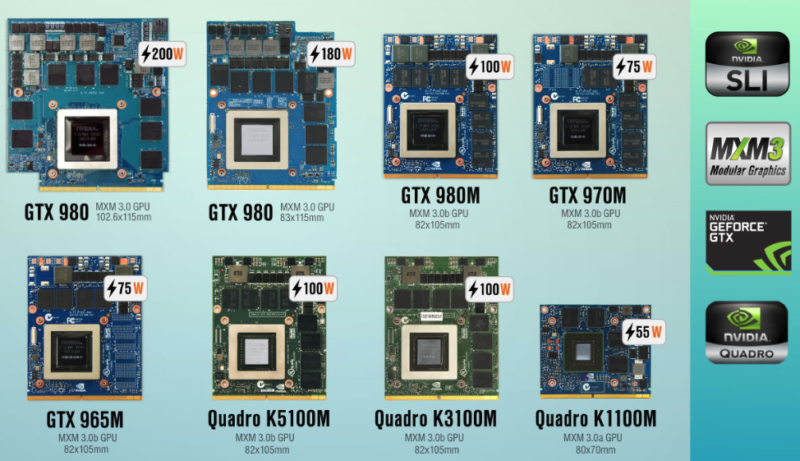
Mxm Modules Explained
MXM stands for Mobile PCI Express Module. It is a special slot for dedicated laptop GPUs. Some gaming and professional laptops use MXM modules to allow GPU upgrades.
Not all laptops have MXM slots. Those that do let you swap the GPU without changing the whole laptop. This option is rare but useful for future GPU upgrades.
External Gpu Options
External GPUs, or eGPUs, connect to a laptop through ports like Thunderbolt. They offer desktop-level graphics power for laptops.
eGPUs are useful for laptops without upgradeable internal GPUs. They require an external box that holds a desktop GPU. This setup improves gaming and creative work on laptops.
Checking Laptop Compatibility
Checking your laptop’s compatibility is the first step to changing its GPU. Not all laptops allow easy GPU upgrades. Some models have fixed graphics cards. Others support swapping or adding GPUs. Knowing your laptop’s details helps avoid mistakes and extra costs.
Identifying Your Laptop Model
Find the exact model number of your laptop. Look at the label under your laptop or in system settings. Search the model online for detailed specs. This information tells you about your laptop’s design and upgrade options.
Available Gpu Slots And Interfaces
Check if your laptop has a slot for a new GPU. Most laptops use soldered GPUs without slots. Some gaming or workstation laptops have MXM slots. Understand the interface type to match your new GPU correctly.
Power And Cooling Requirements
New GPUs need enough power and good cooling. Verify your laptop’s power supply capacity. Check if the cooling system can handle more heat. Upgrading without this can cause overheating and damage.
Credit: www.shoshitamam.com
Tools And Materials Needed
Changing a laptop GPU requires specific tools and materials. Having the right items makes the process smoother and safer. This section lists everything needed before starting the upgrade.
Essential Tools For Disassembly
A small Phillips screwdriver is a must-have tool. It helps remove screws without damaging them. A plastic pry tool or spudger prevents scratches when opening the laptop case. Tweezers assist in handling tiny screws and connectors. An anti-static wrist strap protects your laptop from static electricity. A clean, flat workspace is necessary to keep parts organized.
Safety Precautions
Wear the anti-static wrist strap to avoid electric shocks. Turn off the laptop and unplug it from power sources. Remove the battery if possible before starting. Work in a dry and well-lit area to see small components clearly. Avoid touching the GPU chip and other circuits directly to prevent damage.
Backup And Data Protection
Backup important files to an external drive or cloud service. Save your work and close all programs before disassembly. Data loss can occur if something goes wrong during the upgrade. Create a system restore point for extra security. This step keeps your information safe and reduces risk.
Step-by-step Gpu Replacement
Replacing a laptop GPU can improve graphics performance significantly. The process requires care and attention. Follow these simple steps to replace your GPU safely. Each step is clear and easy to follow.
Powering Down And Unplugging
Turn off your laptop completely. Do not put it to sleep or hibernate. Unplug the power adapter from the laptop. Remove any connected devices like USB drives or headphones. This prevents electrical damage during the process.
Opening The Laptop Case
Place the laptop on a flat surface with good light. Flip it over to access the screws on the bottom. Use the correct screwdriver to remove all screws carefully. Keep the screws in a safe place. Gently pry open the case using a plastic tool or your fingers. Avoid using metal tools to prevent scratches or damage.
Removing The Old Gpu
Locate the GPU on the motherboard. It is usually near the cooling fan. Disconnect any cables attached to the GPU. Unscrew the screws holding the GPU in place. Carefully lift the GPU out of its slot. Handle it by the edges to avoid static damage.
Installing The New Gpu
Align the new GPU with the slot on the motherboard. Press it gently but firmly into place. Secure the GPU with screws you removed earlier. Reconnect any cables you disconnected before. Make sure everything is snug and secure.
Reassembling The Laptop
Place the laptop case back onto the base. Press down gently until it clicks into place. Reinsert and tighten all screws removed earlier. Flip the laptop back over and reconnect the power adapter. Power on the laptop to test the new GPU. Ensure the system recognizes the new hardware correctly.
Installing Drivers And Software
After changing your laptop GPU, installing the right drivers and software is crucial. Drivers help your laptop recognize the new hardware. They ensure the GPU works smoothly with your system. Without proper drivers, the GPU might not perform well or cause errors.
Software tools also help you manage and optimize your GPU settings. They allow you to adjust performance, monitor temperature, and update drivers easily. Follow these steps to install drivers and set up your new laptop GPU correctly.
Downloading Latest Gpu Drivers
Start by visiting the official website of your GPU manufacturer. Common brands include NVIDIA, AMD, and Intel. Choose the driver that matches your GPU model and your laptop’s operating system. Download the most recent version to ensure compatibility and best performance.
Driver Installation Process
Locate the downloaded driver file on your laptop. Double-click to start the installation. Follow the on-screen instructions carefully. The process usually involves agreeing to terms and choosing installation type. A clean installation is often best to avoid conflicts with old drivers. Restart your laptop once installation finishes to apply changes.
Optimizing Gpu Settings
Open the GPU control panel or software after installation. Adjust settings like power management, resolution, and refresh rate to suit your needs. Use default settings for stable performance or tweak for better graphics quality. Monitor your GPU temperature and usage during heavy tasks to avoid overheating. Regularly check for driver updates to keep your GPU running smoothly.
Troubleshooting Common Issues
Changing a laptop GPU can sometimes cause problems. Knowing how to fix common issues helps save time and stress. This guide covers three typical problems after a GPU upgrade. Each solution is clear and easy to follow.
No Display Or Boot Problems
The laptop may not show any image or fail to start after the GPU change. Check if the GPU is properly seated in its slot. Make sure all power connectors are attached. Reset the BIOS by removing the battery or using the reset jumper. Try connecting to an external monitor to rule out screen issues.
Overheating After Upgrade
New GPUs can run hotter than old ones. Ensure the cooling system is clean and working well. Check that the fan spins freely and the heatsink is firmly attached. Apply fresh thermal paste between the GPU and heatsink. Avoid blocking air vents and keep the laptop on a hard surface.
Performance Not Improving
Sometimes the GPU upgrade does not boost speed or graphics. Verify the driver is correctly installed and up to date. Check in the device manager for any hardware conflicts. Confirm the laptop is using the new GPU, not the old one. Close background apps that use high resources to test performance.

Credit: www.shoshitamam.com
Maximizing Your New Gpu’s Performance
Upgrading your laptop’s GPU is only the first step. To get the most out of your new hardware, you need to care for it well. Small actions can improve your GPU’s speed and lifespan.
Focus on three key areas. Keep your drivers fresh. Use tools to push your GPU safely. Make sure your laptop stays cool during use.
Regular Driver Updates
GPU drivers help your laptop talk to the graphics card. New drivers fix bugs and add support for new games. Download the latest drivers from the GPU maker’s website. This keeps your GPU working smoothly and fast.
Using Gpu Overclocking Tools
Overclocking means running your GPU faster than usual. Use simple software made for this. Increase speed slowly and test for stability. This can give extra power for games and apps. Stop if your laptop feels too hot or crashes.
Keeping Your Laptop Cool
Heat slows down your GPU and can cause damage. Use a cooling pad under your laptop. Keep vents clear of dust and blockages. Run heavy programs in cool rooms. This helps your GPU stay at safe temperatures.
Frequently Asked Questions
Can I Upgrade My Laptop Gpu Easily?
Upgrading a laptop GPU is usually difficult due to soldered components. Most laptops have integrated or fixed GPUs. Only some gaming or workstation laptops support GPU upgrades via MXM modules or external GPU enclosures.
What Tools Do I Need To Change A Laptop Gpu?
You typically need a small Phillips screwdriver, anti-static wrist strap, and thermal paste. Some laptops require specialized tools for opening and disassembling. Always consult your laptop’s service manual for specific tool requirements.
Will Changing My Laptop Gpu Void Warranty?
Yes, opening your laptop and replacing the GPU often voids the warranty. Manufacturer warranties usually cover hardware only if unmodified. Check your warranty terms before attempting a GPU upgrade.
How To Check If My Laptop Gpu Is Replaceable?
Check your laptop’s specifications and service manual. Look for MXM GPU slots or upgrade options. Online forums and manufacturer support pages can also confirm if your GPU is replaceable.
Conclusion
Changing your laptop GPU can boost performance and extend its life. Always check compatibility before starting the process. Take your time and follow each step carefully. Keep your workspace clean and organized to avoid mistakes. If unsure, ask for help or watch tutorial videos.
With patience, you can upgrade your laptop’s graphics smoothly. Enjoy better visuals and faster speeds once done. Remember, safety and care matter most during this task.