
Are you tired of your computer struggling with games, videos, or heavy software? Switching from integrated graphics to a dedicated GPU can give your system the boost it needs.
But how do you make this change without risking damage or confusion? In this guide, you’ll discover simple, clear steps to help you switch your graphics smoothly. By the end, you’ll know exactly how to get better performance and enjoy a faster, sharper experience.
Keep reading—you’re just a few clicks away from unlocking your computer’s full potential.
Why Switch To A Gpu
Switching from integrated graphics to a dedicated GPU can greatly improve your computer’s abilities. Integrated graphics share resources with your CPU, limiting overall power. A dedicated GPU has its own memory and processor to handle graphics tasks. This means smoother visuals and better performance.
Choosing a GPU helps with tasks that need strong graphics support. It makes your system ready for more demanding programs and games. The switch is important for users who want faster and clearer graphics.
Benefits Of Dedicated Graphics
A dedicated GPU has its own video memory. This frees up your computer’s RAM for other uses. It also reduces the load on the CPU, making your system faster overall. Dedicated graphics offer better image quality and support higher screen resolutions. They handle complex effects and 3D graphics easily.
Performance Gains
With a GPU, graphics processing is faster and smoother. Games run with higher frame rates and less lag. Video editing and rendering times are shorter. Software that uses 3D models or animations works more efficiently. The speed boost is noticeable in many everyday tasks.
Use Cases For Gpu
GPUs are useful for gaming, video editing, and 3D design. They help with tasks like photo editing and streaming. Professionals in architecture, engineering, and animation rely on GPUs. Even casual users benefit during high-definition video playback. A GPU supports new software that needs strong graphics power.
Credit: www.asus.com
Check Your System Compatibility
Before switching from integrated graphics to a dedicated GPU, checking your system compatibility is essential. This step ensures your computer supports the new hardware and runs it smoothly. Skipping this can cause installation issues or poor performance.
Identify Your Current Graphics Setup
First, find out what graphics your system uses now. On Windows, open Device Manager and expand Display adapters. The listed device shows your current graphics card. Integrated graphics usually appear as Intel HD Graphics or similar. Knowing this helps confirm the need for a GPU upgrade.
Verify Gpu Support
Next, check if your motherboard supports a dedicated GPU. Look for PCI Express (PCIe) slots, which most GPUs require. Some older or small form-factor boards lack these slots. Also, verify your operating system supports the GPU drivers you plan to install. This avoids compatibility problems.
Power Supply And Space Requirements
Assess your power supply unit (PSU) wattage. GPUs need extra power, often between 150 to 300 watts. Ensure your PSU can handle this load. Also, check your computer case size. Some GPUs are large and may not fit in compact cases. Measuring available space prevents installation issues.
Prepare For The Switch
Preparing to switch from integrated graphics to a dedicated GPU is important. This step ensures a smooth change without problems. Taking time to prepare helps protect your data and system.
Follow key steps before starting the hardware swap. These actions make the process safer and easier to manage.
Backup Important Data
Save all your important files before changing graphics hardware. Copy documents, photos, and other data to an external drive or cloud storage. This protects your information in case something goes wrong.
Backing up prevents loss during system updates or driver changes. It is a simple step that saves a lot of trouble later.
Download Necessary Drivers
Download the latest drivers for your new GPU from the official website. Drivers are software that help your computer use the new hardware properly. Having them ready avoids delays after installing the GPU.
Use the correct driver version that matches your operating system. This keeps your system stable and improves performance.
Update Bios And System Firmware
Check if your motherboard BIOS and system firmware need updates. Updated firmware supports new hardware better and fixes bugs. Visit your motherboard maker’s site for the latest versions.
Install updates carefully following the instructions. This step can prevent compatibility issues with your new GPU.

Credit: www.youtube.com
Install The Gpu Hardware
Installing your new GPU hardware is a key step to switch from integrated graphics. This process involves careful handling and simple tools. Follow each step to ensure a smooth installation and avoid damage.
Power Down And Unplug
Turn off your computer completely. Unplug the power cable from the wall socket. This prevents any electric shock or damage. Press the power button for a few seconds to discharge leftover power. Safety first.
Remove Existing Components If Needed
Open your computer case by removing screws or latches. Locate the current graphics card or cover panel in the PCIe slot. Unscrew and gently pull out the old card if present. Clear any cables blocking the slot. Make space for the new GPU.
Insert The Gpu Into Pcie Slot
Find the PCIe slot on your motherboard. Align the GPU with the slot carefully. Push the card firmly into the slot until it clicks. Ensure the metal bracket fits into the case’s rear slot. The card must be seated fully for proper function.
Secure And Connect Power Cables
Use screws to secure the GPU’s metal bracket to the case. Locate the power connectors on the GPU. Connect the appropriate power cables from your power supply. Make sure connections are tight and secure. This provides the GPU with the power it needs.
Configure System Settings
Configuring your system settings is a key step to switch from integrated graphics to a dedicated GPU. This process ensures your computer uses the better graphics card for improved performance. It involves changing some basic settings in the BIOS menu. Follow the steps carefully to make the GPU the main graphics source.
Access Bios To Enable Gpu
Start by restarting your computer. Press the BIOS access key during the startup. Common keys are F2, Del, or Esc. The exact key depends on your motherboard or laptop brand. Inside the BIOS, look for the “Advanced” or “Chipset” menu. Find the graphics or display options. Enable the dedicated GPU if it is disabled.
Set Primary Display Output
Next, locate the “Primary Display” or “Initial Display Output” option. Change this setting from “Integrated” or “IGFX” to your GPU, often labeled as “PCI-E” or “PEG.” This tells the system to use the graphics card first. Save this change before leaving the BIOS. This step ensures your system prefers the GPU over integrated graphics.
Save And Exit Bios
After making the changes, find the “Save & Exit” option in the BIOS menu. Confirm your changes to keep the new settings. Your computer will restart automatically. The system will now use the GPU as the primary graphics processor. Check your display and performance to confirm the change worked.
Install And Update Drivers
Installing and updating drivers is a key step when switching from integrated graphics to a dedicated GPU. Drivers help your computer communicate with the new graphics card. The right drivers improve performance and fix bugs. Keeping drivers up to date ensures your GPU runs smoothly and supports the latest features.
This process starts with removing old drivers and ends with updating the new ones. Each step needs attention to avoid conflicts or errors. Follow these steps carefully for the best results.
Uninstall Old Graphics Drivers
Remove the current integrated graphics drivers first. Open the Device Manager on your PC. Find the Display Adapters section and select the integrated graphics driver. Right-click and choose “Uninstall device.” This clears old files that might cause conflicts. Restart your computer after uninstalling.
Install New Gpu Drivers
Visit the official website of your GPU manufacturer. Download the latest driver for your specific card model. Run the installer and follow the instructions on the screen. Installing the correct driver helps your system recognize the new GPU. Restart your PC after installation to apply changes.
Run Driver Updates And Software
Use the GPU’s software to check for updates regularly. Many manufacturers offer apps that manage driver updates automatically. These tools keep your drivers current without extra effort. Regular updates improve stability and add new features to your GPU.
Verify Gpu Activation
Verifying GPU activation is important after switching from integrated graphics to a dedicated GPU. This step ensures your computer uses the GPU for better performance. It also helps spot any issues early before running demanding programs. Simple checks can confirm if the GPU is active and working properly.
Check Device Manager
Open Device Manager on your PC. Look under “Display adapters.” You should see your dedicated GPU listed there. If only the integrated graphics appear, the GPU might not be active. Right-click the GPU name and select “Enable” if needed. This confirms Windows recognizes your GPU.
Run Benchmark Tests
Use benchmark software to test GPU performance. These tools stress your GPU and measure its speed. Compare the scores with typical results for your GPU model. Good scores mean the GPU is working correctly. Low scores might indicate the system still uses integrated graphics.
Monitor Performance And Temperature
Check GPU activity with monitoring software. Watch the GPU load while running games or apps. The load should increase if the GPU is active. Also, monitor temperatures to avoid overheating. Normal temperature means the GPU runs smoothly. High temperature might need better cooling or settings adjustment.
Credit: vixencomposites.com
Troubleshooting Tips
Switching from integrated graphics to a dedicated GPU can improve your computer’s performance. Sometimes, this change does not work smoothly. Troubleshooting helps fix common problems quickly. It saves time and avoids frustration. Below are key tips to solve issues during the switch.
Common Installation Issues
Many users face problems installing the GPU. The card might not fit properly in the slot. Check if the GPU is firmly seated. Loose connections stop the GPU from working.
Power supply can also cause issues. Ensure your power unit supports the new GPU. Some cards need extra power cables connected.
Verify the monitor cable is plugged into the GPU, not the motherboard. Using the wrong port means the integrated graphics stay active.
Driver Conflicts
Old drivers often cause conflicts after installing a new GPU. Remove integrated graphics drivers first. Use a tool like Display Driver Uninstaller for a clean removal.
Download and install the latest GPU drivers from the manufacturer’s website. Updated drivers improve compatibility and performance.
Restart your computer after installing drivers. This step completes the driver setup and activates the GPU.
Bios Settings Reset
Sometimes BIOS settings revert to default after a reset or update. The system might still use integrated graphics by default.
Enter BIOS setup during boot by pressing keys like Del or F2. Look for graphics settings or display options.
Set the primary display to PCI Express or PEG (PCI Express Graphics). Save changes and exit BIOS.
Restart the computer to apply the new settings. This ensures the system prioritizes the dedicated GPU.
Frequently Asked Questions
How Do I Switch From Integrated Graphics To Gpu?
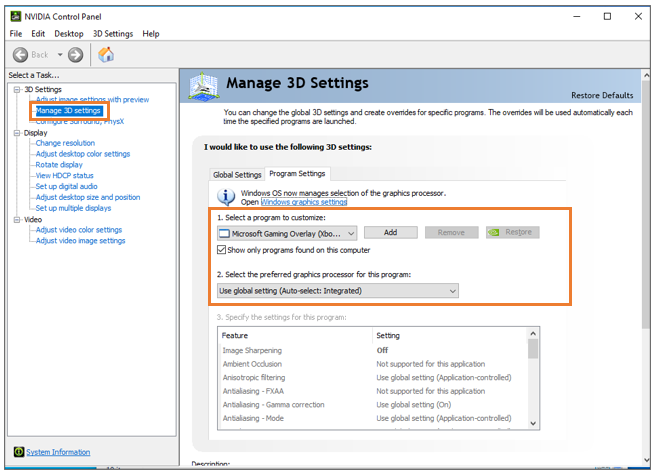
To switch, enter your PC’s BIOS/UEFI settings during boot. Find the graphics settings, then select your dedicated GPU as the primary display adapter. Save and exit BIOS. Alternatively, use your OS’s graphics control panel to set GPU preferences for specific applications.
Can I Use Both Integrated And Dedicated Gpus Simultaneously?
Yes, many systems allow simultaneous use. Integrated graphics handle basic tasks, while the dedicated GPU manages intensive graphics. This setup saves power and improves performance. Ensure your system supports this and configure settings in BIOS or your GPU control panel accordingly.
Why Isn’t My Pc Using The Dedicated Gpu?
Your PC might default to integrated graphics to save power. Check BIOS settings to prioritize the GPU. Update GPU drivers and set preferred GPU in your OS graphics settings. Also, ensure your GPU is properly installed and recognized by your system.
Does Switching To Gpu Improve Gaming Performance?
Yes, dedicated GPUs deliver better graphics and faster processing than integrated graphics. Switching improves frame rates, visual quality, and reduces lag in games. Ensure your GPU drivers are updated for optimal gaming performance.
Conclusion
Switching from integrated graphics to a dedicated GPU can boost your computer’s performance. It helps run games and apps more smoothly. Follow the steps carefully to avoid mistakes. Check your system settings and install the right drivers. Remember to restart your PC after changes.
This simple change can make a big difference in how your computer works. Keep your drivers updated for the best results. Enjoy better graphics and faster speeds with your new GPU setup.