
Thinking about upgrading your laptop’s performance? Changing the CPU can give your machine a serious boost, but it might sound complicated or risky.
What if you could learn exactly how to do it step-by-step, without technical confusion or costly mistakes? In this guide, you’ll discover simple, clear instructions that put you in control of your laptop’s power. Ready to unlock your device’s full potential?
Keep reading, because by the end, you’ll know how to change your laptop’s CPU with confidence.
Preparing For The Upgrade
Preparing to change a CPU in a laptop takes careful steps. This preparation helps avoid mistakes and damage. It also makes the upgrade smoother and safer. Before opening your laptop, spend time on these key tasks.
Checking Laptop Compatibility
Not all laptops allow CPU upgrades. Some have CPUs soldered to the motherboard. Check your laptop model online for CPU upgrade options. Find the exact CPU socket type and supported processors. Use the laptop manual or manufacturer website for details. This step saves time and prevents buying the wrong CPU.
Gathering Necessary Tools
Having the right tools is crucial for a safe upgrade. Common tools include a small Phillips screwdriver and an anti-static wrist strap. A plastic pry tool helps open the laptop case without damage. Keep a clean, flat workspace with good lighting. Organize screws and small parts to avoid losing them.
Backing Up Important Data
Changing the CPU can risk data loss. Always back up your important files before starting. Use an external hard drive or cloud storage for backups. This protects your data from accidental damage or software issues. Double-check the backup to ensure everything is saved.
Credit: www.easeus.com
Removing The Old Cpu
Removing the old CPU from a laptop is a careful process. It needs focus and patience. Each step must be done gently to avoid damage. This section guides you through the safe removal of your laptop’s CPU.
Powering Down And Unplugging
Start by shutting down your laptop completely. Do not just close the lid or put it to sleep. Remove the power cable from the laptop. Take out the battery if possible. This stops electricity flow and protects the laptop parts.
Opening The Laptop Case
Place the laptop on a flat surface. Use a screwdriver to remove the screws on the back cover. Keep the screws safe and organized. Carefully lift the cover off. Avoid using too much force to prevent cracks.
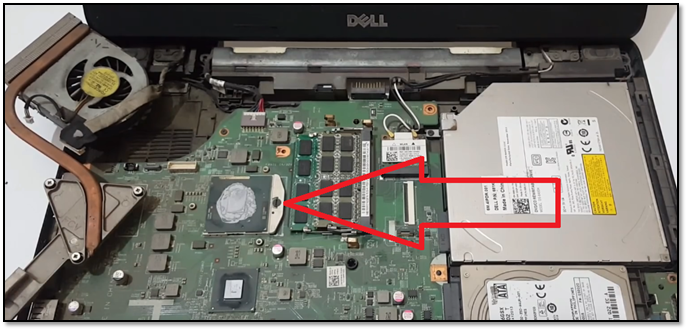
Locating The Cpu
Inside, look for the CPU. It sits under a metal plate or heat sink. The CPU is a small square chip on the motherboard. It usually has a fan or cooling system above it.
Detaching Cooling Components
Remove the screws holding the cooling system. Gently lift the heat sink or fan away from the CPU. Be careful not to pull wires or damage connectors. Set the cooling parts aside in a safe place.
Unlocking The Cpu Socket
Find the small lever or latch next to the CPU. Lift it gently to unlock the CPU socket. This releases the CPU from its place. Do not force the lever to avoid breaking it.
Removing The Cpu Safely
Hold the CPU by its edges. Do not touch the pins or contacts underneath. Slowly lift the CPU straight out of the socket. Place it on an anti-static surface. This keeps the CPU safe and clean.
Installing The New Cpu
Installing the new CPU in your laptop is a careful task. It needs focus and steady hands. This step is critical for your laptop to work well with the new processor. Follow each step closely to avoid damage and ensure proper function.
Aligning The Cpu Correctly
Look for the small triangle on the CPU corner. Match it with the triangle on the CPU socket. Do not force the CPU into the socket. It should fit easily and sit flat without gaps.
Securing The Cpu In Place
Lower the socket lever gently to lock the CPU. This lever holds the CPU firmly. Make sure the CPU does not move once locked. A loose CPU can cause errors or damage.
Applying Thermal Paste
Apply a small pea-sized dot of thermal paste on the CPU center. The paste helps heat move from the CPU to the cooler. Spread it evenly if needed. Too much paste can cause overheating.
Reattaching Cooling Components
Place the heat sink or cooler back over the CPU carefully. Tighten the screws in a diagonal pattern. This ensures even pressure on the CPU. Connect the fan cable to the motherboard to power the cooler.

Credit: www.hp.com
Reassembling And Testing
After installing the new CPU in your laptop, the next step is reassembling and testing. This step ensures your laptop works correctly with the new processor. It is crucial to handle this part carefully to avoid damage and confirm the upgrade success.
Closing The Laptop Case
Start by placing the laptop case back carefully. Align all screws with their holes. Tighten screws evenly but do not overtighten. Check for any loose parts inside before closing fully. Proper closure prevents dust and damage.
Powering On The Laptop
Press the power button to switch on the laptop. Watch for the startup screen and any unusual sounds. If the laptop does not start, recheck the CPU installation and connections. Successful power-on means the hardware is likely set up well.
Verifying Cpu Recognition
Open your system settings or BIOS to check the CPU details. Confirm the new CPU model is displayed correctly. This step proves the laptop detects the new processor. If the CPU is not recognized, troubleshoot the installation.
Monitoring Temperature And Performance
Use software tools to check CPU temperature and speed. Keep an eye on normal temperature ranges to avoid overheating. Test laptop performance with everyday tasks. Stable temperature and smooth performance confirm a good upgrade.
Troubleshooting Tips
Changing a CPU in a laptop can bring great performance benefits. Sometimes, issues can occur after the replacement. Troubleshooting helps fix these problems fast. Knowing basic tips saves time and stress.
Dealing With Boot Issues
Boot problems are common after a CPU change. The laptop might not start or show a black screen. Check if the CPU is correctly seated in the socket. Make sure the cooling system is connected well.
Clear the CMOS by removing the battery for a few minutes. This resets BIOS settings that may block startup. Use the original RAM sticks and test one at a time. Faulty RAM can also cause boot failures.
Handling Overheating Problems
New CPUs can run hotter than the old ones. Overheating causes sudden shutdowns or slow performance. Apply fresh thermal paste between the CPU and heatsink. Ensure the heatsink is mounted tightly for good contact.
Clean the cooling fans and vents. Dust blocks airflow and raises temperatures. Monitor the CPU temperature with software tools. High temps over 90°C need immediate action to prevent damage.
Updating Bios And Drivers
Old BIOS versions may not support the new CPU. Visit the laptop manufacturer’s website for BIOS updates. Follow their instructions carefully to avoid errors during update.
Install the latest chipset drivers after BIOS update. These drivers help the system recognize and use the new CPU fully. Restart the laptop after updates to apply changes correctly.

Credit: www.youtube.com
Frequently Asked Questions
How Do I Know If My Laptop Cpu Is Replaceable?
Most laptops have soldered CPUs, making replacement difficult. Check your laptop’s manual or manufacturer website to confirm if your CPU is socketed and removable.
What Tools Are Needed To Change A Laptop Cpu?
You need a small screwdriver set, thermal paste, anti-static wristband, and a clean workspace. These tools help safely remove and install the CPU without damage.
How Do I Apply Thermal Paste When Changing A Cpu?
Apply a small pea-sized amount of thermal paste on the CPU’s center. Spread it evenly to ensure proper heat transfer between the CPU and heatsink.
Can Changing My Laptop Cpu Improve Performance?
Yes, upgrading to a faster CPU can boost speed and multitasking. However, ensure compatibility with your laptop’s motherboard and cooling system.
Conclusion
Changing a CPU in a laptop takes patience and care. Always check compatibility before buying a new processor. Follow each step slowly to avoid damage. Use the right tools and keep parts safe. This upgrade can improve your laptop’s speed and performance.
Remember, not all laptops allow CPU changes. Doing it yourself saves money and teaches new skills. Take your time and stay focused throughout the process. With careful work, your laptop will run better than before.