
If you want your CPU to run cooler and perform better, applying thermal paste correctly is key. But if you’ve never done it before, the process might seem confusing or even risky.
Don’t worry—this guide will walk you through every step in a simple, clear way. By the end, you’ll know exactly how to apply thermal paste like a pro, protecting your hardware and boosting your computer’s efficiency. Keep reading, because getting this right can make a huge difference to your PC’s health and speed.
Credit: koolingmonster.com
Choosing The Right Thermal Paste
Choosing the right thermal paste is very important for your CPU’s health. Thermal paste helps transfer heat from the CPU to the cooler. This keeps the CPU from overheating. Not all thermal pastes are the same. Some work better on certain CPUs and coolers. Picking the right one can improve your computer’s performance and lifespan.
Types Of Thermal Paste
There are several types of thermal paste available. Silicone-based pastes are common and easy to use. Metal-based pastes contain tiny metal particles for better heat transfer. Ceramic-based pastes use non-metal particles and are safe for all CPUs. Liquid metal pastes offer the best heat transfer but can be tricky to apply. Choose a type that fits your skill level and CPU type.
Factors To Consider
Look at the thermal conductivity of the paste. Higher numbers mean better heat transfer. Check if the paste is safe for your CPU and cooler materials. Some metal-based pastes can cause damage if applied incorrectly. Consider how long the paste lasts before drying out. Think about how easy it is to apply and clean.
Recommended Brands
Some brands are known for quality thermal paste. Arctic Silver is popular for metal-based pastes. Noctua offers ceramic-based paste that is easy to use. Thermal Grizzly provides high-performance liquid metal options. Cooler Master also makes reliable silicone-based pastes. Choose from trusted brands to ensure good results and safety.

Credit: www.tglobaltechnology.com
Preparing The Cpu Surface
Preparing the CPU surface is a crucial step before applying thermal paste. A clean and smooth surface ensures better heat transfer from the CPU to the cooler. Dirt, old paste, or dust can block this heat flow. This can cause the CPU to overheat and slow down. Take time to prepare the surface carefully for the best results.
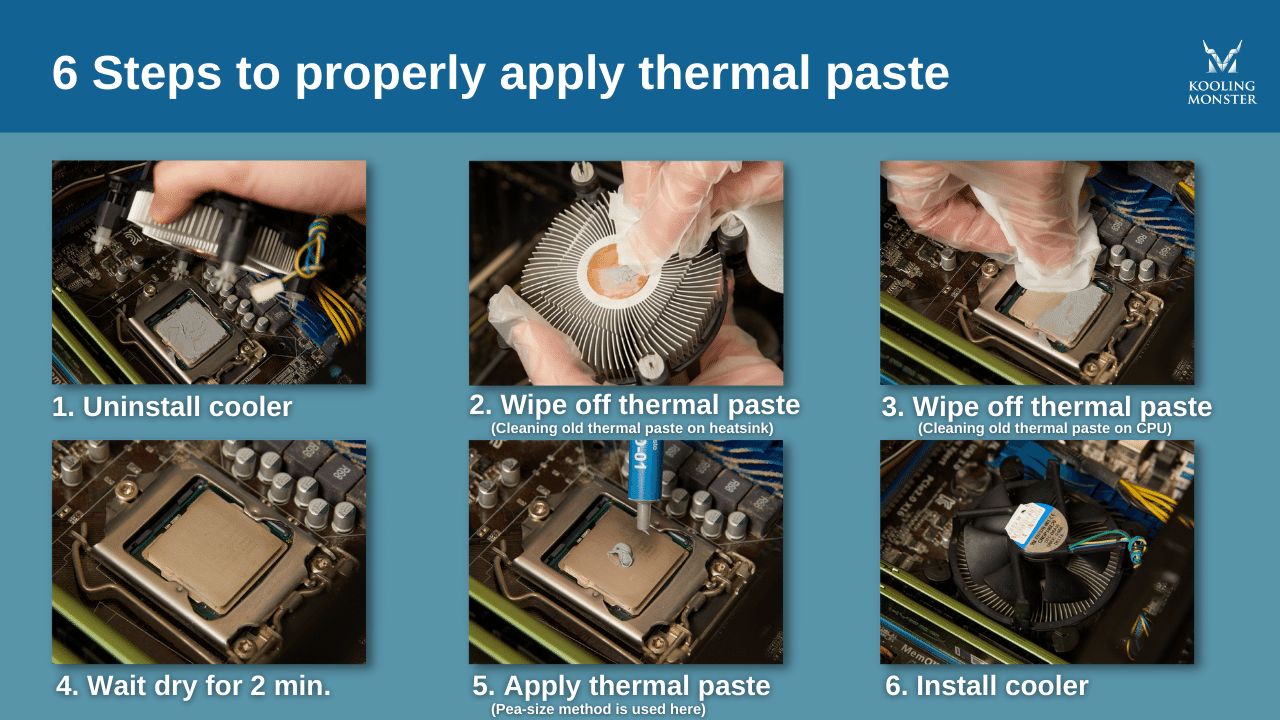
Cleaning Old Thermal Paste
Remove the old thermal paste gently. Use a soft cloth or paper towel to wipe off as much as possible. Then, apply isopropyl alcohol (90% or higher) to clean the surface thoroughly. Avoid using water or other liquids that leave residue. Let the surface dry completely before applying new paste.
Tools Needed
Gather the right tools to prepare the CPU surface. You need isopropyl alcohol, lint-free cloth or coffee filters, and a plastic or wooden spatula. Avoid metal tools to prevent scratches. Have cotton swabs handy for hard-to-reach areas. Good tools make the cleaning process easier and safer.
Ensuring A Dust-free Environment
Work in a clean and dust-free space. Dust particles can stick to the CPU surface and reduce thermal paste effectiveness. Turn off any fans or air conditioners that blow dust around. Use an anti-static wristband to protect sensitive CPU parts. Clean surroundings help maintain a perfect surface for paste application.
Applying Thermal Paste Methods
Applying thermal paste correctly is key for good CPU cooling. The paste helps heat move from the CPU to the cooler. There are several ways to apply thermal paste. Each method has its own benefits. Choose the method that suits your skill and setup.
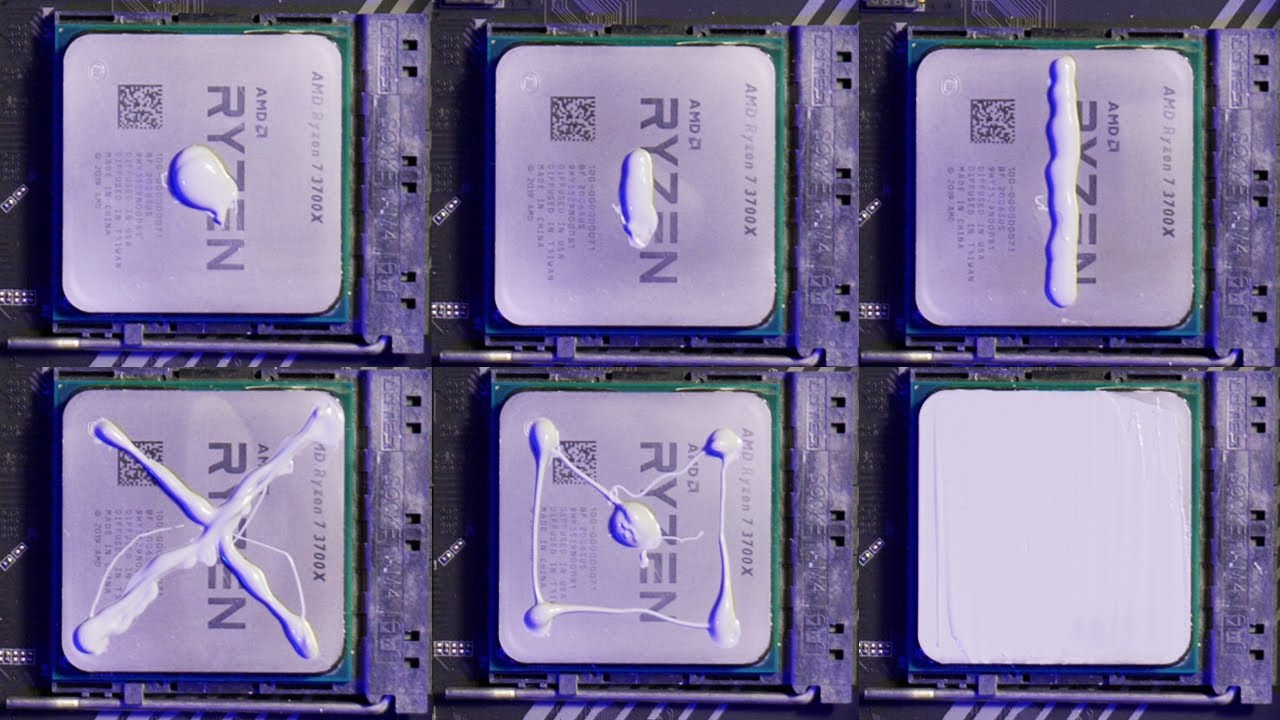
Dot Method
The dot method places a small dot of paste in the center of the CPU. This dot should be about the size of a pea. When the cooler presses down, the paste spreads evenly. This method is simple and works well for most CPUs. It avoids air bubbles that reduce cooling.
Line Method
The line method uses a thin line of paste across the CPU surface. This line runs from one side to the other. It covers more area than the dot method at once. This method suits rectangular CPUs well. It helps in spreading the paste evenly under pressure.
Spread Method
The spread method involves using a tool or finger to spread paste evenly. It covers the whole CPU surface with a thin layer. This method gives you control over the paste thickness. But it needs careful and clean application. Too much paste can cause problems.
Installing The Cooler
Installing the cooler is the next step after applying thermal paste on your CPU. This step helps keep your CPU cool during use. A properly installed cooler improves your computer’s performance and lifespan. Follow these simple steps to install your cooler correctly.
Aligning The Cooler Correctly
Place the cooler directly over the CPU. Make sure it fits the socket holes on the motherboard. The cooler’s base must touch the thermal paste on the CPU. Check that no cables or parts block the cooler’s position. Align it carefully to avoid uneven contact.
Securing The Cooler
Use the screws or clips that came with your cooler. Tighten them slowly in a diagonal pattern. This helps apply pressure evenly across the CPU surface. Do not overtighten, as it can damage the motherboard or CPU. Secure the cooler firmly but gently.
Checking For Even Pressure
After securing, check that the cooler is flat on the CPU. Press lightly on the cooler to feel if it moves. It should stay steady without gaps. Uneven pressure causes poor heat transfer and higher temperatures. Adjust screws if the cooler is loose or tilted.
Testing Cpu Temperatures
Testing CPU temperatures is important after applying thermal paste. It shows if the paste spreads heat well from the CPU to the cooler. Monitoring temperatures helps keep your computer safe and fast.
Check the CPU temperature right after you finish applying the thermal paste. Run your computer for some time and watch the numbers. This helps you know if the paste is working or if you need to try again.
Recommended Software
Use simple programs to check CPU temperature. Popular tools include HWMonitor, Core Temp, and SpeedFan. These apps show real-time temperature and other details. Download and install one to keep track of your CPU’s heat easily.
Ideal Temperature Ranges
Normal CPU temperatures vary by model but usually range between 30°C and 50°C at idle. Under load, temperatures can rise to 70°C or 80°C safely. If your CPU runs hotter than 85°C, it might cause problems.
Troubleshooting Overheating
High CPU temperature means something is wrong. Check if the thermal paste was spread evenly. Ensure the cooler is firmly attached to the CPU. Clean dust from fans and heatsinks. Replace the thermal paste if overheating continues.
Credit: www.youtube.com
Reapplying Thermal Paste
Reapplying thermal paste is important for keeping your CPU cool. Over time, thermal paste can dry out or lose effectiveness. This can cause your CPU to run hotter than it should. Knowing when and how to reapply thermal paste helps prevent overheating and keeps your computer running smoothly.
When To Reapply
Reapply thermal paste every 2 to 3 years. Also, reapply if you remove the CPU cooler for any reason. High CPU temperatures or poor performance are signs to check the paste. Regular maintenance improves heat transfer and CPU lifespan.
Signs Of Degraded Paste
Look for higher CPU temperatures during normal use. The computer may shut down unexpectedly. The paste may look dry or cracked if you open the cooler. These signs show the paste no longer works well. Replace it to avoid damage.
Proper Removal Techniques
Turn off and unplug your computer before starting. Remove the CPU cooler carefully. Use a lint-free cloth or paper towel to wipe off old paste. Apply isopropyl alcohol to clean the surface fully. Wait until it dries before applying new paste. Clean surfaces ensure better paste adhesion and cooling.
Frequently Asked Questions
What Is The Best Way To Apply Thermal Paste On Cpu?
The best way is to apply a small pea-sized amount in the center of the CPU. This ensures even spread when the cooler is installed. Avoid using too much paste to prevent overheating and maintain optimal heat transfer.
How Much Thermal Paste Should I Use On My Cpu?
Use a small, pea-sized amount or a thin line of thermal paste. Excessive paste can cause poor heat transfer and mess. The right amount creates a thin, even layer between the CPU and cooler for efficient cooling.
Can I Reuse Thermal Paste After Removing The Cpu Cooler?
No, you should always clean off old thermal paste and apply a fresh layer. Reusing old paste can reduce cooling efficiency and cause overheating. Use isopropyl alcohol and a lint-free cloth for cleaning.
How Often Should I Reapply Thermal Paste On A Cpu?
Reapply thermal paste every 2 to 3 years or when you remove the CPU cooler. Over time, paste can dry out and lose effectiveness. Regular reapplication helps maintain optimal CPU temperatures and system stability.
Conclusion
Applying thermal paste on your CPU is simple and important. It helps keep your computer cool and working well. Use a small amount of paste for the best results. Spread it evenly to avoid air bubbles. Clean the old paste before adding new.
Taking these steps can stop your CPU from overheating. A cooler CPU means better performance and longer life. Try these tips next time you build or fix a PC. Your computer will thank you.