
Is your computer making too much noise or getting too hot? Knowing how to adjust your CPU fan speed can solve both problems quickly.
By controlling the fan speed, you can keep your PC cool when it’s working hard or make it run quieter when you’re just browsing. You’ll learn simple, step-by-step ways to take charge of your CPU fan and improve your computer’s performance and comfort.
Keep reading—you’ll be surprised how easy it is to make your PC work exactly the way you want.
Why Adjust Cpu Fan Speed
Adjusting your CPU fan speed is important for your computer’s health and performance. It helps balance cooling and noise. You can make your PC run cooler or quieter based on your needs. Understanding why to adjust the fan speed helps you keep your system safe and efficient.
Impact On Cooling Performance
CPU fans cool down the processor. A faster fan speed removes heat quickly. This prevents your CPU from overheating. Overheating can cause slowdowns or crashes. Adjusting fan speed keeps your CPU at a safe temperature. This helps your computer run smoothly and avoid damage.
Noise Levels And User Comfort
Fans make noise when they spin fast. Loud noise can be annoying or distracting. Lowering fan speed reduces noise and creates a quiet environment. This is good for work or study times. You control the noise without hurting the cooling. It makes your computer use more comfortable.
Extending Hardware Lifespan
Heat shortens the life of computer parts. Proper cooling protects your CPU and other components. Running the fan at the right speed lowers heat damage. It keeps your hardware working longer. Adjusting fan speed helps avoid costly repairs or replacements. Your PC stays reliable for many years.

Credit: softwareg.com.au
Tools Needed For Adjustment
Adjusting your CPU fan speed requires specific tools. These tools help control how fast or slow the fan runs. Choosing the right tool depends on your system and comfort level. Some tools work inside your operating system. Others need changes in the BIOS or physical hardware.
Software Utilities
Software utilities are programs that let you change fan speed from your desktop. Many motherboard makers offer free fan control software. These tools show current fan speeds and let you set custom curves. Some popular examples include SpeedFan and MSI Afterburner. Software is easy to use and does not require restarting your computer.
Bios Settings
The BIOS is the basic system setup on your computer. You can access it by pressing a key during startup. BIOS settings often include fan control options. You can set fan speed profiles like silent, normal, or performance. Adjusting fan speed here works even before your operating system loads. It is a reliable way to control your fan directly.
Hardware Fan Controllers
Hardware fan controllers are physical devices you install inside your PC. They connect to your fans and let you adjust speed manually. Some controllers have knobs or buttons on the front panel. Others come with a small screen and remote control. Hardware controllers offer precise control and work independently of software or BIOS.
Checking Current Fan Speed
Checking the current speed of your CPU fan helps you understand how your cooling system works. It shows if the fan runs too fast or too slow. This is important to keep your computer safe from overheating. You can check the fan speed using software or through your computer’s BIOS settings.
Using System Monitoring Software
System monitoring software displays real-time information about your CPU fan speed. Many programs are free and easy to use. They show the fan speed in revolutions per minute (RPM). Some popular tools include HWMonitor, SpeedFan, and Core Temp.
After installing the software, open it and find the fan speed section. The software will list all fans in your system, including the CPU fan. Note the RPM value to see how fast the fan is spinning. This data helps decide if you need to adjust the fan speed.
Accessing Bios Fan Information
The BIOS also shows CPU fan speed and lets you control fan settings. To enter BIOS, restart your computer and press a key like Del, F2, or Esc during startup. The exact key depends on your computer model.
Inside BIOS, find the hardware monitoring or PC health section. Here, the CPU fan speed is shown in RPM. Some BIOS versions let you change fan speed profiles or set custom speeds. This method gives direct control over fan behavior without extra software.
Adjusting Fan Speed Via Bios
Adjusting your CPU fan speed through the BIOS gives you direct control over your system’s cooling. This method helps reduce noise or increase cooling power based on your needs. It is safe and does not require extra software. Follow these steps to adjust fan speed easily.
Entering The Bios Setup
Turn on or restart your computer. As it starts, press the key to enter BIOS. Common keys are Delete, F2, or Esc. Watch the screen for a message showing which key to press. Press it quickly before Windows loads. You will enter the BIOS setup menu.
Locating Fan Control Settings
Inside BIOS, look for the section named “Hardware Monitor” or “PC Health.” Fan controls are often under these menus. Use the arrow keys to navigate. Find options labeled “CPU Fan Speed” or “Fan Control.” These settings let you change how the fan behaves.
Setting Fan Curves And Profiles
Most BIOS offer fan curves or profiles. Fan curves allow you to set fan speed at different temperatures. Profiles like Silent, Normal, or Performance adjust speeds automatically. Choose a profile or set a custom curve. Save your settings before exiting BIOS. Your fan will now run at the new speed.
Using Software To Change Fan Speed
Adjusting your CPU fan speed through software is a simple way to manage your computer’s cooling. This method helps reduce noise and prevent overheating. Software tools give you control without opening your PC case. You can set fan speeds based on temperature levels.
Using software is safer and more flexible than manual adjustments. It also offers presets and custom options. You can monitor temperatures and fan speeds in real time. Many programs work on different motherboard brands and models.
Popular Fan Control Programs
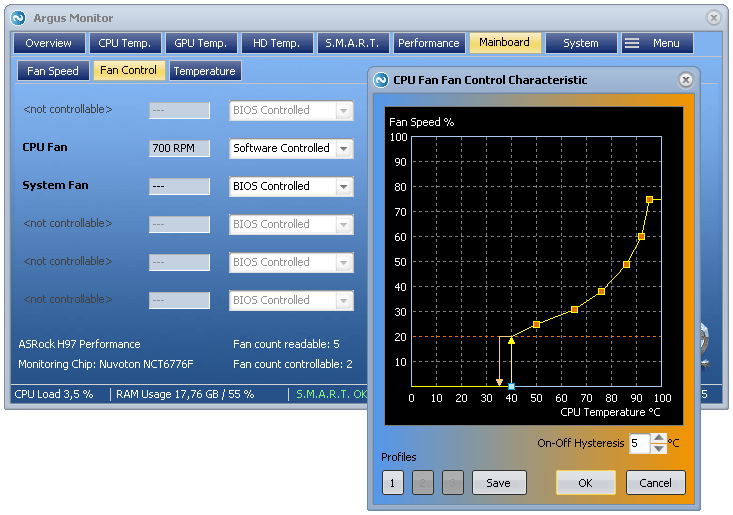
SpeedFan is a well-known program for controlling fan speeds. It supports many sensors and lets you set custom fan curves. HWMonitor shows temperature and fan speed readings but has limited control features. MSI Afterburner is popular for gaming PCs. It controls GPU and CPU fans and displays detailed system info. Argus Monitor offers easy fan speed adjustments and health monitoring. Each program has its own user interface and features.
Step-by-step Software Configuration
First, download and install your chosen fan control program. Open the program and allow it to detect your hardware. Look for fan speed settings or a fan control tab. Check the current fan speeds and temperature readings. Set a custom fan curve or manual fan speed. Save your settings and test if the fan speed changes. Adjust the curve or speed until you find a balance. Keep an eye on temperatures to avoid overheating. Repeat the process if needed for fine-tuning.
Manual Fan Speed Control With Hardware
Manual fan speed control with hardware lets you adjust your CPU fan without software. This method uses physical devices to change how fast the fan spins. It gives direct control over cooling and noise levels.
You can make the fan run slower to reduce noise or faster to cool better. It works well for users who want simple and quick adjustments. No need to open computer software or BIOS menus.
Fan Controllers And Dials
Fan controllers are small devices that connect to your CPU fan. They often have dials or sliders to change the fan speed. You turn the dial to increase or decrease fan rotation.
Some controllers fit in your PC case, while others are external. External controllers allow easy access without opening the case. They often show fan speed with lights or small screens.
Benefits And Limitations
Manual control offers instant speed changes. It helps reduce noise and improve cooling quickly. No need for complex software setups or BIOS tweaks.
Limitations include less precise speed control. It may not show exact fan speed numbers. Also, not all fans support manual hardware control. Some fans need specific connectors or power sources.
Testing And Monitoring After Adjustment
After adjusting your CPU fan speed, testing and monitoring are crucial. This step ensures your computer runs cool and quiet. You want to check the temperature and noise to find the right balance. Proper monitoring helps avoid overheating or loud fans.
Temperature Monitoring
Check your CPU temperature using software tools. Programs like HWMonitor or Core Temp work well. Watch the temperature for at least 10 minutes under normal use. Make sure it stays within safe limits. High temperatures mean the fan speed might be too low.
Noise Level Assessment
Listen to your computer’s fan noise in a quiet room. Note if the sound is too loud or distracting. Some noise is normal but loud buzzing or rattling is not. Quiet fans improve your working comfort. Adjust speed if noise becomes a problem.
Adjusting For Optimal Balance
Change fan speed slightly based on temperature and noise checks. Increase speed if temperatures are high or decrease if noise is loud. Test again after each change to see how it affects both. Find a balance where the computer stays cool and noise is low.
Common Issues And Fixes
Adjusting your CPU fan speed can improve your computer’s cooling and performance. Sometimes, issues arise that stop these changes from working properly. Knowing common problems helps you fix them fast. This section covers frequent issues and easy fixes.
Fan Not Responding To Changes
The fan may not change speed after adjustment. Check if your BIOS or fan control software is updated. Make sure the fan is connected to the correct motherboard header. Try resetting BIOS settings to default. Faulty hardware could also cause this. Test the fan on another system if possible.
Unusual Noises Or Vibrations
Fans can make strange noises or vibrate a lot. Dust buildup often causes this issue. Clean the fan blades and surrounding area carefully. Loose screws or mounts can also cause vibration. Tighten any loose parts around the fan. Replace the fan if noise continues after cleaning.
Overheating Despite Adjustments
CPU might still overheat after changing fan speed. Check if the fan speed is set too low for your CPU load. Ensure the thermal paste between CPU and cooler is applied correctly. Verify the cooler is properly seated on the CPU. Consider upgrading your cooling system if overheating persists.
Tips For Long-term Cooling Maintenance
Keeping your CPU fan running well helps your computer stay cool and last longer. Regular care protects your system from overheating and damage. Simple steps can keep the fan working efficiently for years.
Regular Cleaning
Dust blocks air and slows the fan down. Clean your fan every few months. Use a soft brush or compressed air. Turn off the computer before cleaning. Keep vents clear to improve airflow.
Replacing Old Fans
Fans wear out over time and lose power. Replace old or noisy fans quickly. Choose a fan that fits your computer model. New fans keep cooling strong and reduce noise.
Updating Firmware And Software
Fan speed often depends on software controls. Check for updates from your computer or motherboard maker. Updated software can fix bugs and improve fan control. Keep your system software current for best cooling.
Credit: www.argusmonitor.com
Credit: www.pcguide.com
Frequently Asked Questions
How Do I Check My Cpu Fan Speed?
You can check CPU fan speed using BIOS settings or software like HWMonitor. BIOS shows real-time fan speed in RPM. Software tools provide detailed monitoring and control options for fan speed adjustments on Windows or Mac.
Can Adjusting Cpu Fan Speed Improve Performance?
Yes, adjusting CPU fan speed helps balance cooling and noise. Increasing speed improves cooling, preventing overheating. Lowering speed reduces noise but may increase temperature. Proper fan speed ensures optimal CPU performance and longevity.
Is It Safe To Manually Change Cpu Fan Speed?
Yes, it is safe if done carefully through BIOS or trusted software. Avoid excessively low speeds that cause overheating or very high speeds causing noise. Always monitor CPU temperatures after adjustments to maintain safe operation.
What Tools Can I Use To Adjust Cpu Fan Speed?
You can use BIOS settings, motherboard software like MSI Afterburner, or third-party apps like SpeedFan. These tools allow you to customize fan curves and set speeds based on temperature thresholds for efficient cooling.
Conclusion
Adjusting your CPU fan speed helps keep your computer cool and quiet. It also improves your PC’s performance and lifespan. Use the BIOS or software tools for easy control. Always check temperatures to avoid overheating. Small changes make a big difference in fan noise and heat.
Try different settings to find what works best for you. Stay patient and careful while adjusting speeds. Your computer will thank you with better stability and less noise.