
Is your computer making loud noises or overheating? It might be time to remove your CPU fan.
But if you’ve never done it before, the thought can be a bit intimidating. Don’t worry—you’re in the right place. This guide will walk you through the simple steps to safely take out your CPU fan without causing damage. By the end, you’ll have the confidence to handle your computer’s cooling system like a pro.
Keep reading to learn how to protect your PC and keep it running smoothly.

Credit: softwareg.com.au
Tools Needed
Removing a CPU fan requires some basic tools. Having the right tools makes the job easier and safer. It helps protect your computer parts from damage. Some tools are must-haves, while others can help but are not necessary. Let’s look at what tools you need.
Essential Tools
A Phillips-head screwdriver is the top tool for this job. Most CPU fans are held by screws that fit this type of screwdriver. A small size, like a 2, works best for tight spaces inside the case.
An anti-static wrist strap is very important. It stops static electricity from harming your computer parts. You can buy one at most electronics stores. If you do not have one, touch a metal part of the case often to discharge static.
A pair of tweezers helps to unplug small fan connectors safely. It gives better grip than fingers and avoids cable damage.
Optional Accessories
Thermal paste is not needed for removing the fan but useful if you plan to replace the CPU cooler. It helps keep the processor cool by filling tiny gaps.
A can of compressed air clears dust from the fan and heatsink. Dust can slow down the fan and cause overheating. Use short bursts to clean without spinning the fan too fast.
Small containers or magnetic trays keep screws safe and prevent loss. It is easy to drop tiny screws inside the case without one.
Preparing Your Workspace
Preparing your workspace is the first step to safely remove a CPU fan. A clean and organized area helps prevent damage to your computer parts. It also makes the whole process easier and faster. Taking time to prepare protects you and your equipment from harm.
Power Off And Unplug
Turn off your computer completely. Do not just put it to sleep or hibernate. Unplug the power cable from the wall socket or power strip. This stops any electricity from running through the system. It keeps you safe from electric shock. It also prevents damage to the computer’s components.
Grounding Yourself
Static electricity can harm sensitive computer parts. Touch a metal object to discharge any static build-up. A metal desk or case works well. Alternatively, wear an anti-static wrist strap. Connect it to a grounded surface. This step keeps static electricity away from your CPU and motherboard.
Clearing The Area
Remove any clutter around your workspace. Keep tools like screwdrivers and pliers nearby. Clear space helps you work without distractions or accidents. Use a flat, stable surface to place your computer. Good lighting is important too. It helps you see small screws and parts clearly.
Locating The Cpu Fan
Locating the CPU fan is the first step in removing it safely. The CPU fan helps keep your computer’s processor cool. It prevents overheating and keeps your system stable. Knowing exactly where the fan is will make the removal process easier.
Opening The Case
Start by turning off your computer and unplugging it. Place it on a flat surface. Use a screwdriver to remove the screws on the side panel. Slide the panel off to see inside. Be careful not to touch any components inside. This gives you clear access to the internal parts.
Identifying The Fan
The CPU fan is usually located at the center of the motherboard. It sits on top of a large metal piece called the heat sink. The fan is small and round with blades inside. You will see wires running from the fan to the motherboard. This fan is different from other case fans because it is directly on the CPU.
Credit: www.intel.com
Disconnecting The Fan
Disconnecting the CPU fan is a crucial step before removing it. This process involves carefully unplugging the power cable and handling the fan connectors. Taking your time here prevents damage to the motherboard or the fan itself. Follow these simple steps to disconnect the fan safely.
Unplugging The Power Cable
Locate the fan’s power cable on the motherboard. It is usually a small, four-pin or three-pin connector. Gently grip the connector, not the wires. Pull the connector straight out without twisting. Avoid using too much force to prevent damage. Make sure the cable is fully unplugged before moving on.
Handling Fan Connectors
Fan connectors can be delicate and easy to break. Use your fingers or a small tool to release any clips securing the connector. Do this slowly and carefully. Never pull the wires alone; always pull the connector body. Once loose, lift the connector straight out. Keep the connector safe for reassembly.
Removing The Fan
Removing the CPU fan is a key step before cleaning or replacing it. The fan keeps your CPU cool and stops it from overheating. To remove it safely, you must follow a few simple steps.
Handle the fan gently to avoid damage. Make sure your computer is off and unplugged. This prevents electric shock and protects your parts.
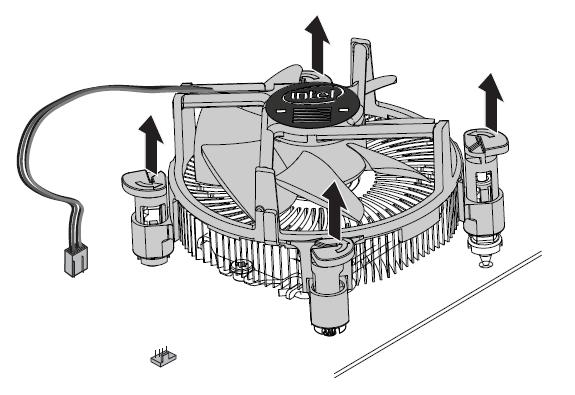
Unscrewing The Fan
Most CPU fans are held by screws. Use a screwdriver that fits well to avoid stripping the screws. Turn the screws counterclockwise to loosen them. Keep the screws in a safe place for reassembly. Some fans have four screws, others have three. Remove all screws before trying to lift the fan.
Releasing Clips Or Latches
Some fans use clips or latches instead of screws. These clips secure the fan to the heatsink. Look closely for small plastic tabs around the fan. Press or lift the tabs gently to release the fan. Do not force the clips as they can break easily. Once the clips are free, you can lift the fan off the CPU.

Credit: www.youtube.com
Cleaning The Area
Cleaning the area after removing the CPU fan is a crucial step. Dust and dirt can build up inside your computer. This buildup can cause overheating and reduce performance. Taking time to clean the area helps maintain your PC’s health. It also prepares the space for a new or reinstalled fan.
Removing Dust And Debris
Start by using a soft brush or compressed air to clear dust. Blow gently to avoid damaging sensitive parts. Focus on the heatsink and fan blades. Remove any loose dirt from nearby surfaces. Avoid using a vacuum as it can create static electricity. Dust can block airflow and cause the CPU to heat up.
Inspecting For Damage
Look closely at the fan and surrounding parts. Check for broken blades or loose wires. Examine the heatsink for bent fins or corrosion. Damaged parts may reduce cooling efficiency. Replace or repair any faulty components before reinstalling. This step ensures your CPU stays cool and runs smoothly.
Tips For Reinstallation
Reinstalling a CPU fan is a key step after removing it. Doing it right helps keep your computer cool and running well. Small mistakes can cause overheating or damage. Follow these tips to ensure a smooth and safe reinstallation.
Applying Thermal Paste
Thermal paste helps move heat from the CPU to the fan. Clean off old paste with isopropyl alcohol and a soft cloth. Use a small pea-sized amount of new paste in the center of the CPU. Spread it evenly if needed. Too much paste can cause problems. Too little paste lowers cooling efficiency.
Securing The Fan Properly
Place the fan carefully on the CPU. Align it with the mounting holes. Tighten screws evenly in a cross pattern. Avoid over-tightening to prevent damage. Make sure the fan is stable and does not wobble. Connect the fan cable to the motherboard securely. A loose connection can cause the fan to stop working.
Frequently Asked Questions
How Do I Safely Remove A Cpu Fan?
First, power off and unplug your computer. Then, disconnect the fan’s power cable. Unscrew or unclip the fan carefully. Avoid damaging the motherboard or CPU during removal.
What Tools Are Needed To Remove A Cpu Fan?
You typically need a Phillips-head screwdriver. An anti-static wrist strap is recommended. Some fans may require a flat-head screwdriver or clips to unfasten.
How To Avoid Damage When Removing Cpu Fan?
Handle components gently and avoid force. Use proper tools and unplug power cables first. Ground yourself to prevent static discharge on parts.
Can I Remove Cpu Fan Without Thermal Paste Damage?
Yes, but avoid separating the fan and heatsink abruptly. Warm the CPU slightly to soften thermal paste. Clean and reapply new thermal paste after removal.
Conclusion
Removing a CPU fan is easier than it seems. Take your time and follow each step carefully. Always unplug your computer before starting. Handle parts gently to avoid damage. Clean the area before installing a new fan. This keeps your CPU cool and working well.
Regular maintenance helps your computer last longer. Now, you can confidently remove a CPU fan yourself. Simple tools and a bit of patience make all the difference. Give your PC the care it needs today.