
Is your computer running hotter than usual or making strange noises? It might be time to clean your CPU.
Keeping your CPU clean is key to making sure your computer runs smoothly and lasts longer. But how do you clean it without causing damage? You’ll learn simple, step-by-step tips to safely clean your CPU and improve its performance. By the end, you’ll feel confident handling this task yourself—saving time and money.
Let’s get started and give your CPU the care it deserves!
Tools Needed
Cleaning a CPU requires certain tools to do the job safely and effectively. Having the right supplies helps avoid damage and keeps your computer running well. Gather these items before starting your cleaning process.
Essential Cleaning Supplies
Isopropyl alcohol is a must-have. Use 70% or higher for best results. It removes old thermal paste and dirt without harming parts. A soft, lint-free cloth or microfiber cloth works well for wiping surfaces. Cotton swabs help reach tight spots gently. Thermal paste is needed to reapply after cleaning the CPU. A small brush with soft bristles clears dust from fans and heatsinks. Compressed air cans blow dust out of hard-to-reach areas.
Safety Equipment
Static electricity can harm your CPU. Use an anti-static wrist strap to prevent shocks. Work on a clean, static-free surface. Avoid working on carpeted floors to reduce static risks. Wearing gloves protects your hands and prevents oils from transferring to parts. Make sure the area is well-lit to see small components clearly.
Preparing Your Workspace
Preparing your workspace is the first step to safely clean a CPU. A clean and organized area helps prevent damage. It also keeps small parts from getting lost. Taking time to set up properly makes the whole process easier and faster.
Choosing A Clean Area
Pick a flat, stable surface with good lighting. Avoid carpeted floors because they hold dust and static. A wooden or plastic table works well. Clear the area of any clutter or liquids. This reduces the risk of accidents and keeps dust away from your CPU parts.
Static Electricity Precautions
Static electricity can harm delicate CPU components. Touch a grounded metal object before handling parts. Use an anti-static wrist strap if possible. Work on a non-conductive mat or surface. Keep your movements slow and careful to avoid static build-up.
Powering Down And Disassembling
Cleaning your CPU starts with safely powering down and disassembling your computer. This step protects your hardware and prevents damage. It also makes the cleaning process easier and more effective.
Follow these steps carefully to access your CPU without risking any harm to your system.
Shutting Down The Computer
Turn off your computer completely. Do not just put it to sleep or hibernate. Press the power button and wait for the screen to go black. Unplug the power cable from the wall or power strip. This stops any electricity flow and keeps you safe.
Removing The Cpu Cooler
Open your computer case carefully. Find the CPU cooler, usually a fan and heat sink on top of the CPU. Unscrew or unclip the cooler from the motherboard. Gently lift it off. Avoid pulling hard to prevent damage. Set it aside on a clean surface.
Accessing The Cpu
Locate the CPU socket under the cooler. Unlock the socket lever or latch. Lift the CPU out slowly by holding its edges. Do not touch the pins or contacts. Place the CPU on an anti-static mat or soft cloth. Now, your CPU is ready for cleaning.
Cleaning The Cpu Surface
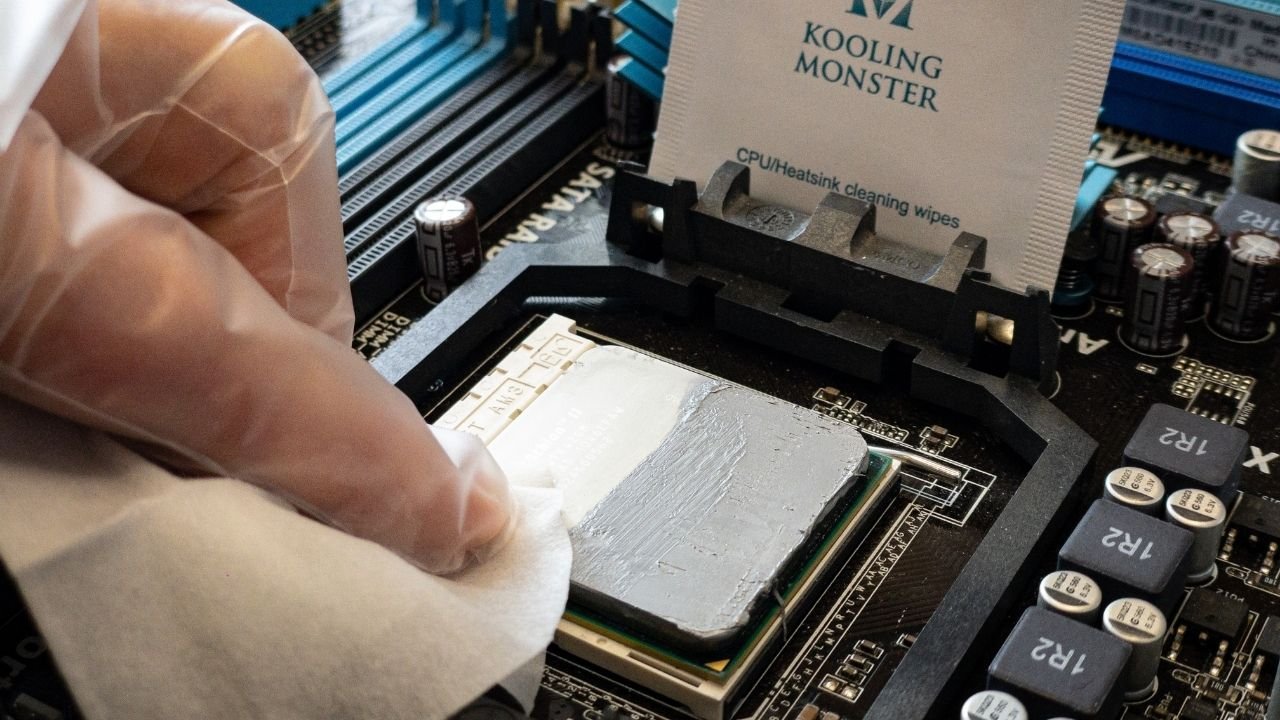
Cleaning the CPU surface is a key step in maintaining your computer’s performance. Dirt, dust, and old thermal paste can block heat transfer. This causes your CPU to run hotter and slower. Proper cleaning helps keep your CPU cool and efficient.
This process involves removing old thermal paste and cleaning the surface carefully. You need the right tools and gentle handling. Small steps make a big difference in CPU health.
Removing Old Thermal Paste
Start by removing the old thermal paste from the CPU surface. Use a soft cloth or paper towel. Gently wipe off the thick paste without scratching the CPU. Avoid using water or harsh chemicals.
Work slowly and carefully. The thermal paste may be sticky or dry. Repeat wiping until the surface looks clean. Don’t leave any paste behind as it blocks heat transfer.
Cleaning With Isopropyl Alcohol
Use isopropyl alcohol to clean the CPU surface after removing the paste. Choose 90% or higher purity for best results. Apply a small amount to a lint-free cloth or cotton swab.
Gently wipe the CPU surface to remove any remaining residue. Alcohol evaporates quickly and leaves no moisture. Make sure the surface is fully dry before applying new thermal paste.
Cleaning The Cpu Cooler
Cleaning the CPU cooler is important to keep your computer running cool and fast. Dust and dirt build up on the cooler over time. This blocks airflow and makes the CPU hotter. A clean cooler helps the fan spin well and the heat sink work properly. This section explains how to clean your CPU cooler safely and easily.
Dust Removal Techniques
Turn off your PC and unplug it from power. Open the case to access the CPU cooler. Use a can of compressed air to blow dust away. Hold the fan blades still to stop them from spinning. Blow air from different angles to remove dust inside the fins. Avoid using a vacuum as it may damage parts. Repeat the process gently until most dust is gone.
Fan And Heat Sink Maintenance
Check the fan blades for dirt or grime. Wipe them with a soft, dry cloth if needed. Do not use water or liquid cleaners on the fan. Look at the heat sink fins and clean any remaining dust. If the fan is noisy, consider applying a small drop of machine oil to the bearing. Make sure the fan spins smoothly before closing the case. Proper maintenance extends the life of your CPU cooler.

Credit: www.youtube.com
Applying New Thermal Paste
Applying new thermal paste is a crucial step after cleaning your CPU. It helps the processor stay cool by improving heat transfer between the CPU and the cooler. Using the right paste and applying it properly ensures your CPU runs efficiently and avoids overheating.
Choosing The Right Thermal Paste
Not all thermal pastes work the same. Some are better for high performance, while others suit everyday use. Look for pastes with good thermal conductivity. Silicone-based pastes are common and easy to apply. Metal-based pastes offer better heat transfer but need careful handling. Avoid cheap pastes that dry out quickly or do not spread well.
Proper Application Methods
Clean the CPU surface first. Use isopropyl alcohol and a soft cloth for best results. Apply a small pea-sized drop of thermal paste in the center of the CPU. Do not spread it with your fingers. The pressure from the cooler will spread the paste evenly. Too much paste can cause poor heat transfer. Too little paste will leave air gaps, reducing cooling efficiency.
Reassembling And Testing
After cleaning the CPU, reassembling and testing are key steps. These ensure your computer runs smoothly and stays cool. Proper reassembly prevents damage and improves performance. Testing confirms the CPU works well after cleaning.
Reattaching The Cpu Cooler
Place the CPU cooler carefully on the CPU. Align it with the mounting points. Apply a small amount of thermal paste if needed. Tighten the screws evenly to avoid pressure spots. Connect the cooler’s power cable to the motherboard. Check that the cooler sits firmly and does not move.
Powering On And Monitoring Temperatures
Turn on your computer and enter the BIOS or use software tools. Watch the CPU temperature closely for the first few minutes. Normal temperatures vary but should stay below 80°C. If temperatures rise quickly, turn off the PC and check the cooler again. Proper cooling keeps your CPU safe and efficient.

Credit: gamemaxpc.com
Tips For Ongoing Maintenance
Keeping your CPU clean is key to its long life and strong performance. Dirt and dust can block airflow and cause overheating. This section shares simple tips to keep your CPU in good shape over time. Follow these steps to avoid common problems and enjoy smooth computer use.
Regular Cleaning Schedule
Set a routine to clean your CPU every few months. Use a soft brush or compressed air to remove dust from vents and fans. Avoid using wet cloths or liquids inside the case. Keep the area around your computer free from dust to reduce buildup. Regular cleaning stops dust from piling up and harming your CPU.
Monitoring Performance
Watch your CPU’s performance to catch issues early. Use simple software tools to check temperature and speed. If the CPU runs hotter than normal, it might need cleaning. Slow performance or random shutdowns are signs of overheating. Check these signs often to keep your CPU working well.
Credit: koolingmonster.com
Frequently Asked Questions
How Often Should I Clean My Cpu?
Cleaning your CPU every 3 to 6 months prevents dust buildup. Regular cleaning improves cooling efficiency and prolongs CPU life. Check more often in dusty environments or if overheating occurs.
What Tools Do I Need To Clean A Cpu?
You need a soft brush, compressed air can, microfiber cloth, and thermal paste. Avoid using vacuum cleaners or liquids. These tools safely remove dust and old thermal paste without damaging components.
Can I Clean A Cpu Without Removing It?
Yes, you can clean the CPU cooler and surrounding area without removing the CPU. However, for thorough cleaning and thermal paste replacement, removing the CPU cooler is recommended. Always handle components carefully to avoid damage.
Is It Safe To Use Compressed Air On Cpu?
Yes, compressed air safely removes dust from CPU components. Use short bursts and hold the can upright to avoid moisture release. Keep fans still to prevent damage during cleaning.
Conclusion
Cleaning a CPU keeps your computer running cool and fast. Dust and dirt can cause overheating and slow performance. Regular cleaning helps prevent damage and extends your CPU’s life. Use gentle tools and avoid harsh chemicals for safety. Take your time and follow steps carefully.
A clean CPU means better speed and fewer problems. Stay consistent to protect your computer over time. Simple care makes a big difference in your device’s health.