
If your computer is running hotter than usual or you notice performance drops, the problem might be with your CPU’s thermal paste. Changing the thermal paste can make a huge difference in keeping your processor cool and your system running smoothly.
But if you’ve never done it before, the idea might seem tricky or even risky. Don’t worry—this guide will walk you through each step clearly and simply. By the end, you’ll know exactly how to change the thermal paste on your CPU safely and effectively, giving your computer the fresh start it needs.
Keep reading to learn how to protect your investment and boost your PC’s performance.

Credit: www.instructables.com
Why Replace Thermal Paste
Thermal paste plays a key role in keeping your CPU cool. Over time, it dries out and loses its ability to transfer heat. Replacing it helps your CPU run better and last longer.
Signs Of Old Thermal Paste
Look for higher CPU temperatures than usual. Your computer may shut down suddenly. Fans might run louder and more often. Sometimes, the paste looks dry or cracked if you open the cooler.
Impact On Cpu Temperature
Old thermal paste causes poor heat transfer. This makes your CPU hotter during use. Higher temperatures can slow down your computer. It may also reduce the life of your CPU. Fresh paste helps lower these temperatures effectively.
Tools And Materials Needed
Changing the thermal paste on your CPU needs the right tools and materials. These items help you do the job safely and correctly. Using the correct supplies makes the process easier and keeps your computer safe.
Thermal Paste Types
Choose thermal paste based on your CPU and cooling system. Common types include ceramic, metal-based, and silicone. Metal-based paste offers high heat transfer but can conduct electricity. Ceramic paste is safer and still effective. Silicone paste is less common but easy to apply. Pick a paste that fits your needs and budget.
Cleaning Supplies
Cleaning old thermal paste is key before applying new paste. Use isopropyl alcohol with 70% or higher purity. Cotton swabs or lint-free cloths help remove residue. Avoid paper towels or tissues as they leave fibers. Clean the surface gently to avoid damage. Proper cleaning ensures good contact and heat transfer.
Application Tools
Apply thermal paste smoothly for best results. A small plastic spatula or a dedicated applicator tool works well. Some pastes come with an applicator in the package. You can also use a clean fingertip covered with a plastic glove. Avoid using metal tools that might scratch the CPU. The right tools help spread paste evenly and avoid mess.
Preparing Your Workspace
Preparing your workspace is the first step in changing your CPU’s thermal paste. A clean and organized space helps you work safely and efficiently. It reduces the risk of damage to your computer parts. Setting up properly saves time and avoids mistakes.
Power Down And Unplug
Turn off your computer completely before starting. Unplug the power cable from the wall socket. Disconnect all other cables and accessories. This stops any electric current from flowing. It keeps you and your PC safe during the process.
Static Precautions
Static electricity can harm delicate computer parts. Touch a metal object to discharge static before handling components. Use an anti-static wristband if you have one. Avoid working on carpets or dry areas that increase static. Always keep your hands grounded while working inside the PC.
Gathering Components
Collect all tools and materials before you begin. You will need thermal paste, a screwdriver, and cleaning supplies. Use isopropyl alcohol and a lint-free cloth to clean old paste. Have paper towels or cotton swabs ready. Prepare these items close to your workspace for easy access.
Removing The Old Thermal Paste
Removing old thermal paste is an important step before applying new paste. It helps keep your CPU cool and working well. Old paste can dry out and block heat transfer. Cleaning it properly makes sure the new paste sticks and works as it should. Follow these simple steps to remove the old thermal paste safely and effectively.
Detaching The Cpu Cooler
First, turn off your computer and unplug it. Wait for the CPU to cool down. Loosen the screws or clips holding the cooler in place. Gently lift the cooler straight up. Avoid twisting or pulling hard. This prevents damage to the CPU or motherboard. Place the cooler on a clean surface.
Cleaning The Cpu Surface
Use a soft cloth or cotton swab with isopropyl alcohol. Gently wipe off the old thermal paste from the CPU top. Avoid pressing too hard to protect the CPU pins. Clean until no residue or paste remains. Let the surface dry completely before moving on.
Cleaning The Cooler Base
Check the base of the CPU cooler for leftover paste. Use the same cloth or swab with alcohol. Remove all old paste carefully. Make sure the cooler base is smooth and clean. This ensures good contact with the CPU for better cooling.
Applying New Thermal Paste
Applying new thermal paste is a key step in maintaining your CPU’s cooling system. It helps transfer heat from the processor to the heatsink effectively. Correct application ensures your CPU runs cooler and lasts longer.
Many users find this step tricky. Too much or too little paste affects performance. Following the right methods will make the process simple and successful.
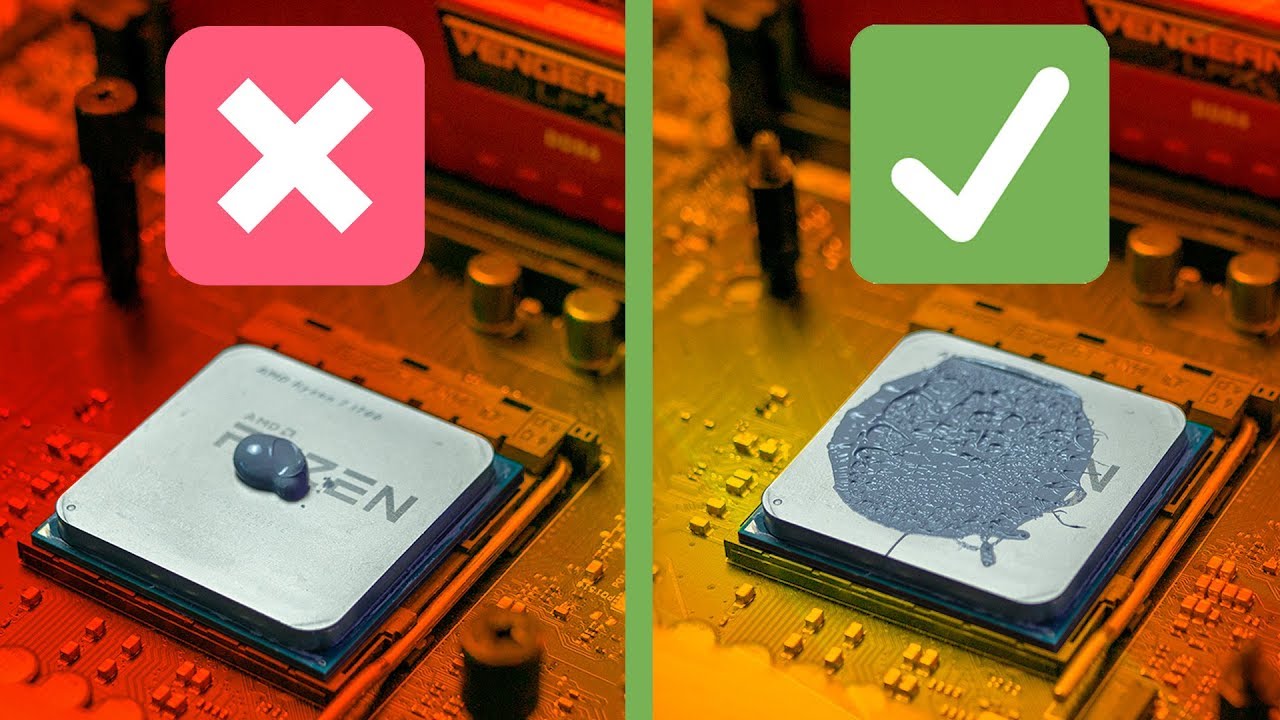
Choosing The Right Amount
Use a small pea-sized amount of thermal paste. This amount covers the CPU surface well. Using too much paste can cause spills and reduce heat transfer. Too little paste leaves gaps and air pockets. Both reduce cooling efficiency.
Application Techniques
Place the paste in the center of the CPU. When you attach the heatsink, it spreads the paste evenly. Press the heatsink down gently but firmly. Avoid moving it side to side after placing. This keeps the paste smooth and uniform.
Avoiding Common Mistakes
Do not use old or dried-out paste. Clean the CPU surface before applying new paste. Avoid touching the paste with your fingers. It can contaminate and reduce performance. Always check for excess paste and clean it off carefully.
Reassembling And Testing
After applying new thermal paste, the next step is reassembling and testing your CPU. This process ensures your computer runs smoothly and stays cool. Careful reassembly prevents damage and maintains good contact between the CPU and cooler.
Reattaching The Cpu Cooler
Place the CPU cooler carefully back onto the processor. Align the cooler with the mounting points on the motherboard. Tighten screws evenly in a diagonal pattern. This helps spread pressure evenly across the CPU surface. Connect the cooler’s fan cable to the motherboard header. Make sure the connection is secure to allow proper fan operation.
System Boot And Monitoring
Turn on your computer and watch for normal startup. Listen for unusual noises or beeps. These signals can indicate installation issues. Enter the BIOS or use software to check CPU status. Verify the cooler fan is spinning properly. Early checks help avoid overheating and hardware problems.
Temperature Check Tools
Use simple tools like HWMonitor or Core Temp to measure CPU temperature. Run these programs during normal use and heavy tasks. Check temperatures stay within safe limits, usually under 80°C. High temperatures suggest poor thermal paste application or cooler contact. Regular monitoring keeps your CPU healthy and efficient.
Tips For Long-term Cooling Performance
Keeping your CPU cool is key to a healthy computer. Good cooling stops your processor from overheating. This helps your PC run smooth for a long time. Applying thermal paste right is just the start. To keep the best cooling, follow these tips.
Regular Maintenance
Check your CPU cooler and fans often. Dust and dirt build up can block airflow. Clean fans and vents with a soft brush or air duster. Replace thermal paste every one to two years. Old paste dries out and loses power. Keep your PC in a cool, dry place. Good air flow around the case helps cooling.
Upgrading Cooling Solutions
Use better coolers if your CPU gets very hot. Air coolers with bigger heatsinks cool well. Liquid cooling can lower temperatures even more. Choose a cooler that fits your PC case size. Higher quality coolers last longer and work better. Check fan speeds and noise levels too. A quiet cooler improves your PC experience.
Credit: www.youtube.com

Credit: tehnoblog.org
Frequently Asked Questions
What Tools Do I Need To Change Cpu Thermal Paste?
You need a screwdriver, isopropyl alcohol, lint-free cloth, and new thermal paste. These tools ensure safe and clean application.
How Often Should I Replace Thermal Paste On My Cpu?
Replace thermal paste every 2 to 3 years or if overheating occurs. Fresh paste improves heat transfer and cooling efficiency.
Can I Apply Too Much Thermal Paste On Cpu?
Yes, applying too much paste can cause poor heat transfer. Use a pea-sized amount for optimal coverage and cooling.
Is It Safe To Remove Old Thermal Paste With Alcohol?
Yes, isopropyl alcohol safely removes old thermal paste without damaging CPU or cooler surfaces. Use a lint-free cloth for cleaning.
Conclusion
Changing the thermal paste on your CPU helps keep your computer cool. Clean the old paste carefully before applying the new one. Use only a small, even amount of fresh thermal paste. Secure the heat sink tightly but gently. This simple task can improve your PC’s performance and lifespan.
Regular maintenance keeps your system running smoothly. Don’t rush the process; take your time. Your computer will thank you with better temperatures and stability.