
If your computer is overheating or making loud noises, your CPU fan might need some attention. Knowing how to remove the CPU fan is a simple skill that can save you time and money.
In this guide, you’ll learn easy steps to safely take out your CPU fan without causing damage. Whether you’re fixing a problem or upgrading your system, this article will help you feel confident and in control. Keep reading to discover exactly what you need to do next.
Tools Needed
Removing a CPU fan needs the right tools. Having the correct tools saves time and prevents damage. Some tools are essential to start the job. Others are helpful but not required. Prepare your workspace with these tools for smooth work.
Essential Tools
- Screwdriver: A Phillips-head screwdriver is usually needed.
- Anti-static wrist strap: Prevents static damage to components.
- Thermal paste remover: Helps clean old thermal paste from the CPU.
- Lint-free cloth or paper towel: For wiping the CPU surface clean.
Optional Accessories
- Small container: To keep screws safe and organized.
- Compressed air can: Removes dust from the fan and heatsink.
- Plastic pry tool: Helps to gently detach clips or connectors.
- Flashlight: Improves visibility inside the computer case.

Credit: www.youtube.com
Preparing The Workspace
Preparing the workspace is the first step to safely remove the CPU fan. A clean and organized area helps avoid mistakes and damage. It also makes the process faster and easier. Setting up your workspace properly protects both you and your computer parts.
Power Off And Unplug
Always turn off the computer before starting. Shut down the system completely. Then, unplug the power cable from the wall socket. This prevents electrical shock and stops any power from reaching the fan or motherboard. Double-check that the computer is not connected to any power source.
Static Safety Measures
Static electricity can damage computer parts easily. Touch a grounded metal object before handling internal components. Use an anti-static wrist strap if possible. Work on a non-carpeted surface to reduce static build-up. Keep your movements slow and steady to avoid static shocks.
Accessing The Cpu Fan
Accessing the CPU fan is the first step to remove it safely. You need to open your computer case carefully. This allows you to reach inside and find the fan attached to the CPU. Knowing where the fan is and how to get to it helps avoid damage to other parts.
Take your time and work in a clean space. This makes the process easier and keeps dust away from your computer’s inside.
Opening The Case
Turn off your computer and unplug all cables. Place the computer on a flat surface. Most cases have screws at the back. Use a screwdriver to remove these screws. Slide or lift the side panel off gently. Keep the screws in a safe place for later. Avoid touching other parts inside to prevent static damage.
Locating The Fan
The CPU fan sits on top of the CPU cooler. It is usually near the center of the motherboard. Look for a round or square fan with blades. It connects to a small power cable on the motherboard. The fan helps keep the CPU cool during use. Identifying the fan correctly helps you remove it without trouble.
Disconnecting The Fan
Disconnecting the CPU fan is an important step before removing it. This process stops power going to the fan. It also prevents any damage to the motherboard or fan. Take your time and follow the steps carefully. Handle the fan cable gently to avoid breaking it.
Identifying The Fan Connector
Look for a small cable running from the fan to the motherboard. The connector is usually a white or black plastic piece. It has two to four pins inside. Check the area near the CPU socket on the motherboard. The fan connector often says “CPU_FAN” or similar on the board.
Safely Unplugging The Cable
Hold the fan connector firmly, not the wires. Gently pull the connector straight out from the socket. Avoid twisting or yanking the cable. Use slow and steady force to unplug it. This keeps the pins and wires safe from damage.
Removing The Fan
Removing the CPU fan is an important step before cleaning or replacing it. This process needs care to avoid damage to the fan or the CPU. Follow simple steps to remove the fan safely and easily.
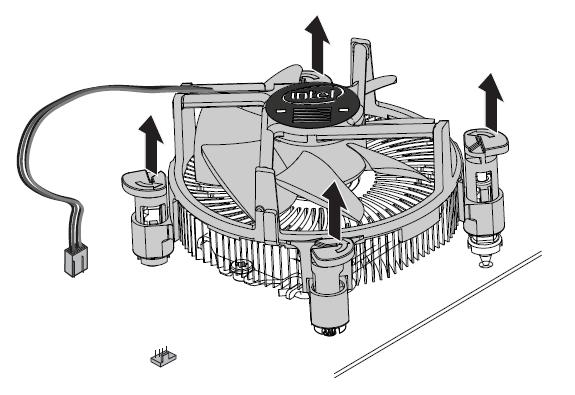
Unscrewing Or Releasing Clips
Start by checking how the fan is attached. Some fans have screws holding them in place. Use a small screwdriver to remove these screws gently. Other fans may have clips instead of screws. Press or pull these clips carefully to release the fan. Avoid using too much force to prevent breaking the clips or the fan.
Lifting The Fan Carefully
After loosening screws or clips, lift the fan slowly. Hold the fan by its edges to avoid touching the blades or wires. If the fan feels stuck, check for any cables or connectors still attached. Gently disconnect these cables before removing the fan completely. Handle the fan with care to keep it safe for reuse or cleaning.
Credit: docs.oracle.com
Cleaning And Maintenance Tips
Cleaning and maintaining your CPU fan helps keep your computer cool and running smoothly. Regular care prevents dust buildup and potential damage. This section guides you through simple steps to clean and inspect your CPU fan safely.
Removing Dust And Debris
Turn off your computer and unplug it from the power source. Open the case carefully to access the CPU fan. Use a soft brush or compressed air to remove dust from the fan blades and surrounding areas. Hold the fan blades still to avoid spinning while cleaning. Clean both the fan and the heatsink to improve airflow. Avoid using a vacuum as it may cause static damage.
Inspecting For Damage
Check the fan blades for cracks or chips that could affect performance. Look at the fan’s bearing area for signs of wear or noise. Ensure the fan spins freely without resistance or wobbling. Examine the fan cable for any frays or loose connections. Replace the fan if you find any damage to maintain proper cooling.
Reinstallation Considerations
Reinstalling the CPU fan needs careful steps to keep your computer safe. A wrong move can cause overheating or damage. Focus on two key tasks: applying thermal paste and securing the new fan. Both steps help the CPU stay cool and work well.
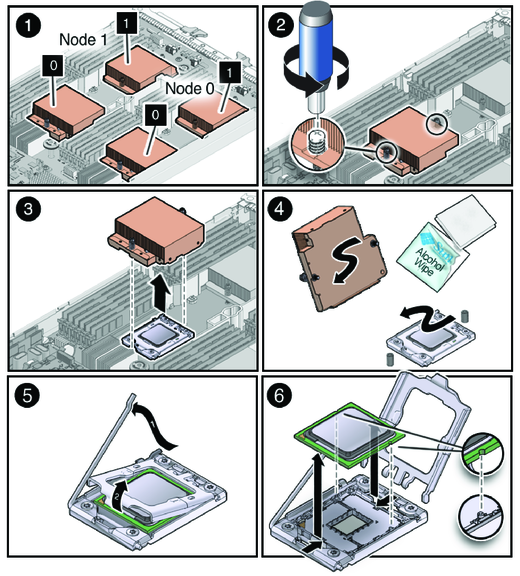
Applying Thermal Paste
Thermal paste helps heat move from the CPU to the fan faster. Clean the old paste off the CPU with a soft cloth and alcohol. Use a small pea-sized drop of new thermal paste in the center. Spread it evenly if needed, but a small amount is enough. Too much paste can cause problems.
Securing The New Fan
Place the fan carefully over the CPU. Align the screws with the holes on the motherboard. Tighten the screws evenly, but do not force them. Connect the fan’s power cable to the correct header on the motherboard. Check if the fan spins freely before closing your computer case.
Credit: www.intel.com
Frequently Asked Questions
How Do I Safely Remove A Cpu Fan?
First, turn off and unplug your PC. Ground yourself to avoid static damage. Unscrew the fan and unplug its cable carefully.
What Tools Are Needed To Remove A Cpu Fan?
You typically need a Phillips-head screwdriver and an anti-static wrist strap. These tools help remove screws safely and prevent static damage.
Can I Remove The Cpu Fan Without Damaging The Motherboard?
Yes, by grounding yourself and handling cables gently. Avoid pulling wires forcefully and keep screws organized for safe removal.
How Do I Disconnect The Cpu Fan Cable Properly?
Locate the fan cable connected to the motherboard. Gently pull the connector straight out without twisting or bending the pins.
Conclusion
Removing the CPU fan is easier than it seems. Take your time and follow each step carefully. Always unplug your computer before starting to stay safe. Keep track of screws and parts to avoid confusion. Cleaning or replacing the fan can help your computer run cooler and quieter.
With patience, anyone can do this task at home. Stay calm and work slowly for the best results. Now, you are ready to handle your CPU fan confidently.