
Are you ready to unlock the full power of your CPU? Overclocking through your MSI BIOS can boost your computer’s speed and performance beyond its factory settings.
But if you’re unsure where to start or worried about making mistakes, this guide is made just for you. You’ll learn clear, simple steps to safely overclock your CPU, helping you get more from your system without stress. Keep reading, and by the end, you’ll have the confidence to take control of your PC’s speed like a pro.

Credit: www.youtube.com
Preparing For Overclocking
Preparing for overclocking your CPU in the MSI BIOS is essential. It ensures a smooth and safe process. Taking time to get ready reduces risks of damage or crashes. Follow these key steps before you start changing settings.
Check System Compatibility
Not all CPUs or motherboards support overclocking. Confirm your CPU model can handle it. Check your MSI motherboard’s specs for overclocking features. Make sure your cooling system is strong enough. Overclocking increases heat, so good cooling is crucial.
Update Msi Bios
Updating your BIOS improves stability and adds new features. Visit MSI’s official website to download the latest BIOS version. Follow the update instructions carefully. A fresh BIOS helps avoid bugs during overclocking. It also supports new CPU functions.
Backup Current Settings
Save your current BIOS settings before changing anything. Use the BIOS’s built-in save feature or take notes. This backup helps restore your system if overclocking fails. It keeps your system safe and avoids frustration.
Gather Necessary Tools
Prepare the right tools to monitor and control your system. Download software to check CPU temperature and voltage. Have a reliable power supply to handle extra power use. A stable power source prevents sudden shutdowns. Also, keep a USB drive ready for BIOS updates or recovery.
Credit: www.esseg.eu
Accessing Msi Bios
Accessing the MSI BIOS is the first step to overclock your CPU. The BIOS is the control center of your motherboard. It allows you to change hardware settings safely. Knowing how to enter and navigate the MSI BIOS helps you tweak settings for better CPU performance.
Entering Bios Setup
Turn on your computer. Press the Delete key repeatedly as the screen lights up. This opens the MSI BIOS menu. Some MSI models may use the F2 key. Stop pressing keys once the BIOS screen appears. Do not enter the operating system before pressing the key.
Navigating Bios Interface
The MSI BIOS has a simple layout. Use your keyboard’s arrow keys to move around. The mouse may also work in newer versions. Look for tabs at the top or side. Each tab holds different settings. Use Enter to select and Esc to go back.
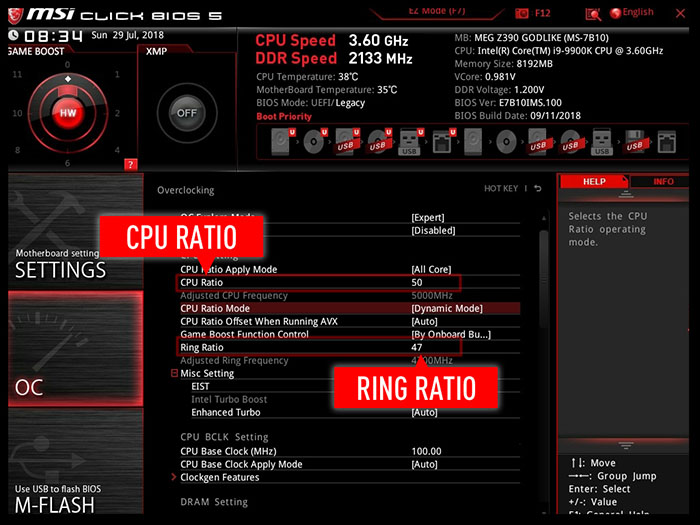
Locating Overclocking Section
Find the tab named OC or Overclocking. This section contains all CPU and memory speed settings. Here, you can adjust the CPU multiplier, voltage, and more. Take your time to explore. Changes here affect your CPU’s speed and stability.
Adjusting Cpu Clock Settings
Adjusting CPU clock settings in the MSI BIOS is a key step for overclocking your processor. It lets you increase the CPU speed to improve performance. Careful changes can boost your system without causing damage.
This part of the BIOS controls how fast your CPU runs. You can change the multiplier, the base clock, and the voltage. Each setting affects the CPU speed and stability. Understanding these helps you find the right balance.
Modifying Cpu Multiplier
The CPU multiplier determines the CPU speed by multiplying the base clock. Increasing the multiplier raises the CPU frequency. For example, a base clock of 100 MHz with a multiplier of 40 gives 4.0 GHz.
Start with small increases to avoid system crashes. Save changes and test your system after each step. This helps ensure your CPU stays stable.
Tweaking Base Clock Frequency
The base clock (BCLK) sets the foundation for CPU speed and other components. Adjusting it changes the CPU speed and memory frequency. Increasing BCLK can boost overall performance.
Keep changes small, usually 1 MHz or less. Larger jumps may cause instability. Test your system after each change to check for errors or crashes.
Setting Voltage Controls
Voltage controls supply power to your CPU. Raising voltage can help stabilize higher clock speeds. Use caution, as too much voltage can damage your CPU.
Increase voltage slowly in small steps. Monitor CPU temperature closely during testing. Proper voltage settings keep your CPU safe and stable.
Fine-tuning Memory And Power Settings
Fine-tuning memory and power settings is key to a stable CPU overclock in MSI BIOS. These settings help your system run faster without crashing. Adjusting memory and power carefully improves performance and keeps your PC safe.
Optimizing Ram Timings
RAM timings control how fast your memory works. Lower timings mean faster data access. In MSI BIOS, find the DRAM Timing section. Change values like CAS Latency (CL) to lower numbers step by step. Test stability after each change. Keep changes small to avoid errors.
Adjusting Power Limits
Power limits tell your CPU how much energy it can use. Increasing these limits lets your CPU maintain higher speeds. In MSI BIOS, look for CPU Power Management. Raise the Power Limit and Current Limit to higher values but stay within safe ranges. This prevents power throttling during heavy loads.
Configuring Load-line Calibration
Load-Line Calibration (LLC) controls voltage drops under load. Proper LLC keeps voltage stable during stress. In MSI BIOS, find the LLC setting in the CPU Voltage section. Choose a level that reduces voltage drops without causing spikes. Test the system to find the best balance for your setup.
Testing Stability And Performance
Testing stability and performance is a key step after overclocking your CPU in the MSI BIOS. It checks if your system runs smoothly without crashes or errors. This step also helps ensure your CPU performs well under heavy tasks. Proper testing protects your hardware from damage and lets you enjoy faster speeds safely.
Saving Bios Changes
After adjusting CPU settings in MSI BIOS, save your changes. Use the “Save & Exit” option to apply new settings. This action restarts your computer with the new overclocked values. Never skip saving; your system needs these changes to test stability.
Running Stress Tests
Stress tests push your CPU to its limits. Use software like Prime95 or AIDA64 to run these tests. Let the test run for at least 30 minutes. Watch for crashes, freezes, or errors. If the system fails, reduce the overclock settings and test again.
Monitoring Temperatures
High temperatures can harm your CPU. Use tools like HWMonitor or MSI Afterburner to check temps. Keep CPU temperature below 85°C during stress tests. If temps rise too high, improve cooling or lower the overclock. Safe temperatures keep your CPU healthy and stable.
Troubleshooting Common Issues
Troubleshooting common issues is part of overclocking your CPU through MSI BIOS. Problems can happen even with careful settings. Knowing how to fix these issues helps keep your system stable. This guide covers the most frequent problems and how to solve them fast.
Fixing Boot Failures
Boot failures happen when your PC cannot start after overclocking. This usually means settings are too high or unstable. To fix, enter BIOS by pressing the delete key during startup. Lower the CPU frequency or reset settings. Save and restart your PC. Repeat until it boots properly.
Adjusting Voltages Safely
Voltage controls the power your CPU gets. Too much voltage causes heat and damage. Too little causes crashes and instability. Increase voltage in small steps, like 0.01 volts. Test stability after each change. Use monitoring tools to check CPU temperature. Keep voltage in safe limits to avoid harm.
Resetting Bios To Defaults
Resetting BIOS returns all settings to factory defaults. This is helpful if overclocking causes serious problems. To reset, find the option “Load Optimized Defaults” or “Load Setup Defaults” in BIOS. Select it and save changes. Your PC will restart with safe settings. This step clears all custom overclock options.
Credit: forum-en.msi.com
Frequently Asked Questions
What Is The First Step To Overclock Cpu In Msi Bios?
The first step is to enter the MSI BIOS by pressing the Delete key during boot. Next, navigate to the OC (Overclock) tab to access CPU settings.
How Do I Safely Increase Cpu Clock Speed In Msi Bios?
Gradually increase the CPU multiplier in small increments. Test system stability after each change using stress tests to avoid crashes or overheating.
Can I Overclock Cpu Without Changing Voltage In Msi Bios?
Yes, you can start by adjusting the CPU multiplier without increasing voltage. If stability issues occur, cautiously increase CPU core voltage.
How To Monitor Cpu Temperature During Msi Bios Overclocking?
Use hardware monitoring tools like HWMonitor or MSI Dragon Center to track CPU temperatures. Keep temperatures below 85°C to ensure safe overclocking.
Conclusion
Overclocking your CPU in MSI BIOS can boost performance. Start slow and test settings carefully for stability. Watch your temperatures to avoid overheating issues. Small changes make a big difference in speed. Always save your BIOS settings after adjustments. This guide helps you get the best results safely.
Keep learning and experimenting with patience and care. Enjoy a faster PC experience without risking damage.