
Are you ready to boost your computer’s speed and performance? Installing RAM on your motherboard might sound tricky, but it’s easier than you think.
Whether you’re upgrading for gaming, work, or just smoother everyday use, knowing how to put RAM on your motherboard can save you time and money. In this guide, you’ll get simple, step-by-step instructions that anyone can follow. By the end, you’ll feel confident handling your own hardware and enjoy a faster, more powerful PC.
Let’s get started!
Credit: vixencomposites.com
Preparing Your Workspace
Preparing your workspace is a key step before installing RAM on your motherboard. A clean, organized area helps prevent damage and makes the process easier. Taking time to set up properly keeps you safe and protects your computer parts.
Clear a flat surface to work on. Good lighting helps you see small parts clearly. Keep all tools and components within easy reach. Avoid carpeted areas to reduce static electricity risk.
Gathering Necessary Tools
Collect all tools before you start. You usually need a small screwdriver. A clean cloth or anti-static mat is helpful. Have your RAM sticks and motherboard ready. Organize everything to avoid searching during installation.
Ensuring Safety And Anti-static Measures
Static electricity can damage computer parts. Touch a metal object to discharge static before handling RAM. Use an anti-static wrist strap if possible. Avoid working on carpet or wearing wool clothing. Keep your hands dry and clean for better grip.
Credit: garinfobahn.com
Identifying Ram Slots
Identifying the RAM slots on your motherboard is the first step to installing memory modules correctly. Knowing where these slots are and how they work helps avoid mistakes. This guide breaks down the basics clearly and simply.
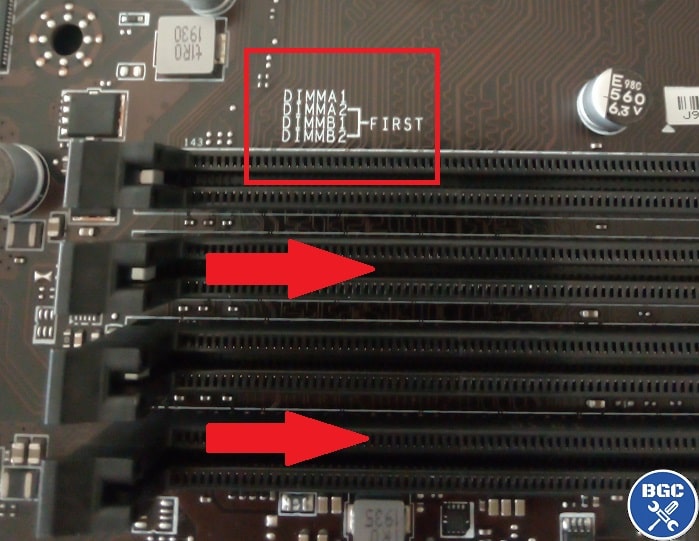
Locating Ram Slots On The Motherboard
RAM slots are long, thin connectors on the motherboard. They usually sit near the CPU socket. These slots are parallel to each other in a group. Most motherboards have two to four slots. The slots are easy to spot because of their size. They often have small clips on each end to hold RAM sticks in place.
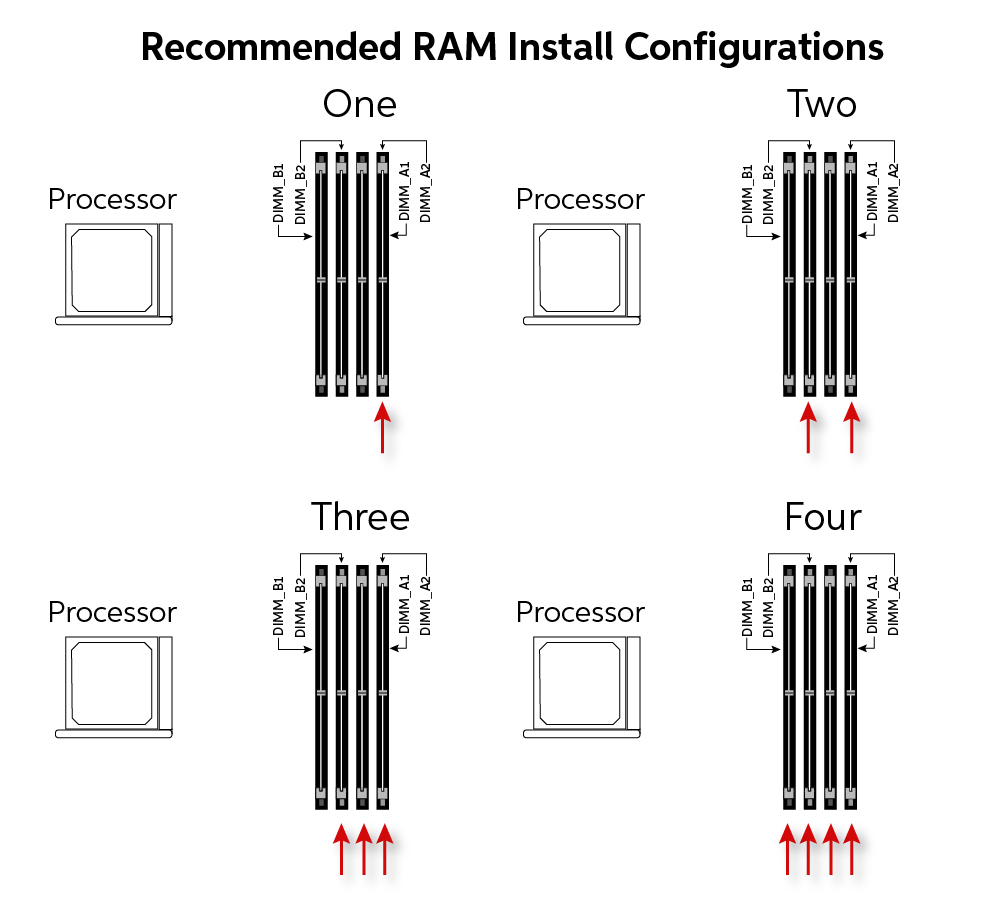
Understanding Slot Types And Configurations
RAM slots come in different types. The most common type is DDR (Double Data Rate). Older motherboards use DDR2 or DDR3 slots. Newer ones use DDR4 or DDR5 slots. Each type is not compatible with others. Slots are also arranged in pairs or sets. This setup allows dual-channel or quad-channel memory. Using matching pairs improves computer speed and performance.
Handling Ram Modules
Handling RAM modules carefully is important before installing them on the motherboard. RAM sticks are delicate and can be damaged easily. Proper handling keeps them safe and working well.
Touching the wrong parts can cause static damage or physical harm. Follow simple steps to protect your RAM and ensure a smooth installation process.
Inspecting Ram For Damage
Check the RAM stick for any visible damage before installation. Look for scratches, dents, or bent pins on the gold connectors. Any damage can cause the RAM to fail or not fit properly.
Also, make sure there is no dust or dirt on the contacts. Clean them gently with a soft brush if needed. Avoid using liquids or harsh materials.
Holding Ram Correctly
Hold the RAM module by its edges to avoid touching the gold contacts. Fingers on the contacts can leave oils that reduce connection quality. Always handle RAM with clean, dry hands.
Keep the module flat and steady. Avoid bending or twisting the RAM during handling. This careful grip helps protect the module and ensures easy installation on the motherboard.
Installing Ram Modules
Installing RAM modules is a key step to improve your computer’s speed. It is simple and quick if done right. This section explains each step clearly.
Aligning Ram With The Slot
Hold the RAM module by its edges. Find the notch on the RAM stick. Match it with the slot on the motherboard. The notch ensures you place the RAM the correct way. Never force the RAM if it does not fit easily.
Inserting Ram Firmly
Press the RAM down straight into the slot. Use gentle but firm pressure. Both ends should click into place. This confirms the RAM is properly seated. Avoid pushing too hard to prevent damage.
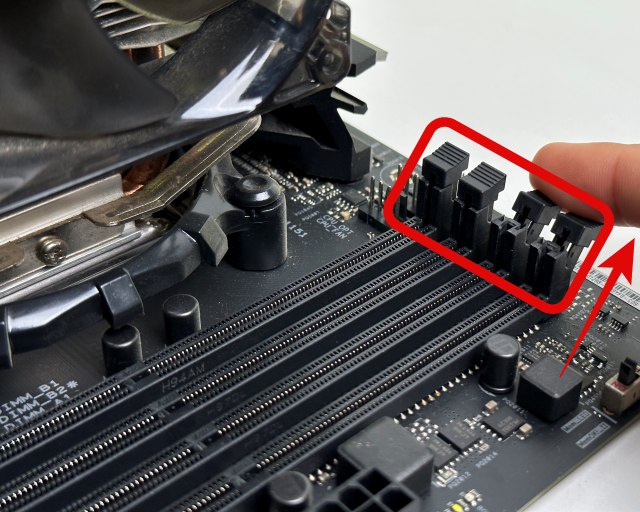
Securing Ram With Clips
Check the clips on each side of the slot. They should snap over the RAM module. This locks the RAM in place. Make sure the clips are fully closed. Loose clips can cause connection problems.
Verifying Installation
After installing RAM on your motherboard, checking its proper setup is important. This step avoids issues and ensures your computer runs smoothly. Verifying installation involves both physical checks and software confirmation. Follow these steps to confirm your RAM is correctly installed and recognized.
Checking Physical Installation
First, power off your computer and unplug it. Open the case carefully. Look at the RAM sticks. Ensure they sit firmly in their slots. The clips on both ends should lock into place. There should be no gaps between the RAM and the slot. Press down gently if the RAM feels loose. Avoid forcing it to prevent damage. Proper seating is key to good connection.
Booting Up And Bios Confirmation
Next, close the case and power on the computer. Watch the screen for the initial boot process. Press the key to enter BIOS or UEFI setup. This key varies by motherboard but is often Delete, F2, or Esc. Inside BIOS, find the memory or system information section. Check the listed RAM size and speed. It should match the installed modules. If the RAM does not show correctly, shut down and recheck the physical installation.
Credit: www.esseg.eu
Troubleshooting Common Issues
Troubleshooting common issues is important when installing RAM on a motherboard. Sometimes, the computer may not detect the new memory. Other times, the system may not work correctly. Simple checks can fix many problems fast. Follow these steps to find and solve RAM installation issues.
Detecting Unrecognized Ram
Check if the computer shows the full RAM amount. Open system settings or BIOS to see memory details. If the RAM size is smaller or zero, the module may not be detected. This can happen if the RAM is faulty or not installed properly. Use a memory test tool to check for errors.
Reseating Modules
Turn off the computer and unplug it. Remove the RAM modules carefully. Clean the slots gently with compressed air if dusty. Reinsert the RAM firmly until you hear a click. Make sure the clips lock the module in place. Power on the system and check if it recognizes the RAM now.
Updating Bios If Necessary
Some motherboards need a BIOS update to support new RAM. Visit the motherboard maker’s website for the latest BIOS version. Follow their instructions carefully to update. An updated BIOS can improve compatibility and fix detection issues. Always back up important data before updating BIOS.
Frequently Asked Questions
How Do I Install Ram On A Motherboard?
To install RAM, first power off your PC and unplug it. Open the case, locate RAM slots, align the RAM module, and firmly press it until it clicks into place.
What Precautions Should I Take Before Installing Ram?
Always ground yourself to avoid static damage. Handle RAM modules by the edges and avoid touching the gold contacts.
How To Check If Ram Is Properly Installed?
Once installed, power on your PC. Enter BIOS or check system info to verify the RAM is detected and running at correct speed.
Can I Install Ram On A Powered Motherboard?
No, always turn off and unplug the motherboard before installing RAM to prevent electrical damage and ensure safety.
Conclusion
Installing RAM on your motherboard is simple and quick. Just follow the steps carefully. Align the RAM stick with the slot and press gently until it clicks. Make sure it fits well and locks in place. Double-check your work before turning on your computer.
This small upgrade can improve your PC’s speed and performance. Keep your system clean and handle parts with care. Practice makes perfect, so don’t worry if it feels tricky at first. Now, you are ready to enjoy a smoother computing experience.