
If you’ve ever opened up your computer or upgraded your CPU, you know that thermal paste plays a crucial role in keeping your processor cool. But when it’s time to replace or reapply that paste, cleaning off the old stuff can feel tricky and messy.
Don’t worry—this guide will show you exactly how to clean off CPU thermal paste quickly and safely. By following these simple steps, you’ll protect your hardware and improve your PC’s performance. Keep reading to learn the best techniques and avoid common mistakes that could cost you time and money.

Credit: www.youtube.com
Tools Needed
Cleaning off CPU thermal paste requires a few simple tools. These tools help you remove old paste safely and prepare the surface for new paste. Having the right materials makes the job easier and protects your CPU from damage. Below are the main tools you will need for this task.
Recommended Cleaning Materials
Isopropyl alcohol with 90% or higher purity is the best choice. It evaporates quickly and leaves no residue. Use lint-free cloths or coffee filters to avoid fibers sticking to the CPU. Cotton swabs help reach tight spots but use them gently. Thermal paste remover solutions are optional but can speed up cleaning. Avoid household cleaners as they may harm the CPU.
Safety Precautions
Work on a clean, static-free surface. Ground yourself to prevent static electricity damage. Avoid touching the CPU pins or contacts directly. Handle the CPU by its edges only. Use gloves if possible to keep oils from your skin off the CPU. Make sure the CPU and cleaning materials are dry before reapplying thermal paste.
Preparing Your Workspace
Preparing your workspace is the first step to clean off CPU thermal paste safely. A clean and organized area helps prevent damage to computer parts. It also makes the process easier and faster. You need a clear desk, good lighting, and the right tools ready.
Gather soft cloths, isopropyl alcohol, and a small brush or cotton swabs. Avoid using rough materials that can scratch the CPU surface. Keep all tools within reach to avoid interruptions.
Powering Down And Unplugging
Turn off your computer completely. Do not just put it to sleep or hibernate mode. Press the power button and wait for the system to shut down. Then, unplug the power cable from the wall socket. This step is crucial to avoid electrical shocks or damage.
Disconnect all other cables connected to the computer. This includes USB devices, monitors, and network cables. Keeping your workspace free of cables reduces the risk of accidents.
Removing The Cpu Cooler
The CPU cooler must be removed carefully to access the thermal paste. Locate the screws or clips holding the cooler in place. Use the correct screwdriver to avoid stripping the screws. Gently loosen and remove them one by one.
Lift the cooler slowly and evenly. Avoid twisting or pulling hard, which might damage the CPU or motherboard. Place the cooler on a soft surface to keep it safe while you clean the thermal paste.
Removing Old Thermal Paste
Removing old thermal paste is an important step before applying new paste on your CPU. Old paste can dry out and lose its ability to conduct heat. This can cause your CPU to run hotter than normal. Cleaning off the old paste helps your CPU cool better and work more efficiently.
Initial Wipe Techniques
Start by gently wiping the CPU surface with a soft cloth or paper towel. Use light pressure to avoid scratching the CPU. Remove as much paste as possible with this first wipe. Avoid using water or cleaning liquids at this stage. The goal is to clear the thick paste before moving on to deeper cleaning.
Using Isopropyl Alcohol
Use isopropyl alcohol with at least 70% purity for best results. Dampen a lint-free cloth or cotton swab with the alcohol. Carefully wipe the CPU surface to remove leftover paste. Alcohol dissolves the paste and evaporates quickly without leaving residue. Repeat this step until the CPU is completely clean and dry. This ensures the new thermal paste will stick properly and work effectively.

Credit: www.wikihow.com
Cleaning The Cpu Surface
Cleaning the CPU surface is a vital step before applying new thermal paste. A clean surface ensures better heat transfer and prevents overheating. Take your time to clean thoroughly but gently. This process helps your CPU run cooler and last longer.
Avoiding Damage
Use soft materials like lint-free cloth or coffee filters. Avoid rough fabrics that can scratch the CPU surface. Do not use excessive force while wiping. Use isopropyl alcohol with at least 90% purity for cleaning. Never pour alcohol directly on the CPU; apply it to the cloth. Keep the CPU dry before reapplying thermal paste. Let the alcohol evaporate completely to avoid short circuits.
Ensuring Complete Residue Removal
Check the CPU surface for leftover paste or dirt. Dab gently with alcohol and cloth until no residue remains. Avoid spreading the paste around the socket or other components. Use cotton swabs dipped in alcohol for small crevices. A clean surface appears shiny and free of marks. Residue can cause poor heat transfer and higher temperatures. Confirm the surface is dry and spotless before next steps.
Cleaning The Cooler Base
Cleaning the cooler base is a key step in maintaining your CPU’s performance. Old thermal paste can block heat transfer between the CPU and cooler. Removing it carefully helps your system run cooler and longer. Use the right tools and methods to avoid damage.
Handling Different Cooler Types
Coolers come in many designs. Some have smooth metal bases, others have copper or aluminum fins. For smooth bases, use a soft cloth with isopropyl alcohol. Gently wipe the paste off. For finned coolers, avoid pushing paste inside the fins. Use a soft brush to clean around them.
Be extra careful with liquid coolers. Their cold plates need gentle cleaning. Avoid using sharp objects that can scratch the surface. Always dry the base completely before reapplying paste.
Dealing With Stubborn Paste
Sometimes, thermal paste becomes hard to remove. Let isopropyl alcohol soak on the surface for a minute. It softens the paste and makes wiping easier. Use cotton swabs for tight spots. Avoid using too much force to prevent damage.
If residue remains, repeat the process. Patience is key. Clean surfaces ensure better heat transfer and lower CPU temperatures.
Applying New Thermal Paste
Applying new thermal paste is a crucial step after cleaning off the old paste from your CPU. It helps improve heat transfer between the CPU and the cooler. Proper application ensures your computer stays cool and runs smoothly.
Choosing The Right Amount
Use just a small pea-sized amount of thermal paste. Too much paste can cause overheating. Too little paste will not cover the CPU properly. The goal is to fill tiny gaps without spilling over the edges. This small amount spreads evenly when you attach the cooler.
Application Methods
Place the paste in the center of the CPU’s surface. Some people prefer a small dot or a thin line. Others like spreading it with a plastic card or finger wrapped in plastic. Avoid air bubbles by applying the paste gently. The pressure from the cooler will spread the paste evenly.
Reassembling And Testing
After cleaning off the old thermal paste, it is time to put everything back. This step is very important to make sure your CPU works well. Careful reassembly helps keep your computer cool and safe.
Reattaching The Cooler
Place the cooler gently on the CPU. Make sure it sits flat and even. Tighten the screws slowly, one by one, in a cross pattern. This stops uneven pressure on the CPU. Check the cooler’s manual for exact instructions. Connect the fan cable to the motherboard. This allows the fan to spin and cool the CPU.
Monitoring Temperatures
Turn on your computer and open a temperature monitoring tool. Watch the CPU temperature closely. Normal idle temperatures usually stay below 40-50°C. Run a stress test to see if the CPU heats up too much. If temperatures stay stable and low, the thermal paste and cooler are working well. High temperatures mean you need to check the cooler or reapply paste.
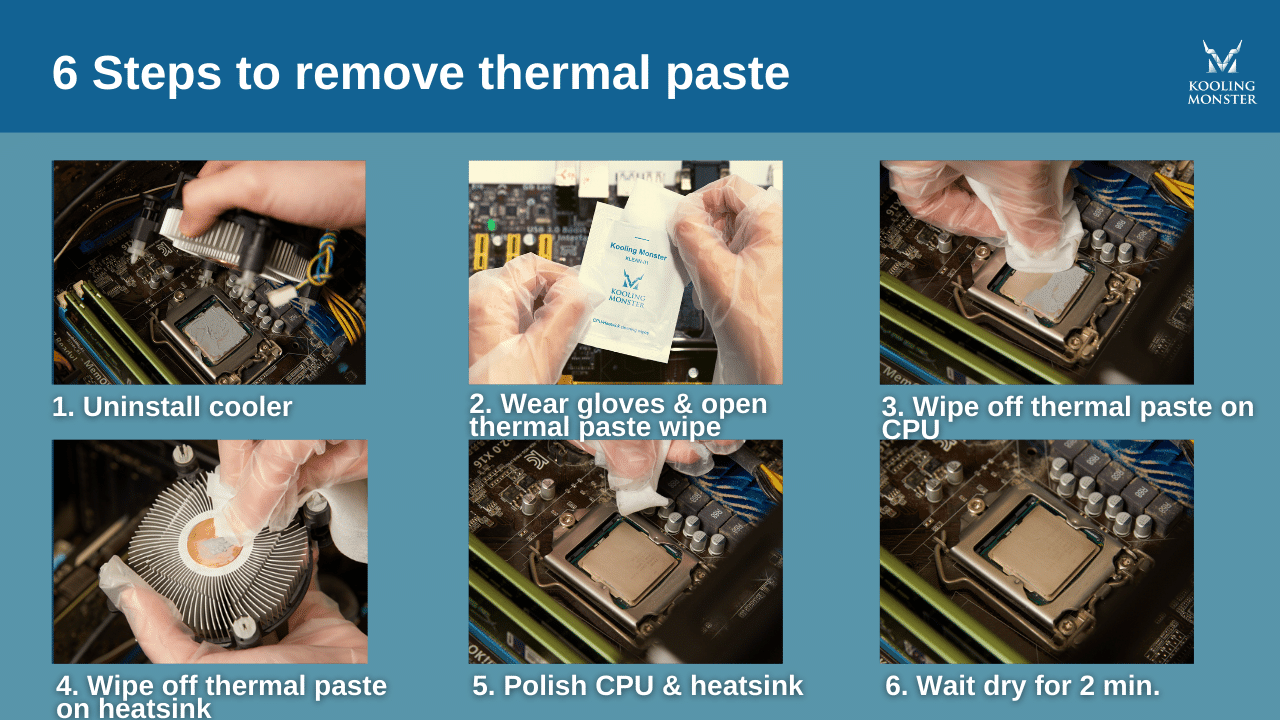
Credit: koolingmonster.com
Frequently Asked Questions
How Do I Safely Remove Old Cpu Thermal Paste?
Use isopropyl alcohol (70% or higher) and a lint-free cloth. Gently wipe the paste off without scratching the CPU surface. Avoid using water or abrasive materials to prevent damage.
What Materials Are Best For Cleaning Cpu Thermal Paste?
Isopropyl alcohol and microfiber cloths work best. Avoid paper towels or rough fabrics that can leave fibers or scratch the CPU. Cotton swabs help clean tight spots carefully.
How Often Should I Clean Off Cpu Thermal Paste?
Clean thermal paste when replacing or upgrading your CPU cooler. Regular cleaning ensures optimal heat transfer and prevents overheating. Avoid unnecessary cleaning to reduce risk of damage.
Can I Reuse Old Thermal Paste After Cleaning?
No, always apply a fresh layer of thermal paste after cleaning. Old paste loses effectiveness and can cause poor heat conduction, leading to higher CPU temperatures.
Conclusion
Cleaning CPU thermal paste is simple with the right tools. Use isopropyl alcohol and a soft cloth for best results. Take your time to avoid damaging the CPU or cooler. Clean thoroughly to ensure good heat transfer later. Remember, a clean surface keeps your PC running cool and safe.
Follow these steps to maintain your computer’s performance easily. Your CPU will thank you with better cooling and longer life.