
Are you looking to boost your computer’s performance and run virtual machines smoothly? Enabling CPU virtualization is the key to unlocking this powerful feature.
Whether you want to test new software, create a safe environment for experiments, or run multiple operating systems, turning on CPU virtualization can make all the difference. In this guide, you’ll discover simple, step-by-step instructions to enable CPU virtualization on your machine quickly and easily.
Keep reading, and you’ll be up and running in no time!
What Is Cpu Virtualization
CPU virtualization is a technology that allows one computer to act like many computers. It lets a single physical CPU run multiple virtual CPUs. Each virtual CPU works like a real CPU inside a separate environment.
This technology helps run different operating systems or apps on the same machine. It creates isolated spaces called virtual machines. Each virtual machine behaves like a complete computer.
What Does Cpu Virtualization Mean?
CPU virtualization means dividing the CPU’s power into smaller parts. These parts work separately to handle different tasks. It helps use the CPU more efficiently.
How Does Cpu Virtualization Work?
The CPU uses special instructions to manage virtual machines. It switches between them fast to share resources. This process is controlled by software called a hypervisor.
Why Is Cpu Virtualization Important?
It saves money by using one machine for many jobs. It also improves security by separating tasks in different virtual machines. This reduces the risk of one task affecting others.
Common Uses Of Cpu Virtualization
Many companies use it to run servers and test software. It is also common in cloud computing and data centers. Virtualization makes managing computers easier and faster.
Benefits Of Enabling Virtualization
Enabling CPU virtualization offers several important benefits for computer users. It allows your system to run multiple operating systems at the same time. This makes your computer more flexible and useful.
Virtualization improves performance and helps run software designed for different platforms. It is especially useful for developers, testers, and tech enthusiasts who need to use various environments without separate devices.
Improved System Efficiency
Virtualization lets your computer share resources better. It uses CPU, memory, and storage more wisely. This leads to faster performance and less waste of power and space.
Running Multiple Operating Systems
You can use more than one operating system on the same machine. For example, run Windows and Linux together. This is helpful for testing software or using apps that only work on certain systems.
Safe Testing Environment
Virtual machines create a safe space to try new software. If something goes wrong, your main system stays safe. This reduces risks and protects important files.
Cost Savings
Virtualization reduces the need for extra hardware. You do not need many computers for different tasks. This saves money on buying and maintaining devices.
Checking Virtualization Support
Before enabling CPU virtualization, check if your system supports it. Virtualization is a feature that allows one computer to run multiple operating systems. It helps in running virtual machines smoothly. Some CPUs have virtualization built-in, but not all systems enable it by default. Checking support saves time and avoids confusion later.
Using Task Manager
Open Task Manager by pressing Ctrl + Shift + Esc. Click the “Performance” tab. Select “CPU” from the left menu. Look for “Virtualization” at the bottom right. It shows either “Enabled” or “Disabled.” This method works on Windows 10 and 11. Quick and easy to check without extra software.
Using Cpu-z
Download and install CPU-Z software. Run the program and open the “CPU” tab. Check the “Instructions” section for “VT-x” or “AMD-V.” These labels indicate virtualization support. CPU-Z gives detailed info about your processor. It is useful if Task Manager does not show virtualization status.
Bios/uefi Indicators
Restart your computer and enter BIOS/UEFI setup. Usually, press Del, F2, or Esc key during boot. Look for a setting named “Intel Virtualization Technology” or “SVM Mode.” It might be under “Advanced” or “CPU Configuration.” If you find it, virtualization support exists but may be disabled. Change the setting to enable virtualization.

Credit: softwareg.com.au
Accessing Bios Or Uefi Settings
Accessing BIOS or UEFI settings is the first step to enable CPU virtualization. These settings control low-level functions of your computer’s hardware. You must enter the BIOS or UEFI menu before making changes to virtualization features.
The process varies by computer brand and model. Most systems use a special key during startup. Timing is important to catch the right moment. Prepare to act quickly once your PC powers on.
Common Keys To Enter Bios
Several keys often open BIOS or UEFI menus. The most common are Delete, F2, F10, and Esc. Some brands use specific keys like F12 or F1. Watch the screen closely during boot for hints. It may say “Press [key] to enter setup.”
Try pressing the key repeatedly right after powering on. If the screen goes to the operating system, restart and try again. Each PC can be different, so check your manual if unsure.
Preparing Your System
Before entering BIOS or UEFI, save all your work. Close running programs to avoid data loss. Keep your keyboard connected and working. Use a wired keyboard if possible, especially on desktops.
Restart your computer and be ready to press the key immediately. Avoid holding the key down; tap it gently several times. Patience helps, as some systems take longer to respond.
Locating Virtualization Settings
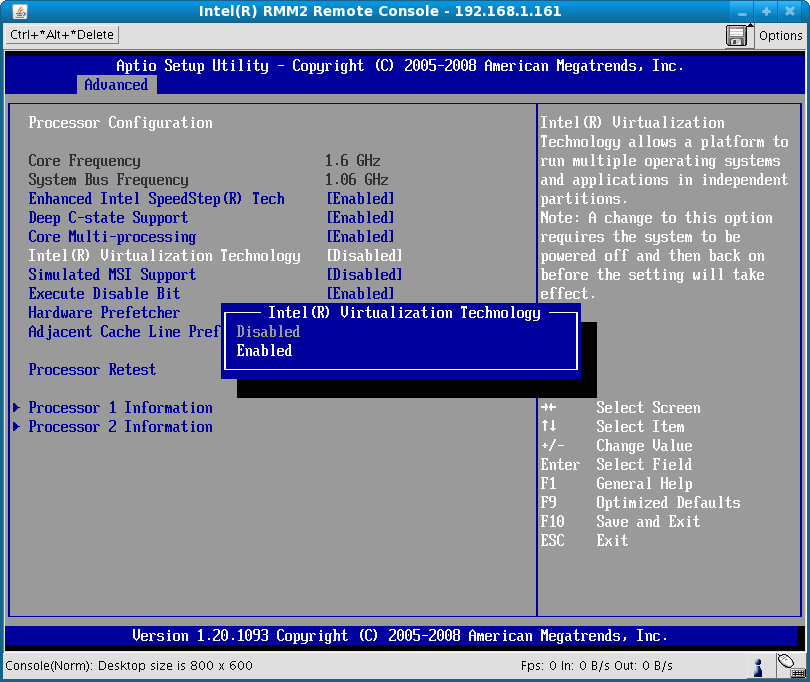
Finding virtualization settings in your computer’s BIOS or UEFI is the first step to enable CPU virtualization. These settings control how your CPU handles virtual machines. The location of these options depends on your CPU type. Intel and AMD processors have different names and places for virtualization features.
Accessing BIOS or UEFI usually involves pressing a key during startup, like F2, Delete, or Esc. Once inside, you must navigate to the right section. This section often has names like “Advanced,” “CPU Configuration,” or “Security.” Look carefully, as the virtualization option might be hidden among other CPU features.
Intel Vt-x Options
Intel calls its virtualization technology VT-x. In the BIOS or UEFI, look for settings named “Intel Virtualization Technology” or “VT-x.” These are often found under the “Advanced” or “Processor” tab. Enable the option if it is disabled. Some systems list it under “CPU Features.” Changing this setting requires saving and restarting your computer.
Amd-v Options
AMD processors use AMD-V for virtualization. Check BIOS or UEFI menus for “SVM Mode” or “Secure Virtual Machine.” This setting is usually in the “Advanced,” “CPU Configuration,” or “Security” section. Turn it on to activate virtualization. Save your changes and reboot the machine to apply them.
Step-by-step Enabling Process
Enabling CPU virtualization helps run virtual machines smoothly. This process requires accessing and changing settings in the BIOS. Follow the steps below carefully to enable virtualization on your computer.
Navigating Bios Menus
Turn off your computer completely. Press the key to enter BIOS during startup. This key varies by brand, often F2, Delete, or Esc. Look for a message on the screen that shows the key. Use arrow keys to move in the BIOS menu.
Changing Virtualization Status
Find the section named “Advanced,” “CPU Configuration,” or “System Configuration.” Locate the option labeled “Intel Virtualization Technology” or “AMD-V.” Select it and change the status from Disabled to Enabled. This option may be called “VT-x” or “SVM.” Make sure virtualization is turned on.
Saving And Exiting
Press the key to save changes, usually F10. Confirm by selecting “Yes” or pressing Enter. The computer will restart with virtualization enabled. Check your system settings or use software to confirm activation.
Verifying Virtualization Activation
After enabling CPU virtualization in your BIOS or UEFI settings, it is important to verify that the feature is active. This step ensures your system can run virtual machines smoothly. Checking virtualization status helps avoid errors in software that needs this technology. There are simple methods to confirm activation using built-in tools or third-party software. These tools provide clear information in a few clicks.
Rechecking With Task Manager
Task Manager is a quick way to check virtualization status on Windows. Open Task Manager by pressing Ctrl + Shift + Esc. Click on the “Performance” tab. Select “CPU” from the left menu. Look for “Virtualization” on the right side. It should say “Enabled.” If it says “Disabled,” virtualization is not active yet. This method requires no extra software and works on most Windows versions.
Using Third-party Tools
Third-party tools offer detailed information about CPU features. Programs like CPU-Z or Speccy show virtualization status clearly. Download and install one of these tools. Run the program and find the CPU section. Check the virtualization field for “Yes” or “No.” These tools also display other useful system data. They are helpful if Task Manager does not show virtualization status or if you want more details.
Troubleshooting Common Issues
Enabling CPU virtualization can sometimes be tricky. Users often face common problems that stop the process. Troubleshooting these issues helps get virtualization up and running smoothly. Understanding what causes the problems saves time and effort.
Virtualization Option Missing
Sometimes, the virtualization option is not visible in the BIOS menu. This happens if the CPU does not support virtualization technology. Also, some motherboard manufacturers hide this feature in advanced settings. Check the CPU model and motherboard manual. If the option is missing, update the BIOS or use a different computer with virtualization support.
Bios Update Recommendations
Updating the BIOS can fix many virtualization problems. BIOS updates add new features and fix bugs. Before updating, backup all important data. Download the latest BIOS version from the official motherboard website. Follow the update instructions carefully to avoid system damage. After the update, the virtualization option often appears in the BIOS menu.
Security Software Conflicts
Some security programs block virtualization features. Antivirus or anti-malware software can interfere with CPU virtualization. Temporarily disable security software during virtualization setup. Check the software settings for any virtualization-related options. If disabling helps, add the virtualization software to the security program’s exceptions list. This prevents future conflicts and allows virtualization to work properly.
Tips For Safe Bios Configuration
Changing BIOS settings can improve your computer’s performance. Enabling CPU virtualization is one of these important changes.
BIOS controls many critical parts of your computer. A small mistake may cause problems. Follow safe steps to avoid issues.
Backup Your Current Bios Settings
Before changing anything, save your current BIOS settings. Some BIOS versions let you export these settings to a file. Keep this file safe. It helps restore settings if needed.
Use The Latest Bios Version
Check your motherboard’s website for BIOS updates. New versions fix bugs and add features. Updating BIOS can make virtualization work better and safer.
Follow Official Guides Carefully
Read your motherboard manual or official website instructions. Each BIOS interface looks different. Follow exact steps to find the virtualization option.
Make Changes One Step At A Time
Change only the virtualization setting at first. Avoid adjusting multiple settings at once. This helps find and fix problems quickly.
Save And Reboot Properly
After enabling virtualization, save your changes before exiting BIOS. Use the “Save and Exit” option. Restart your computer to apply changes.
Test Virtualization After Setup
Check if virtualization is enabled using system tools. Programs like Task Manager or third-party apps can confirm it. Verify before running virtual machines.
Credit: support.bluestacks.com
Credit: www.thomas-krenn.com
Frequently Asked Questions
What Is Cpu Virtualization And Why Enable It?
CPU virtualization allows a single CPU to run multiple operating systems simultaneously. Enabling it improves performance in virtual machines and enhances system efficiency for development or testing.
How Do I Check If My Cpu Supports Virtualization?
You can check virtualization support in your CPU by using tools like Intel VT-x or AMD-V detection software. Alternatively, check your CPU model specifications on the manufacturer’s website.
How To Enable Cpu Virtualization In Bios Settings?
Restart your computer and enter the BIOS/UEFI menu. Look for virtualization options under “Advanced” or “CPU Configuration” and enable Intel VT-x or AMD-V, then save and exit.
Will Enabling Cpu Virtualization Affect My Computer Speed?
Enabling CPU virtualization generally improves system performance for virtual environments. It does not negatively impact regular computer speed and is safe to enable for most users.
Conclusion
Enabling CPU virtualization helps run virtual machines smoothly. It improves computer performance for tasks like testing software or running different operating systems. The process is simple and only takes a few steps in your BIOS settings. Remember to save changes before exiting BIOS.
Check your CPU supports virtualization to avoid issues. Now, your system can handle multiple environments without trouble. Give it a try and see the difference yourself.