
Is your computer making strange noises or overheating? Your CPU fan might be the problem.
Knowing how to replace a CPU fan can save you time, money, and frustration. In this guide, you’ll learn simple steps to swap out your old fan and keep your computer running smoothly. Don’t worry if you’re not a tech expert—this article breaks everything down in a way that’s easy to follow.
Ready to fix your PC and boost its performance? Let’s get started!
Credit: www.buildcomputers.net
Signs Of A Faulty Cpu Fan
A CPU fan keeps your computer cool. It stops the processor from getting too hot. A faulty fan can cause many problems. Knowing the signs helps you fix it fast. Watch for these common symptoms to spot a bad CPU fan.
Overheating Symptoms
Your computer gets hot quickly. The case feels warm or hot to touch. The system may shut down without warning. Overheating can damage important parts inside. A fan that does not spin well causes this.
Unusual Noises
Fans should run quietly. Strange sounds mean trouble. Listen for buzzing, grinding, or clicking noises. These sounds show the fan’s motor or blades are damaged. A noisy fan often stops working soon.
System Performance Issues
The computer runs slower than usual. Programs freeze or crash more often. The system may restart randomly. Poor cooling makes the CPU throttle down speed. This protects it but lowers performance.

Credit: superuser.com
Tools And Materials Needed
Before replacing your CPU fan, gather all the necessary tools and materials. Having the right items ready makes the process smooth and safe. This section lists what you need to prepare.
Essential Tools
You need a small Phillips screwdriver for screws. A flat-head screwdriver may help with some clips. Use an anti-static wrist strap to protect your computer parts. A clean cloth or brush helps remove dust. Thermal paste is important to reapply after fan replacement. Tweezers can help handle tiny screws or connectors.
Compatible Replacement Fans
Choose a fan that fits your CPU socket and case size. Check the fan’s voltage and connector type match your motherboard. Look for brands with good reviews for reliability. A quiet fan improves your computer’s noise level. Some fans come with built-in heat sinks for better cooling. Make sure the fan blades spin freely before buying.
Preparing Your Workspace
Preparing your workspace is the first step to replace a CPU fan. A clean and organized area helps you work safely and efficiently. Taking time to prepare reduces mistakes and protects your computer parts. This section covers important safety tips and tool organization.
Safety Precautions
Turn off the computer and unplug all cables. This stops electric shocks and damage to parts. Work on a flat, stable surface with good lighting. Avoid static electricity by touching a metal object or wearing an anti-static wristband. Handle the CPU fan and motherboard gently to avoid bending pins or breaking parts. Keep liquids and food away from your workspace.
Organizing Your Tools
Gather all tools before you start. Common tools include a screwdriver, thermal paste, and cleaning cloth. Place tools within easy reach to avoid searching mid-task. Use a small container or magnetic mat to hold screws safely. Label parts if needed to keep track of where they belong. Organizing tools saves time and prevents losing small pieces.

Credit: www.youtube.com
Removing The Old Cpu Fan
Removing the old CPU fan is the first step in replacing it. This process requires care to avoid damage to your computer. Follow the steps carefully to ensure a smooth removal.
Shutting Down And Unplugging
Turn off your computer completely. Do not put it to sleep or hibernate. Unplug the power cable from the wall socket. This prevents any risk of electric shock. Wait a few minutes to let the computer cool down.
Accessing The Cpu Fan
Open the computer case by removing screws or sliding the panel. Look for the CPU fan on the motherboard. It is usually near the center and attached to the CPU. Make sure you have enough light to see clearly inside.
Detaching The Fan
Unplug the fan’s power cable from the motherboard. Check for screws or clips holding the fan in place. Remove them carefully with a screwdriver or by hand. Gently lift the fan off the CPU. Avoid pulling hard to prevent damage to the CPU or motherboard.
Cleaning The Cpu Area
Cleaning the CPU area is an important step before replacing the CPU fan. Dust and old thermal paste can block airflow and cause overheating. A clean CPU area helps the new fan work better. It also improves the connection between the CPU and the cooler.
Removing Dust And Debris
Start by turning off your computer and unplugging it. Open the case carefully. Use a soft brush or compressed air to remove dust from the CPU and surrounding parts. Blow out dust from heatsinks and fan blades. Avoid touching the CPU pins or motherboard circuits. Dust can cause overheating and reduce fan efficiency. Cleaning creates a fresh surface for better cooling.
Applying Thermal Paste
After cleaning, remove old thermal paste from the CPU surface. Use isopropyl alcohol and a soft cloth or paper towel. Apply a small amount of new thermal paste in the center of the CPU. A pea-sized drop is enough. Spread it evenly by pressing the cooler on top. Thermal paste fills gaps and improves heat transfer. Proper application prevents CPU from getting too hot.
Installing The New Cpu Fan
Installing the new CPU fan is a key step to keep your computer cool and running well. This process needs care and attention. A properly installed fan helps avoid overheating and system crashes. Follow the steps below to place your new fan correctly and connect it safely.
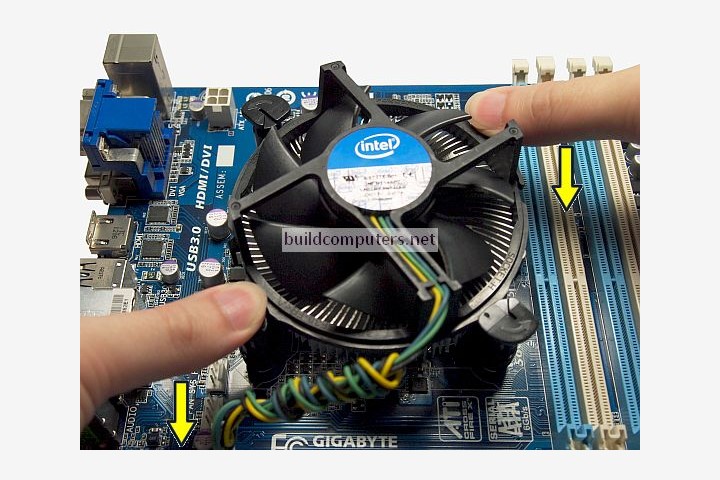
Positioning The Fan
Place the new CPU fan on the heatsink carefully. Align the fan holes with the mounting points. Ensure the fan blows air toward the heatsink fins. This direction helps move hot air away from the CPU. Avoid forcing the fan into place. It should fit snugly but without pressure.
Securing The Fan
Use screws or clips to attach the fan firmly. Tighten screws evenly to avoid bending the fan frame. Check that the fan sits flat against the heatsink. Loose fans cause noise and reduce cooling. Do not overtighten screws to prevent damage.
Connecting The Fan Cable
Find the CPU fan header on the motherboard. It usually says “CPU_FAN” near the pins. Plug the fan cable connector gently onto the header. The connector should fit in one way only. Secure the cable to avoid it touching the fan blades. Proper connection lets the motherboard control fan speed.
Testing The New Fan
After installing the new CPU fan, testing it is crucial. This step ensures the fan works well and keeps the CPU cool. A properly working fan prevents overheating and system damage. Follow these simple steps to check your new fan’s performance effectively.
Powering On The System
First, connect the power cable and switch on the computer. Listen carefully for any unusual sounds from the fan. The fan should start spinning immediately and run smoothly without noise. If the fan does not spin, double-check the power connection and seating on the CPU header.
Monitoring Fan Performance
Use software tools to monitor the fan speed and CPU temperature. Programs like HWMonitor or SpeedFan show real-time data. The fan speed should increase when the CPU heats up. If the speed stays low or the temperature rises quickly, the fan may not be working properly. Regularly check these readings to ensure your system stays cool and stable.
Tips For Maintaining Cpu Cooling
Keeping your CPU cool is key to good computer performance. A well-maintained CPU fan helps stop overheating. This section shares simple tips for maintaining CPU cooling. These tips help your computer run smoothly and last longer.
Regular Cleaning Schedule
Dust builds up inside your computer over time. Dust blocks airflow and makes the fan work harder. Clean the CPU fan and vents every few months. Use a soft brush or compressed air to remove dust. Turn off and unplug your computer before cleaning. Regular cleaning keeps the fan running well and your CPU cool.
Monitoring Temperatures
Check your CPU temperature often to avoid overheating. Use free software tools to track temperature levels. Normal CPU temperature is usually between 30 and 50 degrees Celsius. Temperatures above 70 degrees Celsius can cause damage. Watch for sudden spikes or high temperatures during use. Monitoring helps catch problems early before damage occurs.
Upgrading Cooling Solutions
Stock CPU fans might not cool well under heavy use. Consider upgrading to a better fan or cooling system. Larger fans move more air and run quieter. Liquid cooling offers excellent temperature control for powerful CPUs. Choose cooling solutions that fit your computer case. Upgrades improve cooling and keep your CPU safe.
Frequently Asked Questions
How Do I Know When To Replace A Cpu Fan?
You should replace the CPU fan if it makes loud noises, stops spinning, or causes overheating. Regularly check for dust buildup and poor cooling performance.
What Tools Are Needed To Replace A Cpu Fan?
You will need a screwdriver, thermal paste, and possibly a cleaning brush. Some fans may require specific screws or connectors, so check your CPU model.
Can I Replace A Cpu Fan Without Removing The Motherboard?
In most cases, yes. Many CPU fans are accessible without removing the motherboard, but some compact builds may require partial disassembly.
How Do I Apply Thermal Paste When Replacing A Cpu Fan?
Clean old thermal paste off the CPU and fan base. Apply a small pea-sized amount of new paste evenly before installing the new fan.
Conclusion
Replacing a CPU fan keeps your computer cool and running well. Follow each step carefully to avoid mistakes. Take your time and use the right tools. Regular fan checks help prevent overheating and damage. A working fan means better performance and longer computer life.
Stay safe and enjoy a quieter, cooler PC.