
Are you ready to take your computer skills to the next level? Removing the CPU from your motherboard might sound tricky, but with the right steps, you can do it safely and easily.
Whether you want to upgrade your processor or troubleshoot an issue, knowing how to remove your CPU correctly is essential. In this guide, you’ll learn simple, clear instructions that anyone can follow. Stick with me, and you’ll gain the confidence to handle your hardware like a pro.
Let’s dive in and get started!
Tools Needed
Removing a CPU from a motherboard needs the right tools. Using correct tools protects the CPU and the motherboard. Having these tools ready makes the process easier and safer.
Anti-static Wrist Strap
Static electricity can damage computer parts. An anti-static wrist strap stops this problem. It keeps your body grounded and safe. Always wear it before touching the CPU or motherboard.
Screwdriver Set
A screwdriver helps remove screws that hold the CPU cooler or case. Most CPUs need a Phillips-head screwdriver. Keep different sizes ready for any screws you meet.
Thermal Paste Remover
Thermal paste sits between the CPU and cooler. It must be cleaned before removing the CPU. Use a special thermal paste remover or isopropyl alcohol with a soft cloth.
Plastic Pry Tool
A plastic pry tool helps lift the CPU socket lever. It is gentle and avoids damage. Do not use metal tools that can scratch or break parts.
Clean Cloth Or Microfiber Towel
Use a clean cloth to wipe away dust or old thermal paste. A microfiber towel works well without leaving fibers behind. Keep the area clean for better CPU removal and installation.

Credit: softwareg.com.au
Prepare Your Workspace
Setting up your workspace is the first step before removing a CPU from the motherboard. A clean and organized area helps prevent damage to the delicate parts. It also makes the process easier and faster.
Choose a flat surface with good lighting. This helps you see small components clearly. Avoid soft surfaces like beds or carpets that can create static electricity. Static can harm your CPU and motherboard.
Clear The Area
Remove all unnecessary items from your workspace. Keep only tools and parts related to the CPU removal. A clutter-free space reduces distractions and the chance of losing screws or small parts.
Gather Necessary Tools
Prepare tools like a screwdriver, anti-static wrist strap, and a clean cloth. Having these ready saves time and prevents interruptions. Use tools that fit well to avoid slipping and damaging screws.
Control Static Electricity
Static can damage sensitive computer parts. Use an anti-static wrist strap to ground yourself. If unavailable, touch a metal part of the computer case before starting. Avoid working on carpet or in dry rooms.
Organize Parts And Screws
Use small containers or magnetic trays to hold screws and parts. Label them if possible. This keeps everything safe and helps you find parts quickly during reassembly.
Power Down And Unplug
Start by turning off your computer and unplugging all cables. This prevents electric shocks and protects your hardware. Always wait a few minutes before touching the CPU or motherboard.
Power Down Your Computer
Start by shutting down your computer completely. Do not just put it to sleep or hibernate. Press the power button and wait until the screen goes black. This step stops all running processes and prevents damage.
Unplug The Power Cable
Remove the power cable from the wall outlet or power strip. This cuts the electricity supply to your computer. No power means it is safe to work inside the case. Avoid any risk of electric shock or short circuits.
Disconnect All External Devices
Unplug all connected devices like the keyboard, mouse, and monitor. This keeps cables out of your way and prevents accidental pulls. It also ensures no signals can interfere while you work inside the computer.
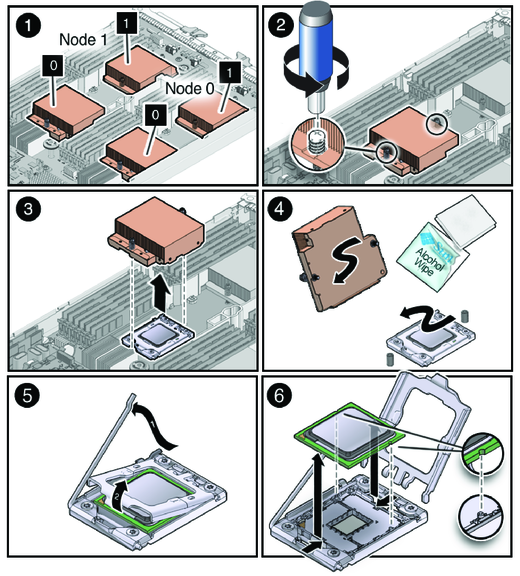
Credit: docs.oracle.com
Open The Computer Case
Opening the computer case is the first step to remove the CPU from the motherboard. It gives you access to the internal parts. You need to do this carefully to avoid damage.
Most computer cases have screws or latches on the back. These hold the side panel in place. Removing the panel reveals the inside of your computer.
Power Off And Unplug The Computer
Always turn off your computer before opening the case. Unplug all cables and power cords. This keeps you safe from electric shock.
Remove The Side Panel
Look for screws at the back of the case. Use a screwdriver to remove them. Some cases have a latch instead of screws. Slide or pull the panel gently to open.
Ground Yourself To Avoid Static
Static electricity can damage parts inside the computer. Touch a metal part of the case to discharge static. You can also use an anti-static wrist strap for safety.
Locate The Motherboard And Cpu
The motherboard is the large board inside the case. The CPU sits under a heat sink or fan. Removing the cover gives you clear access to the CPU socket.
Locate The Cpu Socket
Finding the CPU socket is the first step to remove the CPU from the motherboard. The CPU socket is a special place on the motherboard where the processor sits. It holds the CPU firmly and connects it to the rest of the computer.
Every motherboard has one CPU socket. It looks like a square or rectangle with many tiny holes or pins. The socket may have a metal lever or cover to keep the CPU safe.
Identify The Cpu Socket On The Motherboard
Look for the largest chip slot on the motherboard. It usually sits near the center or close to the RAM slots. The socket is often surrounded by a plastic or metal frame. It is different from other slots like RAM or PCIe slots.
You can also check the motherboard manual. It shows the exact location and name of the CPU socket. The socket type is often printed near it, like LGA 1151 or AM4.
Recognize The Cpu Socket Features
The CPU socket has many small holes or metal pins. These connect the CPU pins to the motherboard. A metal lever or latch locks the CPU in place. It must be lifted before you remove the CPU.
The socket may have a plastic cover if the CPU is not installed. This cover protects the pins from damage.
Check For Surrounding Components
Notice the parts around the CPU socket. These include the CPU fan bracket, power connectors, and RAM slots. Make sure there is enough space to work safely. Remove any cables or parts blocking access to the socket.
Handle these parts carefully to avoid damage. The CPU socket is delicate and needs gentle handling.
Remove The Cooling System
Removing the cooling system is a key step to take out the CPU safely. The cooling system keeps the CPU cool during use. It usually has a fan and a heat sink attached to the CPU.
Before touching the CPU, you must remove the fan and clean the thermal paste. This prevents damage and keeps parts ready for reassembly or replacement.
Detach The Fan
First, unplug the fan’s power cable from the motherboard. This cable is small and near the fan base. Next, check how the fan is attached. It may have clips, screws, or a latch.
Use a screwdriver to remove screws or gently unclip the fan. Hold the fan firmly and lift it straight up. Avoid twisting or forcing it. This stops damage to the motherboard or CPU.
Clean Thermal Paste
Thermal paste sticks the heat sink to the CPU. It helps transfer heat away from the processor. After removing the fan and heat sink, the paste looks like a gray or white layer.
Use isopropyl alcohol and a soft cloth or paper towel. Gently wipe the thermal paste off the CPU and heat sink. Clean until no residue remains. Let both parts dry completely before reusing or installing new paste.
Unlock The Cpu Socket
Removing the CPU from the motherboard starts with unlocking the CPU socket. This step is essential to free the processor safely. The CPU socket holds the CPU firmly in place. You must handle it carefully to avoid damage.
Unlocking the socket involves two main actions. First, lift the retention arm. Next, release the CPU gently. Follow these steps closely for a smooth process.
Lift The Retention Arm
Find the metal retention arm on the side of the CPU socket. It keeps the CPU locked in place. Gently push the arm away from the socket base. Then, lift it upward until it stands up. This action loosens the socket’s hold on the CPU. Do not force the arm. Move it slowly to avoid breaking it.
Release The Cpu
With the retention arm lifted, the CPU is free to move. Hold the CPU by its edges. Avoid touching the pins or contacts underneath. Carefully lift the CPU straight up. Do not wiggle or tilt it, as this can bend the pins. Place the CPU on an anti-static surface. This protects it from static electricity and damage.
Remove The Cpu
Removing the CPU from the motherboard is a delicate task. It requires patience and the right steps. This section guides you through the process of taking out the CPU safely. Follow the instructions carefully to avoid damage to your computer parts.
Handle With Care
Always touch the CPU by its edges. Avoid touching the pins or the top surface. Pins are fragile and can bend easily. Bent pins can cause the CPU to malfunction. Use a gentle hand to lift the CPU out of the socket. Do not force it. If it does not come out easily, check the locking mechanism again.
Store Properly
Place the CPU on an anti-static surface after removal. Avoid placing it on metal or rough surfaces. Use the original CPU case if available. Keep the CPU in a dry, cool place. Protect it from dust and moisture. Proper storage helps maintain the CPU’s condition for future use.
Clean The Socket Area
Cleaning the socket area is a key step when removing a CPU from the motherboard. Dust, dirt, or old thermal paste can cause poor contact between the CPU and socket. This can lead to overheating or system errors. A clean socket ensures better performance and longer lifespan for your components.
Take care while cleaning. The socket pins are very delicate and can bend easily. Use soft tools and gentle methods to avoid damage.
Gather The Right Tools
Use a soft brush, compressed air, and a lint-free cloth. Avoid using liquids or harsh chemicals. These can harm the socket or motherboard.
Remove Dust And Debris
Start by blowing compressed air into the socket. This removes loose dust and particles. Next, use a soft brush to clear away stubborn debris. Brush gently to protect the pins.
Check For Bent Pins
Look closely at the socket pins under good light. Bent pins can cause connection problems. Straighten them carefully with a small tool, like a plastic toothpick, if needed.
Keep The Area Dry And Clean
Make sure no moisture remains on the socket. Use a dry cloth to wipe any leftover dust. A clean socket area helps the CPU fit securely and work well.

Credit: www.youtube.com
Tips For Handling Cpus Safely
Handling a CPU requires care and attention. CPUs are delicate and can be damaged easily. Taking the right safety steps protects the CPU and your motherboard. Follow these tips to handle the CPU safely and avoid common mistakes.
Wear An Anti-static Wrist Strap
Static electricity can harm the CPU’s circuits. An anti-static wrist strap stops static build-up. Connect the strap to a grounded surface. This prevents shocks that can ruin the CPU.
Hold The Cpu By Its Edges
Touching the CPU’s pins or surface can cause damage. Always pick up the CPU by its edges. Avoid pressing down on the top or bottom. This keeps the pins straight and clean.
Keep The Work Area Clean
Dust and dirt can cause problems when installing a CPU. Clean your workspace before starting. Use a soft cloth to wipe surfaces. This helps prevent debris from entering the motherboard.
Use Proper Tools For Removal
Use the correct tool or lever to lift the CPU socket latch. Forcing it can break the socket or CPU. Gently unlock the latch and lift the CPU out carefully.
Avoid Excessive Force
The CPU fits into the socket without force. Forcing the CPU can bend pins or crack the chip. Place the CPU gently and check alignment before pressing down.
Frequently Asked Questions
How Do I Safely Remove A Cpu From The Motherboard?
Turn off the PC and unplug all cables. Release the CPU socket lever gently. Lift the CPU straight up without bending pins.
What Tools Are Needed To Remove A Cpu?
Typically, no special tools are required. Use your hands carefully and a clean, static-free workspace.
How To Avoid Damaging The Cpu During Removal?
Handle the CPU by its edges. Avoid touching pins or contacts. Work slowly and avoid applying excessive force.
Can Removing A Cpu Void My Warranty?
Yes, removing the CPU can void the warranty. Check your manufacturer’s terms before attempting removal.
Conclusion
Removing a CPU from the motherboard is simpler than it seems. Take your time and follow each step carefully. Always handle parts gently to avoid damage. Keep screws and small pieces safe during the process. Use this guide as a handy reference whenever needed.
With practice, the task will become easier. Stay patient and confident throughout your work. Your computer will thank you for proper care.