
Are you staring at your new CPU and wondering how to get your monitor up and running? Connecting your CPU to a monitor might seem tricky at first, but it’s actually easier than you think.
Whether you’re setting up a fresh computer or replacing an old screen, this guide will walk you through every step clearly and quickly. By the end, you’ll have your display working perfectly, so you can dive into work, gaming, or streaming without any hassle.
Ready to make your setup complete? Let’s get started!
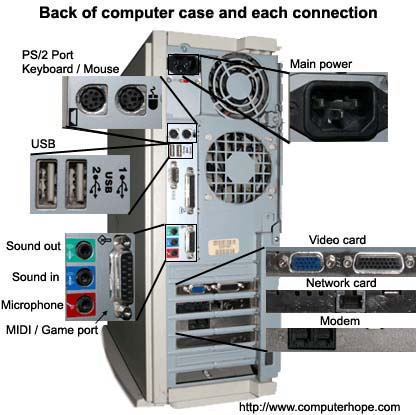
Credit: www.computerhope.com
Choosing The Right Cable
Choosing the right cable to connect your CPU to a monitor matters a lot. The cable affects picture quality and performance. Picking the best cable ensures clear images and smooth display. It also prevents connection problems and signal loss. This guide helps you understand the main cable types and what suits your setup.
Hdmi Vs Displayport Vs Vga
HDMI carries both video and audio in one cable. It is common and works well for most monitors.
DisplayPort supports higher resolutions and refresh rates. It is ideal for newer monitors and gaming.
VGA is an older cable type. It only sends video and has lower image quality. Avoid VGA if possible.
Checking Cable Length And Quality
Pick a cable long enough to reach your monitor without stretching. Too long cables may lose signal strength.
Choose cables made with good materials. Thick cables with shielding reduce interference and last longer.
Cheap cables can cause flickering or poor image quality. Investing in a quality cable pays off.
Adapters And Converters
Adapters help connect different ports on your CPU and monitor. For example, HDMI to VGA adapters.
Converters change the signal type. Use them only if no direct cable fits your devices.
Using too many adapters can weaken the signal and cause problems. Keep connections simple.
Preparing Your Devices
Before connecting your CPU to your monitor, prepare both devices carefully. This step helps prevent damage and makes setup easier.
Take your time to check each device. Make sure everything is ready for the connection process.
Power Off Cpu And Monitor
Always turn off your CPU and monitor before connecting them. This protects your hardware from electrical damage.
Unplug the power cables for extra safety. Never connect or disconnect cables while devices are on.
Locate Video Ports On Cpu And Monitor
Find the video ports on both the CPU and the monitor. Ports may look different, so identify them carefully.
Common ports include HDMI, VGA, and DisplayPort. Match the ports on your CPU with those on the monitor.
Check the shape and size of each port. This helps you pick the right cable for connection.
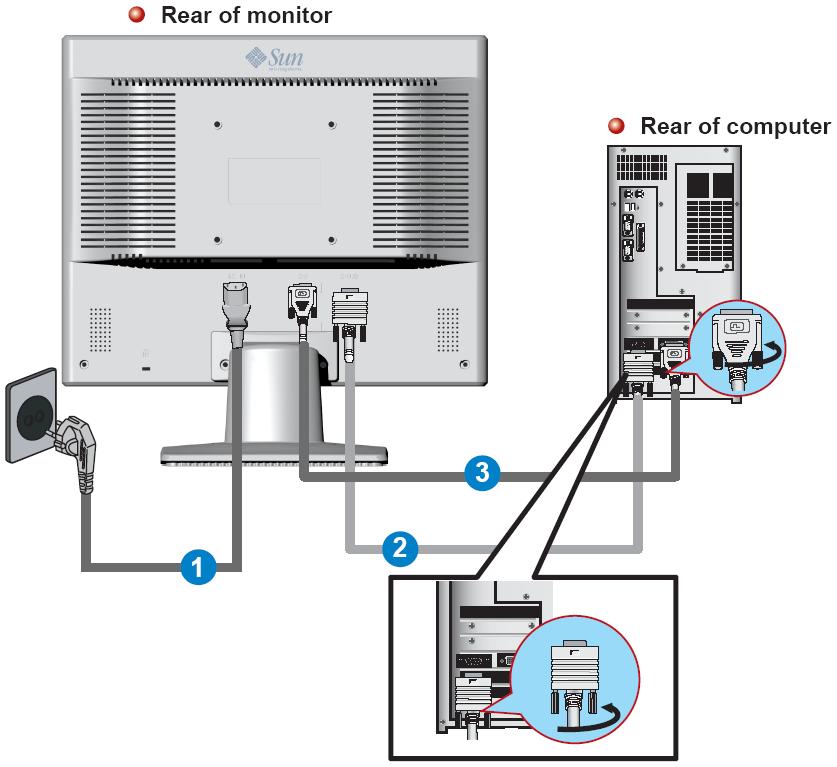
Connecting The Cable
Connecting the cable is a key step in linking your CPU to the monitor. This process ensures that the display receives the signal from your computer. It requires careful handling of the cables and ports to avoid damage and maintain a clear picture.
Use the correct cable type for your devices. Common cables include HDMI, DisplayPort, VGA, or DVI. Each has a unique shape and function. Match the cable to the port on both the CPU and the monitor.
Securely Plugging Into Cpu
Locate the video output port on the back of the CPU. Align the cable connector with the port carefully. Do not force the cable in; it should slide in smoothly. Push the connector fully inside the port until it feels secure. A loose connection here can cause display problems.
Connecting To The Monitor
Find the matching input port on your monitor. Align the cable connector with this port. Insert the cable gently but firmly. Make sure it fits snugly without gaps. This connection allows the monitor to receive video signals correctly.
Avoiding Loose Connections
Check both ends of the cable after plugging them in. Wiggle the cable gently to test stability. If the cable moves or feels loose, unplug and reconnect it. Secure connections prevent flickering or no display issues. Use screws or clips if available for extra security.
Powering On And Initial Setup
Powering on your CPU and monitor is the first step to get your computer ready for use. This process helps you see the display and start working quickly. It also allows you to check if all connections are correct. Follow simple steps to ensure everything works smoothly from the start.
Turning On The Monitor And Cpu
Find the power button on your monitor. It is usually located on the front or side. Press it once to turn on the monitor. Next, locate the power button on your CPU case. Press it to start the computer. Wait for the screen to light up and show the initial loading screen.
Selecting The Correct Input Source
Your monitor may have several input options like HDMI, VGA, or DisplayPort. Use the monitor’s menu buttons to open the input source settings. Choose the input that matches the cable connected to your CPU. This step ensures the monitor displays the correct video signal.
Adjusting Display Settings
After the CPU boots up, check the screen resolution. Right-click on the desktop and select display settings. Adjust the resolution to match the monitor’s native resolution for clear images. Also, set the brightness and contrast for comfortable viewing. Save your settings to keep them for future use.
Troubleshooting Common Issues
Troubleshooting common issues when connecting a CPU to a monitor helps save time and frustration. Problems can happen even with the right connections. Knowing how to fix these problems quickly keeps your setup working smoothly.
This section covers common problems like no signal, display resolution issues, and damaged cables or ports. Each topic explains simple steps to find and fix the problem.
No Signal On Monitor
No signal means the monitor does not receive any video from the CPU. First, check if the monitor is turned on. Make sure the correct input source is selected on the monitor menu. Confirm the cable is firmly connected to both the CPU and monitor ports. Restart the CPU and monitor to refresh the connection. Try a different cable or port if the problem continues.
Resolution And Display Problems
Low or wrong resolution affects screen clarity and size. Open your computer’s display settings to adjust resolution. Pick the resolution recommended for your monitor. Update your graphics driver to improve display performance. If the screen flickers or shows lines, test with another monitor to identify the issue.
Cable And Port Damage Checks
Damaged cables or ports can cause no signal or poor image quality. Inspect cables for cuts, bends, or frays. Swap cables to see if the issue clears. Check the CPU and monitor ports for dust or bent pins. Clean ports gently with compressed air if needed. Replace cables or repair ports if damage is visible.
Credit: vixencomposites.com
Optimizing Your Display
Optimizing your display helps you get the best picture from your monitor. It makes colors look right and text clear. It also reduces eye strain and improves your overall experience. Simple steps can enhance how your screen looks and feels.
Adjusting settings like colors, brightness, and refresh rate ensures your display works well. For users with more than one monitor, proper setup is key. These tips help you set up and enjoy a great screen view.
Calibrating Colors And Brightness
Start by adjusting the brightness to a comfortable level. Avoid settings that are too bright or too dim. Use built-in tools or software for color calibration. This makes colors true and prevents washed-out images. Proper color calibration helps in photo editing and video watching.
Setting Refresh Rate
Refresh rate is how many times the screen updates each second. Higher refresh rates give smoother motion. Go to your computer’s display settings to change the refresh rate. Choose the highest rate supported by your monitor. This reduces flicker and eye fatigue during long use.
Multiple Monitor Setup Tips
Place monitors at eye level and keep them aligned. Use matching resolution and refresh rate for each screen. Arrange monitors in your display settings to match their physical layout. This helps your mouse move smoothly between screens. Keep cables tidy to avoid clutter and improve airflow.

Credit: www.youtube.com
Frequently Asked Questions
How Do I Connect A Cpu To A Monitor?
To connect a CPU to a monitor, use a compatible video cable like HDMI, VGA, or DisplayPort. Plug one end into the CPU’s video output port and the other into the monitor’s input port. Turn both devices on and select the correct input source on the monitor.
What Cable Is Best For Cpu To Monitor Connection?
HDMI is the best cable for connecting a CPU to a monitor. It supports high-definition video and audio signals. DisplayPort is another good option for high resolution. VGA is older and offers lower quality but is still usable for basic displays.
Can I Connect Multiple Monitors To One Cpu?
Yes, you can connect multiple monitors to one CPU if it has multiple video outputs. Use HDMI, DisplayPort, or VGA ports available on the graphics card or motherboard. You may need to adjust display settings to extend or duplicate screens.
Why Is My Monitor Not Detecting The Cpu?
If the monitor doesn’t detect the CPU, check cable connections and ensure both devices are powered on. Verify the correct input source is selected on the monitor. Update or reinstall the graphics drivers if the issue persists.
Conclusion
Connecting your CPU to a monitor is simple and quick. Use the right cable for your ports. Check the connections to avoid loose plugs. Turn on both devices after connecting. Adjust settings on your monitor for best view. This helps you work, study, or enjoy videos easily.
Practice makes it easier next time. Now, you can set up your computer with confidence.