
Installing a CPU on your motherboard might seem tricky at first, but with the right steps, you can do it confidently and safely. If you want your computer to run smoothly, placing the CPU correctly is key.
In this guide, you’ll learn exactly how to install your CPU without any hassle or risk of damage. Whether you’re building your first PC or upgrading an old one, following these simple instructions will save you time and frustration. Keep reading to get your system up and running quickly!
Preparing For Installation
Preparing for CPU installation is a crucial step. It ensures the process goes smoothly and safely. Taking time to prepare helps avoid damage to the CPU or motherboard. Follow simple steps before starting the actual installation.
Gathering Necessary Tools
Collect all tools needed for the job. Usually, a screwdriver and thermal paste are essential. Have a clean cloth or anti-static mat ready. These tools make installation easier and safer.
Ensuring A Static-free Workspace
Static electricity can harm computer parts. Work on a surface that does not create static. Use an anti-static wrist strap if possible. Touch a metal object to discharge static before handling parts.
Checking Compatibility
Verify the CPU fits your motherboard socket. Check the motherboard manual or manufacturer’s website. Confirm the CPU model matches the socket type. Also, check the BIOS version for compatibility updates.
Credit: www.youtube.com
Identifying Cpu And Motherboard Components
Before installing a CPU on a motherboard, identifying key parts is essential. Knowing these parts helps avoid mistakes and damage. This section explains how to recognize the CPU and motherboard components clearly.
Locating The Cpu Socket
The CPU socket is the place where the processor fits on the motherboard. It is usually near the center and looks like a square with a metal or plastic cover. The socket has many small holes or pins that connect with the CPU. Finding the socket is the first step in installation.
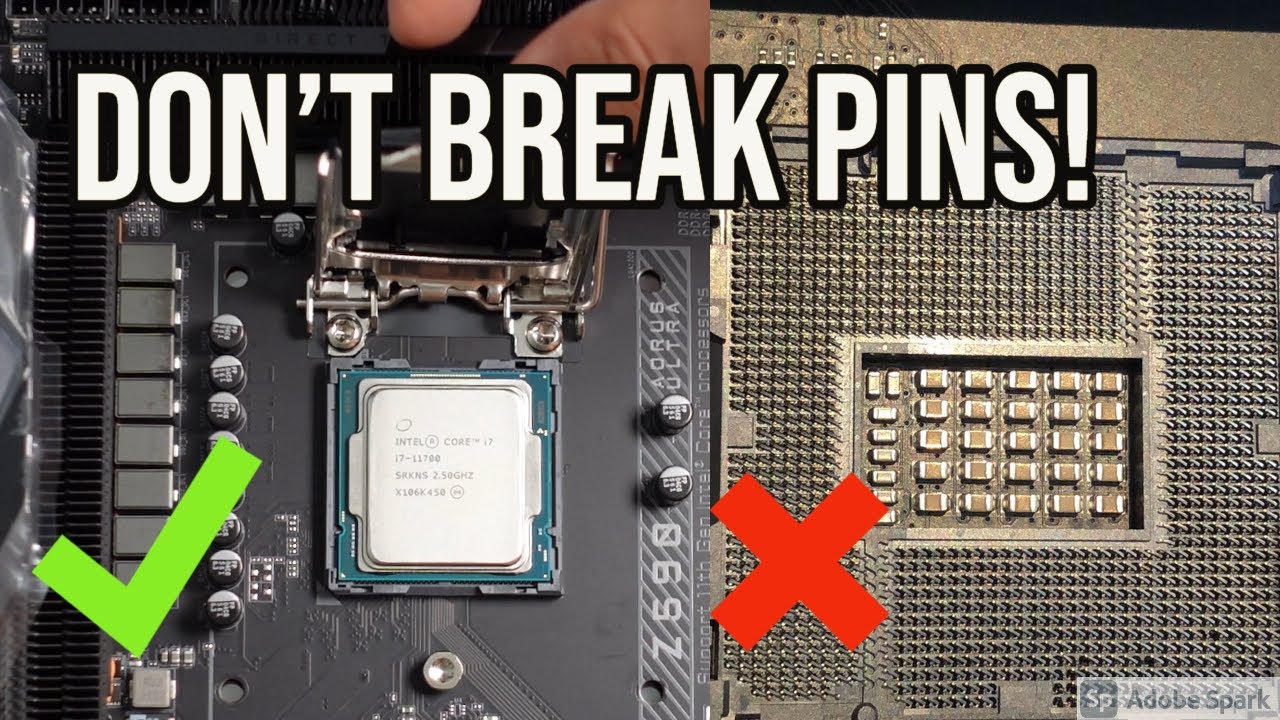
Understanding Cpu Pins And Notches
The bottom of a CPU has many tiny pins or flat contacts. These pins must match the socket holes exactly. CPUs also have notches or cutouts on the edges. These notches help align the CPU correctly. Check pins and notches carefully before placing the CPU.
Recognizing Socket Types
Motherboards use different socket types for different CPUs. Common types are LGA, PGA, and BGA. Each type has a unique design. Knowing your socket type helps choose the right CPU. Always check the motherboard manual for socket details.
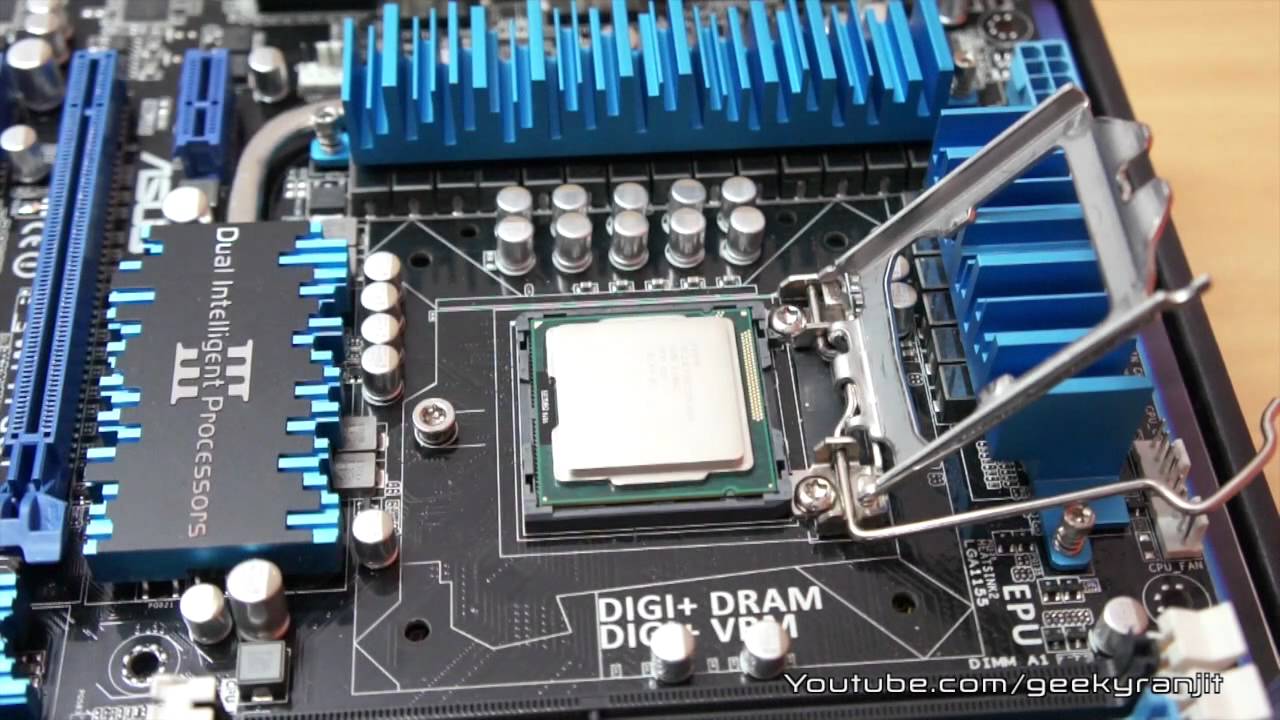
Installing The Cpu
Installing the CPU on the motherboard is a key step in building your computer. It requires care and attention to avoid damage. The process is simple if you follow the steps carefully.
Opening The Cpu Socket
Start by locating the CPU socket on the motherboard. Gently lift the socket lever to open it. This unlocks the area where the CPU will sit. Avoid touching the socket pins to keep them safe.
Aligning The Cpu Correctly
Check the CPU and socket for alignment markers. These are usually small triangles or dots. Match the CPU’s marker with the socket’s. Proper alignment ensures the CPU fits perfectly.
Placing The Cpu Gently
Hold the CPU by the edges. Carefully lower it into the socket. Do not force or push down. The CPU should drop into place smoothly if aligned right.
Securing The Cpu In Place
Lower the socket lever back down to lock the CPU. This keeps the CPU firmly in the socket. Make sure it feels secure but do not apply too much pressure.
Applying Thermal Paste
Applying thermal paste is a key step when installing a CPU on a motherboard. It helps transfer heat from the CPU to the cooler. Without it, the CPU can overheat and slow down or get damaged. Using the right amount and spreading it evenly ensures good cooling performance.
Choosing The Right Thermal Paste
Pick a thermal paste that fits your needs and budget. Some pastes are better for high-performance CPUs. Others are cheaper and good enough for regular use. Look for a paste with good heat conductivity and easy application. Avoid old or dried-out paste, as it won’t work well.
Applying An Even Layer
Place a small pea-sized drop of thermal paste in the center of the CPU. The pressure from the cooler will spread it evenly. You want a thin, uniform layer that covers the CPU surface. Too much paste can cause poor heat transfer. Too little paste leaves gaps and air pockets.
Avoiding Common Mistakes
Do not smear the paste with your fingers or tools. This can add dirt or uneven thickness. Avoid using too much paste; it can spill over the sides. Clean the CPU and cooler surface before applying paste. Use alcohol wipes to remove old paste and dust for best results.
Attaching The Cpu Cooler
Attaching the CPU cooler is a crucial step in building your computer. It keeps the processor cool and prevents overheating. A properly installed cooler ensures your PC runs smoothly and lasts longer.
Follow the steps carefully to avoid damaging the CPU or motherboard. Take your time and handle parts gently. Here is how to attach the CPU cooler correctly.
Positioning The Cooler
Place the cooler directly over the CPU. Align it with the mounting holes on the motherboard. Check that the thermal paste is spread evenly on the CPU surface. This paste helps transfer heat from the CPU to the cooler.
Make sure the cooler is sitting flat. Avoid tilting or shifting it. Position the fan cable near the CPU fan header on the motherboard.
Securing The Cooler Firmly
Use the screws or clips that came with your cooler. Tighten them evenly in a diagonal pattern. This ensures even pressure on the CPU. Do not over-tighten the screws. It can damage the motherboard or CPU.
Check if the cooler is stable and does not move. A loose cooler can cause poor heat transfer and damage the CPU.
Connecting The Cooler Fan
Locate the CPU fan header on the motherboard. It is usually labeled “CPU_FAN”. Plug the cooler’s fan cable into this header. This powers the fan and allows the motherboard to control its speed.
Secure the cable so it does not block other components or fans. Proper cable management helps improve airflow inside the case.
Credit: www.youtube.com
Final Checks And Testing
After installing the CPU on the motherboard, the final step is to perform checks and testing. This step ensures the CPU is properly installed and the system works correctly. It helps avoid damage and ensures smooth operation.
Verifying Installation Stability
Check the CPU socket and pins for any movement or loose parts. The CPU should fit snugly with no gaps. Make sure the locking mechanism is secure. Inspect the thermal paste to see it covers the CPU evenly. A stable installation prevents errors and overheating.
Powering On The System
Connect the power supply and press the power button. Watch for any unusual sounds or smells. The system should boot to the BIOS or initial screen. If the system does not start, turn off power and recheck connections. Proper power-on confirms correct CPU installation.
Monitoring Cpu Temperature
Enter the BIOS or use monitoring software to check CPU temperature. Normal idle temperature varies by CPU model but usually stays below 50°C. High temperatures can indicate poor contact or cooling issues. Monitor temperature closely during the first few minutes of operation.

Credit: www.hackster.io
Frequently Asked Questions
How Do I Align The Cpu With The Socket?
Align the CPU by matching the corner mark on the chip with the socket’s triangle. This ensures proper pin placement and avoids damage.
What Tools Are Needed To Install A Cpu?
No special tools are required. Use your hands and a clean, static-free workspace for safe CPU installation.
How To Secure The Cpu On The Motherboard?
Lower the CPU gently into the socket and lock it using the socket lever or latch to secure it firmly.
Can I Install A Cpu Without Thermal Paste?
No, always apply thermal paste between the CPU and cooler to ensure efficient heat transfer and prevent overheating.
Conclusion
Installing a CPU on a motherboard is simple with care and patience. Align the CPU correctly and avoid touching pins. Secure it gently but firmly into place. Connect the cooler and apply thermal paste properly. Double-check all connections before powering on.
Taking these steps helps your computer run smoothly and last longer. You can build your own PC with confidence now. Just follow the steps carefully and enjoy your new setup.