
If you’ve ever opened up your computer to replace or upgrade your CPU, you know that thermal paste can get messy. Cleaning it off properly is crucial for your processor’s performance and longevity.
But how do you do it without damaging your CPU? In this guide, you’ll discover simple, effective steps to remove thermal paste safely and quickly. By the end, you’ll feel confident handling your CPU like a pro—ready to keep your system running cool and smooth.
Keep reading to learn the best tips and tricks for a clean, hassle-free job.
Why Remove Thermal Paste
Removing thermal paste from a CPU is a key step in maintaining your computer’s cooling system. Old or excess paste can cause problems for your processor. Cleaning off thermal paste helps ensure the CPU runs cooler and lasts longer. It also prepares the surface for new paste, which improves heat transfer.
When To Clean Thermal Paste
Cleaning thermal paste is necessary during CPU upgrades or replacements. Also, if you notice your computer overheating, it might be time to check the paste. Removing old paste before applying new paste avoids poor contact between the CPU and cooler. This keeps the system stable and efficient.
Risks Of Old Paste
Old thermal paste can dry out and lose its effectiveness. This leads to poor heat transfer and higher CPU temperatures. Overheating can cause the CPU to slow down or shut off. It may also shorten the lifespan of your processor. Removing old paste reduces these risks and improves cooling.
Tools Needed
Cleaning thermal paste from a CPU needs the right tools. Using proper materials makes the process safe and effective. Having everything ready helps avoid damage and saves time. Below are the main tools you will need.
Cleaning Materials
Isopropyl alcohol is the best choice for removing thermal paste. Use 90% or higher concentration for quick drying. Cotton swabs help reach small areas carefully. Lint-free cloth or coffee filters avoid leaving fibers behind. A plastic scraper or old credit card can gently lift paste. Avoid metal tools that might scratch the CPU surface.
Safety Equipment
Wear disposable gloves to protect your hands from chemicals. Eye protection guards against accidental splashes. Work in a well-ventilated area to avoid inhaling fumes. Use an anti-static wristband to prevent static damage to components. Keep all cleaning materials away from children and pets.
Preparing Your Workspace
Start by clearing a clean, flat surface to work on. Gather soft cloths, isopropyl alcohol, and tools for gentle cleaning. Good lighting helps see old thermal paste clearly.
Cleaning thermal paste from a CPU needs a clean and organized space. A tidy workspace helps avoid mistakes and keeps parts safe. Gather all tools before you start. This includes isopropyl alcohol, lint-free cloths, and a plastic card or brush. Make sure you have enough light to see small details clearly.
Choose a flat surface with enough room to place your computer parts. Avoid working on carpets or soft surfaces. These can create static electricity that damages components. Keep drinks and food away to prevent spills.
Power Down And Unplug
Turn off your computer completely. Do not just put it to sleep or hibernate. Unplug the power cable from the wall socket. Disconnect all other cables like keyboard, mouse, and monitor. This prevents electric shocks and accidental shorts. Wait a few minutes after unplugging to let the system fully power down.
Static Safety Tips
Static electricity can harm your CPU and motherboard. Touch a grounded metal object before handling parts. Use an anti-static wrist strap if available. Work on a non-static mat or wooden surface. Avoid wearing wool or synthetic clothes. Keep moving gently to reduce static build-up.
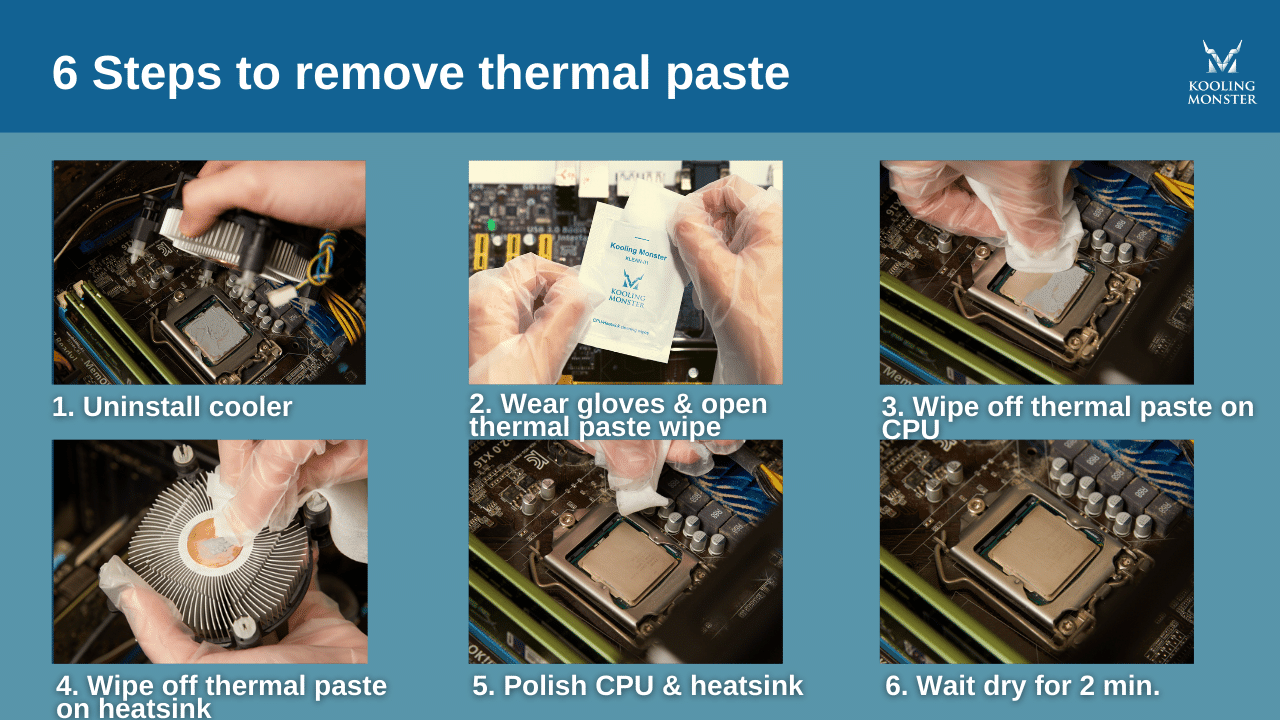
Step-by-step Cleaning Process
Cleaning thermal paste from a CPU is a delicate task. Follow these steps carefully to avoid damage. This process will leave your CPU ready for fresh paste application.
Removing The Cpu Cooler
First, turn off your computer and unplug it. Open the case to access the CPU cooler. Unscrew or unclip the cooler gently. Lift it straight up to avoid bending pins or damaging the CPU. Place the cooler on a clean surface.
Wiping Off Excess Paste
Use a soft cloth or paper towel to wipe off the thick paste. Do this gently to avoid scratching the CPU surface. Remove as much paste as possible without pressing too hard. Avoid spreading the paste outside the CPU area.
Using Isopropyl Alcohol
Apply a small amount of 90% or higher isopropyl alcohol on a lint-free cloth. Gently clean the CPU surface to remove paste residue. Alcohol dissolves the paste and evaporates quickly. Avoid pouring alcohol directly on the CPU.
Final Wipe And Dry
Use a dry, clean cloth to wipe the CPU again. Ensure no moisture or residue remains on the surface. Let the CPU air dry for a few minutes. Your CPU is now clean and ready for new thermal paste.
Common Mistakes To Avoid
Cleaning thermal paste from a CPU seems simple but many make mistakes. These errors can damage the CPU or leave residue behind. Avoiding common pitfalls helps keep your processor safe and clean.
Pay attention to what not to do. This will save time and protect your hardware.
Using Harsh Chemicals
Never use strong chemicals like acetone or bleach on the CPU. They can harm the delicate surface and cause corrosion. Instead, use isopropyl alcohol with 90% or higher purity. It cleans well and evaporates quickly without damage. Gentle cleaners preserve the CPU’s integrity and performance.
Applying Too Much Pressure
Do not press hard when wiping off thermal paste. The CPU is fragile and can crack or bend under force. Use soft, light strokes with a microfiber cloth or coffee filter. Gentle cleaning removes paste without risking damage. Patience is key for safe and effective cleaning.

Credit: www.youtube.com
Reapplying Thermal Paste
Reapplying thermal paste is a key step to keep your CPU cool. Old paste can dry out and lose its ability to transfer heat. Cleaning off the old paste and applying fresh paste helps maintain good contact between the CPU and the cooler.
Doing this right can prevent overheating and improve your computer’s performance. It also helps extend the life of your CPU and other parts. Here is how to choose and apply thermal paste correctly.
Choosing The Right Paste
Select thermal paste that matches your needs and budget. Some pastes have better heat transfer, while others are easier to apply. Look for popular brands with good reviews. Avoid very cheap or unknown products. They may not work well and can damage your CPU.
Consider paste types: ceramic, metal-based, or silicone. Metal-based paste often works best but can be tricky to apply. Ceramic paste is safer for beginners. Choose paste with good conductivity and safe for your CPU socket.
Applying Correct Amount
Use just a small pea-sized drop in the center of the CPU. Too much paste can cause spills and reduce cooling. Too little paste leaves gaps that trap air. Both affect heat transfer negatively.
After applying, place the cooler gently on top. Press down evenly but do not slide the cooler around. The pressure spreads the paste thin and smooth. This creates a tight bond for better heat flow.
Check your work by monitoring CPU temperatures after reassembly. Proper paste application shows lower temperatures under load. This confirms your CPU stays cool and runs efficiently.
Tips For Maintenance
Keeping your CPU clean and well-maintained helps it run cooler and last longer. Cleaning off old thermal paste and applying new paste at the right time is key. Follow these simple tips to keep your CPU in top shape.
Regular Checks
Check your CPU temperature often. High temperatures can mean old or dried thermal paste. Open your computer case carefully to inspect the CPU and cooler. Look for dust buildup around the fan and heatsink. Dust can block airflow and cause overheating. Clean dust with a soft brush or compressed air. Regular cleaning helps your CPU cool better and work faster.
Signs Of Reapplication
Notice slower computer speed or sudden shutdowns. These can signal poor heat transfer from old thermal paste. If temperatures rise above normal, it is time to reapply thermal paste. Also, if you remove the CPU cooler, always clean off the old paste. Apply a fresh layer before putting it back. Fresh thermal paste improves heat flow and protects your CPU from damage.

Credit: www.wikihow.com
Credit: koolingmonster.com
Frequently Asked Questions
How Do I Safely Remove Thermal Paste From A Cpu?
Use isopropyl alcohol (90% or higher) and a lint-free cloth. Gently wipe the paste off in circular motions. Avoid using water or abrasive materials to prevent damage.
What Materials Are Best For Cleaning Thermal Paste?
Isopropyl alcohol, coffee filters, microfiber cloths, or lint-free paper towels work best. These materials clean effectively without leaving fibers or residues on the CPU.
Can I Use Household Items To Clean Thermal Paste?
Avoid household cleaners or water. Isopropyl alcohol is the safest and most effective choice. It evaporates quickly and removes grease without harming components.
How Long Does It Take To Clean Thermal Paste From A Cpu?
Cleaning usually takes about 5 to 10 minutes. Take your time to avoid damaging the CPU or motherboard. Thorough cleaning ensures better thermal performance.
Conclusion
Cleaning thermal paste from your CPU keeps it running cool and safe. Use gentle materials like isopropyl alcohol and soft cloths. Avoid harsh scrubbing to protect delicate parts. Take your time and work carefully to remove all residue. A clean CPU helps maintain good contact with the cooler.
This simple step can improve your computer’s performance and lifespan. Remember, careful cleaning means better heat transfer and fewer problems later. Keep your workspace clean and organized for best results. Small efforts make a big difference in CPU care.