
If you’ve ever wanted to upgrade your computer or build one from scratch, knowing how to put in a CPU is a must-have skill. It might sound tricky, but with the right steps, you can do it yourself without any stress.
Imagine the satisfaction of seeing your computer run faster and smoother because you installed the heart of your system perfectly. In this guide, you’ll get clear, simple instructions that anyone can follow. Ready to take control of your PC and save money on repairs?
Let’s dive in and make your computer powerful, one step at a time.
Preparing Your Workspace
Preparing your workspace is a crucial first step before installing a CPU. A clean and organized area helps prevent mistakes and protects sensitive parts. Taking time to set up properly makes the installation smoother and safer.
Gathering Necessary Tools
Collect all tools needed for the CPU installation. Usually, a small screwdriver and thermal paste are essential. Having everything ready avoids interruptions during the process. Check your computer manual for any special tools required.
Ensuring Static-free Environment
Static electricity can damage the CPU and motherboard. Work on a non-carpeted surface to reduce static buildup. Use an anti-static wrist strap if possible. Touch a metal object to discharge static from your body before handling parts.
Choosing The Right Cpu
Choosing the right CPU is a key step before installing it. The CPU must fit well with your computer’s parts. Picking the wrong one can cause problems or stop your PC from working. This section helps you find the right CPU for your setup.
Checking Compatibility
Not all CPUs work with every motherboard. Check your motherboard’s specifications first. Look for the supported CPU models and brands. Make sure your power supply can support the CPU’s needs. Also, check the cooling system to match the CPU’s heat output.
Understanding Socket Types
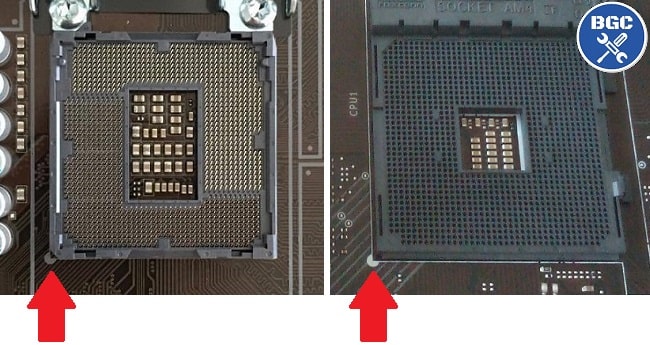
The CPU fits into a socket on the motherboard. Different CPUs use different socket types. Common types include LGA and AM4. The socket type must match exactly. Otherwise, the CPU won’t fit or work. Check your motherboard’s socket type before buying a CPU.
Removing The Old Cpu
Removing the old CPU is the first step in installing a new one. It needs care to avoid damage. The CPU and motherboard are delicate parts. Follow these steps to remove the old CPU safely.
Powering Down And Unplugging
Turn off your computer completely. Press the power button and wait until it shuts down. Unplug the power cable from the wall outlet. Remove all connected devices and cables. This prevents any electric shock or damage.
Touch a metal part to discharge static electricity. This step protects your computer parts from static damage. Avoid working on carpet or soft surfaces.
Releasing The Cpu Socket
Open the computer case to access the motherboard. Find the CPU socket—it holds the CPU in place. Look for a small lever or latch next to the socket. Gently lift the lever to unlock the CPU.
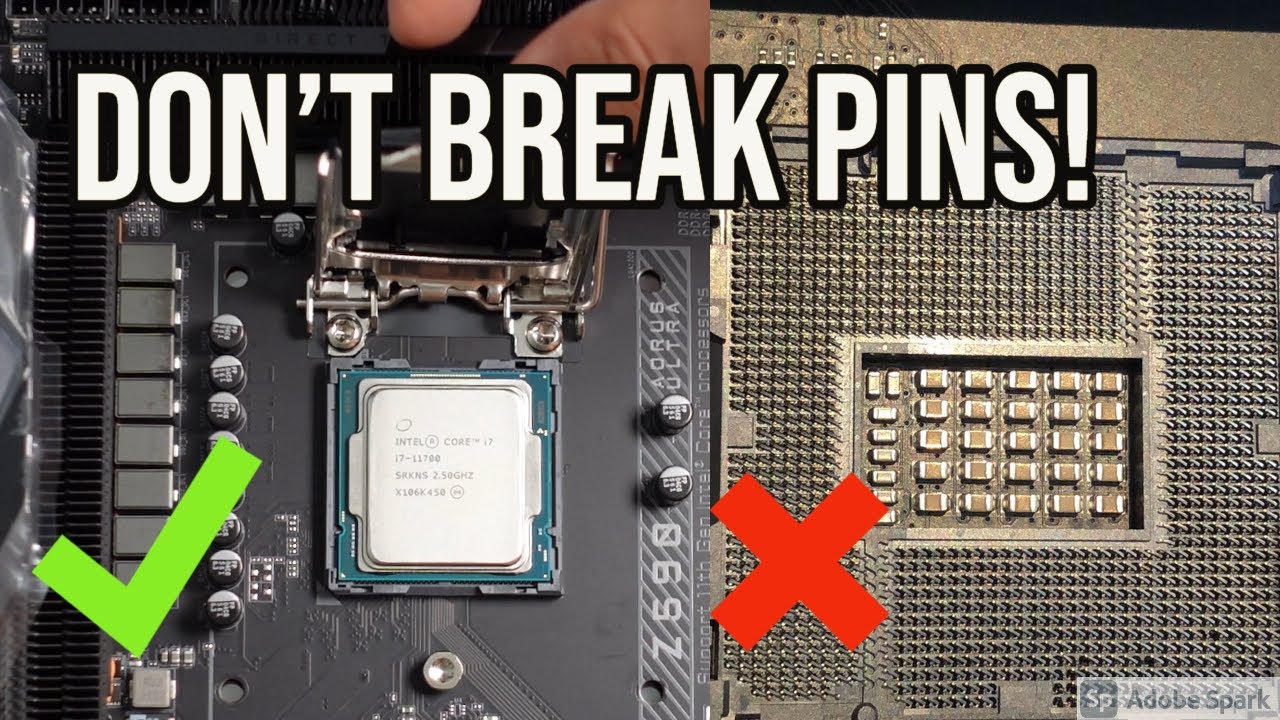
Do not force the lever. Carefully lift the CPU straight out of the socket. Hold the CPU by its edges. Avoid touching the pins or contacts underneath.
Installing The New Cpu
Installing a new CPU needs care and attention. A small mistake can damage the processor or motherboard. Follow the steps carefully to avoid any problems. The CPU must fit perfectly in its socket for the computer to work well.
Aligning The Cpu Correctly
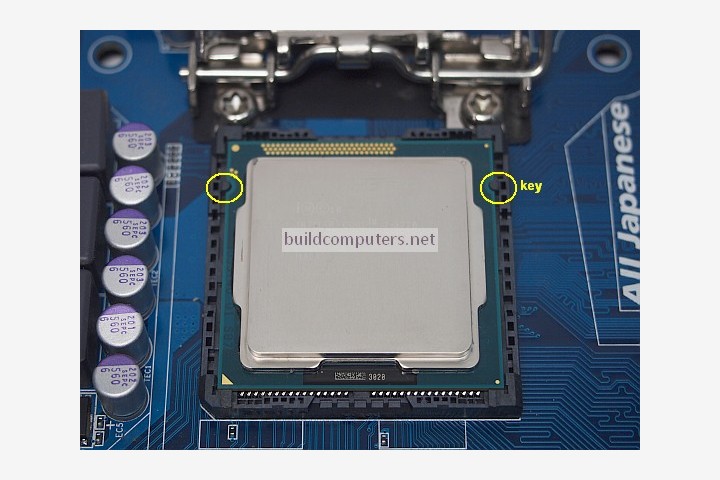
Start by holding the CPU by its edges. Look for the small triangle on one corner of the CPU. Match this triangle with the same mark on the socket. Never force the CPU into the socket. It should fit easily if aligned right. Check the pins or contacts to ensure they do not bend.
Securing The Cpu In Socket
Once aligned, gently place the CPU into the socket. Do not press down hard. Use the locking mechanism next to the socket. Lower the lever or arm slowly to lock the CPU in place. The CPU should not move or wiggle after locking. This step keeps the CPU stable during use.
Applying Thermal Paste
Applying thermal paste is a key step when installing a CPU. It helps transfer heat from the CPU to the cooler. This keeps the processor cool and prevents overheating. Proper application of thermal paste ensures better performance and longer CPU life.
Choosing The Right Paste
Not all thermal pastes are the same. Some have better heat conductivity than others. Look for a paste that suits your CPU and cooler. Popular types include ceramic, metal-based, and silicone pastes. Metal-based pastes conduct heat well but may conduct electricity. Ceramic pastes are safer but less effective. Choose one that fits your needs and budget.
Proper Application Techniques
Clean the CPU surface before applying paste. Use isopropyl alcohol and a soft cloth. Apply a small amount of paste in the center of the CPU. About the size of a pea or a grain of rice works well. When you attach the cooler, it spreads the paste evenly. Avoid using too much paste. Excess paste can reduce cooling efficiency. Make sure the paste covers the CPU without spilling over the edges.
Credit: www.youtube.com
Attaching The Cpu Cooler
Attaching the CPU cooler is a key step after installing the CPU. The cooler keeps the processor cool and prevents overheating. A well-installed cooler helps your computer run smoothly and last longer.
Mounting The Cooler
Place the cooler gently on top of the CPU. Align it with the holes or brackets on the motherboard. Use the screws or clips to secure the cooler firmly. Tighten the screws evenly to avoid damage. Avoid pressing too hard on the CPU.
Connecting The Fan
Find the fan header on the motherboard near the CPU. Plug the cooler’s fan cable into this header. Make sure the connection is secure but do not force it. The fan needs power to spin and cool the CPU. Check that the cable is not blocking other parts.
Final Checks And Booting Up
After installing the CPU, the next step is to perform final checks and start the system. This step ensures that all parts work together correctly. It helps avoid damage to the CPU or other components. Careful attention here saves time and frustration later.
Verifying Connections
Check the CPU socket to confirm the CPU is seated properly. Make sure the locking lever is secure. Connect the CPU cooler firmly to the motherboard. Verify the power cables are plugged into the CPU power connector. Inspect RAM sticks and other components for tight installation. Loose connections can cause the system to fail to start.
Starting The System
Power on the computer by pressing the power button. Watch for any signs of activity, such as fan movement and lights. Listen for beep codes that indicate errors. If the system boots, enter the BIOS to check CPU temperature and settings. Save any changes and exit the BIOS. The CPU is now ready to use, and the system should run smoothly.
Credit: www.buildcomputers.net
Troubleshooting Common Issues
Troubleshooting common issues after installing a CPU helps ensure smooth computer performance. Problems like boot failures and overheating can stop your system from working correctly. Fixing these issues early protects your hardware and saves time. Follow simple steps to identify and solve common CPU problems quickly.
Handling Boot Failures
Boot failures often occur after CPU installation. Check if the CPU is seated correctly in its socket. Make sure the CPU cooler is attached firmly. Inspect all power connectors, especially the one to the motherboard. Reset the BIOS by clearing the CMOS. Listen for beep codes during startup; they indicate specific problems. Confirm that your motherboard supports the new CPU model. Update the BIOS if needed to match your CPU.
Dealing With Overheating
Overheating can damage your CPU and cause shutdowns. Apply thermal paste correctly between the CPU and cooler. Ensure the cooler is properly installed and makes full contact. Clean dust from fans and vents to improve airflow. Use quality cooling solutions that fit your CPU’s needs. Monitor the CPU temperature using software tools. Adjust fan speeds in BIOS or use additional case fans for better cooling.
Credit: www.sietesetenta.com.ar
Frequently Asked Questions
How Do I Safely Install A Cpu?
To install a CPU safely, first ground yourself to avoid static. Align the CPU with the socket, gently place it, and lock it in place. Avoid using excessive force to prevent damage to the pins or socket.
What Tools Do I Need To Put In A Cpu?
You typically need a screwdriver for the case, thermal paste, and possibly an anti-static wrist strap. These tools ensure safe handling, secure installation, and proper cooling for your CPU.
How To Apply Thermal Paste On A New Cpu?
Apply a small pea-sized amount of thermal paste in the center of the CPU. When you attach the cooler, it spreads evenly, ensuring efficient heat transfer without excess paste spilling over.
Can I Install Any Cpu In My Motherboard?
No, CPUs must match the motherboard’s socket type and chipset. Check your motherboard’s specifications before buying a CPU to ensure compatibility and avoid installation issues.
Conclusion
Installing a CPU is easier than it seems. Take your time and follow each step carefully. Make sure the pins line up and do not force the CPU. Secure it firmly but gently. Double-check the placement before closing the case.
Clean the area and apply thermal paste properly. A good installation helps your computer run smoothly. Practice makes perfect, so don’t worry if it feels tricky at first. Soon, you will build confidence and handle upgrades like a pro. Simple steps lead to great results.